An independent media centre content management system
Oscailt 4.x User Guide
User Guide Version 1.8
Updated for use with Oscailt 4.3.1
1. Introduction
Oscailt is an GPL licensed software system primarily designed for running Indymedia publishing websites. However
it can be used anyone wishing to setup a publishing system whether that be using an 'open publishing' model or not.
One of the main advantages of Oscailt is that it can be setup fairly rapidly especially if one of the templates
sites is used.
There are quite a number of features in Oscailt but the most important are that it allows stories and comments to
be published which are stored in a database. Additionaly stories and comments may also attach images, audio, video, various
miscellaneous files like pdfs and embedded video and audio. It can import and export RSS feeds of stories too.
Different story types can be defined and for story types of 'events', there is an event calendar which can list
events in a monthly or weekly format or just a plain listing. For accessing older stories, there is a basic
archives page.
Oscailt has the ability to customise the layout and setup different page layouts for different types of pages. This
allows for different types of newswires and article view pages and headline boxes. Oscailt also has reasonable
multiple language support.
For a full listing of Oscailt features, see Oscailt Feature List.
For previous versions of the Features List and User Guide for Oscailt 3.x, see
1.1 How To Read This Document
You should already have a installed copy of Oscailt 4.x running so that each of the features as they are described,
can be tested out. The layout of this document hopefully allows the reader to be able to jump directly to the
particular area or functionality that they are interested in and read just that part.
1.2 Oscailt System Requirements
To install and run Oscailt, you need to have the following:
- An Apache webserver.
- MySQL database server. From version 4.x to 5.4 for up to Oscailt 3.6. For Oscailt 3.7 onwards, you can use MySQL 5.5 onwards.
- PHP 5.x or later up to 7.4 and version 4.3.1 of Oscailt now supports PHP 8.3.3
Most hosting sites offering an Apache webserver will generally come with MySQL and PHP already installed.
To install, you must create an empty database and load the Oscailt php files onto your webspace and run the
install script. See the README file for more details that comes with Oscailt downloadable zip file.
The software can be downloaded from http://sourceforge.net/projects/oscailt/
1.3 Brief History of Oscailt
The original version of Oscailt was written circa 2002 / 2003 and quickly evolved to have the main core features of stories
and comments and attachments and served as a replacement for the initial collection of Perl scripts written for the startup
of the Indymedia Ireland website back in 2001. Oscailt 1.x had all the core functionality which allowed for publishing
stories and comments and which allowed for the attachment of images, audio and video, adding of events and RSS and Atom feeds.
These features were further enhanched and developed in version 2.x. Almost from the start it had most of editorial functionality
for managing the public site and this consisted of the ability to hide, edit, delete, copy and featurize stories and comments.
Initially the various pages of the site covering front page, newswire and so forth were implemented separately and this meant
layout of site pages was therefore largely fixed.
The main change with Oscailt 3.0 was to introduce a configurable layer around all this whilst retaining the core features and
architecture and yet allowed for the dynamic creation, definition and layout of site pages. This version included inbuilt multiple
language support and support for multiple editors along with site permissions and roles. There are many other numerous improvements
too. The subsequent 3.x releases concentrated on adding many small scale features and enhancements both to the administrative side
and public side of the site. Examples are the ability to publish embedded video, extra spam control, additional auditing and some
improvements to language support.
As of March 2024 the latest version of Oscailt is release 4.3.1
Previous releases were:
- Version: 4.3.1 released on Mar 2024
- Version: 4.3 released on Sep 2023
- Version: 4.2.1 released on Aug 2023
- Version: 4.2 released on May 2023
- Version: 4.1 released on Oct 2021
- Version: 4.0.1 released on Apr 2021
- Version: 4.0 released on Mar 2021
- Version: 3.9 released on Nov 2020
- Version: 3.8 released on Jun 2019
- Version: 3.7.2 released on Feb 2019
- Version: 3.7.1 released on Oct 2018
- Version: 3.7 released on Sept 2018
- Version: 3.6.2 released on Oct 2017
- Version: 3.6.1 released on June 2017
- Version: 3.6 released on Mar 2016
- Version: 3.5 released on Jan 1st 2012
- Version: 3.4 released on Aug 17 2010
- Version: 3.3 released on Apr 30 2009
- Version: 3.2 released on July 27 2008
- Version: 3.1 released on Feb 26 2008
- Version: 3.00 released on Feb 15 2006
2. Oscailt Overview
This section provides a brief overview of Oscailt functionality and lists in detail most of the features or
facilities in each functional area. Subsequent sections then explain how to use these.
A comprehensive list of features and other functionality in Oscailt can be found on SourceForge at this link.
Oscailt 4.x features and functionality
2.1 The Main Sections of Oscailt
There are three main functional areas to Oscailt which this User Guide tries to explain how to use and these are:
- Management of the Public Site. -i.e. editorial actions.
- General Administration Section -i.e. configuration of site settings and editor accounts.
- Configuration of the site layout -i.e. setup and design of pages and customisation.
Note: The public never see the Administration section of the site.
For an example of how the public site looks, goto the Indymedia Ireland website or any of the sites listed
at the bottom of the Oscailt homepage. It will be seen that they are generally composed of a front
page with featured stories and various newswires with story titles and summaries for different topics and categories and then event pages and
information pages.
2.2 Management of the Public Site
The management of the public site refers to the set of actions that editors can carry out on stories, comments and
attachments which are largely the public face of an Oscailt site. The list of editorial actions available to
editors for each component are:
- Stories. -This refers to stories, features, news, events etc
- Edit -allows the text of a story to be modified. Used for corrections, updates etc.
- Hide/Unhide
- Delete -This will delete all attachments and comments belonging to this story.
- Lock -Prevent any further comments being added to a story.
- Clip -Used for copying stories or if downgrading to a comment.
- Featurize -Upgrade a story to a feature so it can be featured on the front page.
- Promote -Promote a story by giving it a vote.
- Stick -Used for making a story sticky so that it stays at the top of the newswire.
- Translate -Link to a translated copy of this story.
- Annotate -Allow editors to write a one line text visible only to editors associated with this story.
- Comments.
- Edit -allows the text of a story to be modified. Used for corrections, updates etc.
- Hide/Unhide
- Delete -This will delete all attachments belonging to this comment.
- Clip -Used for copying comments.
- Upgrade -Allows comment to be upgraded to a story.
- Annotate -Allow editors to write a one line text visible only to editors associated with this comment.
- Attachments. -Attachments are a little different because they can be images, audio files, video, generic documents like PDFs and
from Oscailt 3.2 onwards, embedded audio and embedded video. The editorial actions are focused not on actions to the attachments themselves.
- Edit -This only edits the description text associated with the attachment.
- Hide/Unhide -affects whether the attachment is displayed or not.
- Delete
- Featurize -Photos and audio attachments can be selected for featurizing.
- Swap -Allows the position of the attachment to be swapped with another in the same story or comment.
This is only applicable when a story or comment has 2 or more images.
Access to these actions is controlled for each editor through the editorial roles. The same role can be used for different
editors which is useful if you wish to say define a "features role" or "moderator role".
All of these actions are audited and result in an entry to the editorial log which is viewable by other editors.
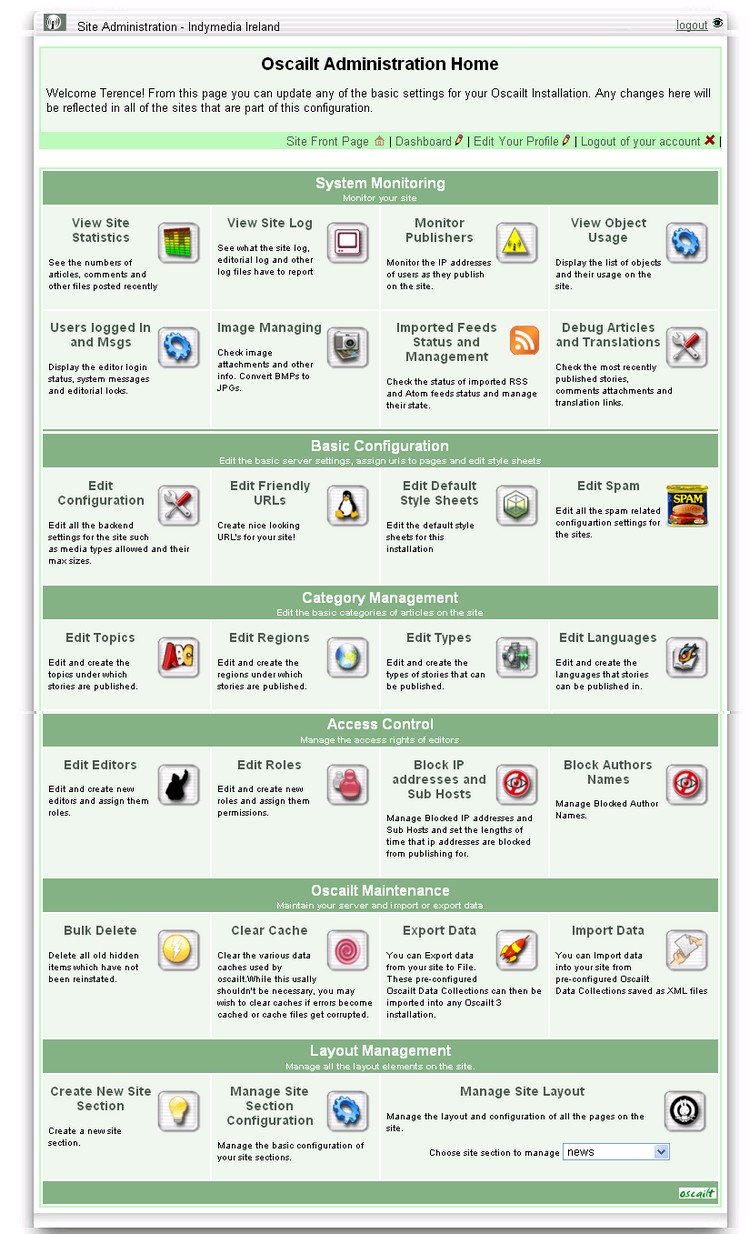
2.3 General Administration Section
All the administration screens are accessible from the main administration screen (admin.php) and can only
be seen when you are logged in.
Access to the different administration pages is generally restricted because the potential for someone to
accidently make an incorrect change and mess up the site is ever present. Therefore it is not a good idea to let
non technical editors access pages that have a role in critical setup parameters. Examples are general
configuration, edit friendly URLs, edit topics, regions, type and languages and bulk deletes.
The list of administration actions (and corresponding screens) is:
- Edit Configuration -i.e. general configuration parameters of site like URL, description, max image, video and audio file sizes.
- Edit Friendly URLs -i.e. define say additional paths in the site url. Examples: www.indymedia.ie/newswire or www.indymedia.ie/publish
- Edit Stylesheets -i.e. edit or view and even generate the three different style sheets in use. Best to refer to HTML source of site pages.
- Edit Topics -i.e. create, update or delete new site topics for stories.
- Edit Regions -i.e. create, update or delete new site regions for stories.
- Edit Types -i.e. create, update or delete new story types.
- Edit Languages -i.e. create, update or delete new site language
- Edit Tags -i.e. create, update or delete a new tag and tag or untag a story
- Edit Editors -i.e. create, update or delete new Oscailt editor accounts.
- Edit Roles -i.e. create, update or delete sets of site permissions defined as roles for use by editors.
- Block IP Addresses -i.e. ban IPs.
- Block Author Names -i.e. same as above.
- Bulk Deletes -i.e. delete hidden comments and spam. This can be done for different time periods.
- Clear Cache -i.e. clear any of the different caches used by Oscailt.
- Export Data -i.e. export site objects used for layouts.
- Import Data -i.e. import site objects created elsewhere
- View Statistics -i.e. stats on MySQL performance and basic stats on the number of stories, comments etc per year, month, year etc.
- View Site Logs -this should be accessible for all editors and allows viewing of site and editorial logs.
- Monitor Publishers -i.e. turns on or off IP monitor and displays data.
- Users Logged In -this should be accessible for all editors and allows sending and viewing Oscailt messages and lists recent logins and logouts
- Manage Feeds -this should be accessible for all editors and allows you to see the status of all incoming RSS and Atom feeds such as whether the fetch failed or there was a parsing failure.
- Image Manager -used for viewing image, video and file attachment information including image type conversion, image rotation and generation of video image covers if required.
- View Objects -this is screen for displaying summary information and usage of all site objects.
- View Articles -this is a debug mode to list recent articles, comments and attachments published. It also contains the management screen for event emails.
- Article Archive -this contains the administration screen for generating and managing HTML archive copies of all site articles.
- Create New Site -this leads to the site layout configuration.
- Manage Site Section Configuration -this leads to the site layout configuration.
- Manage Site Layout -this leads to the site layout configuration.
2.3.1 Hardcoded General Configuration
There is a further set of configuration parameters which are hardcoded in two files which are:
- config/systemconfig.php
- objects/systemconfig.inc
Normally they do not change, but they control some key parameters which probably do not have to change for most sites.
The 5.2 Edit Configuration screen allows you to change a subset of these and the
5.2.1 Installation Info screen accessible from the same page shows most of the hardcoded configuration.
2.4 Configuration of Site Layout
This section is harder to summarize because merely listing the actions available does not easily explain how the
site layout can be setup and configured.
Oscailt provides a set of predefined objects and modules and these are used and combined together to build the site
layout and allow for each page to be configured differently.
In general a page is defined by creating an instance of a module and selecting the page layout which will be used
to display the contents of that module. And then separately the friendly URLs functionality can be used to map
a name like 'newswire' to that particular object id.
For example to create a newsire page that lists story summaries, you would create an instance of a newswire module
and then select a page layout. The page layout allows extra objects like menus to be contained within it, and this
is what controls which menus and banners and lists of links appear around the edges of the a page.
1. Define Elements -These consist of:
- Static documents
- Code box
- Headlines box
- Simple Links
- Category Listings
- Filter box
- Picture box
- IMC City Listing
- User Preferences
| 2. Define Modules -These consist of:
- Newswire Module
- Archive View Module
- Article View Module
- Featurewire Module
- Comments View Module
- Search Module
- Gallery Module
- Publisher Module
- Events Calendar Module
- Import RSS & Atom feeds
- Import Image feeds
- Export RSS & Atom feeds
| 3. Layout Elements -These consist of:
- Vertical Menu
- Listing Box
- Horizontal Bar
- Page Layout
- Inset Box
|
2.5 Installation of Oscailt
Installation of Oscailt is relatively easy and the steps are briefly described in the README.txt file that comes with the downloadable zip file.
See section 13.3.1
2.6 Overview for Creating an Oscailt Site
There are two main approaches to creating an Oscailt site from an installation. They are:
- Import an existing site from the templates during installation and modify accordingly
- Build a site from scratch from all the building blocks of Oscailt.
2.6.1 Importing a Site and Modifying
When installing Oscailt there is an option to install one of the provided template sites. A recommended approach is to install one of the smaller template
sites and examine how it is constructed through the site layout and view objects pages and then start making modifications and adding extra
menus, object, links and other items and generally building out the site.
If you choose not to do this initially you can still install a template site later through the Edit Import admin page and selectively pick
particular objects. More details can be found in See section 5.20
2.6.2 Building a New Site From Scratch
Creating a full fledged site takes a lot of steps and it is advisable to read through most of this user guide to get an understanding of how
Oscailt is organised and familiarity with all the available tools. Here, this task is described at a high level and then the details for most of
the individual tasks can be found through out the rest of this guide.
When an installation is completed, Oscailt will automatically setup an administrator user and one should login with this account to begin the process.
All the actions will be through the various options off the main administration and layout screen. The installation will also create a certain number
of directories on the sever which should match up with default configurations.
It is assumed that the site will contain a main newswire page, an article page for viewing articles or stories, a publish page, a contact form and a help page with some basic text -for example about your new website.
The main steps then are:
- In the EditConfiguration admin page ensure the Site URL is setup correctly and logout and login again after it.
- Create entries for Language(s), Regions, Topics and (Story) Types.
- Create a 'Site' and fill in the relevant fields where appropriate.
- Go to the layout screen for the new 'Site' and do the following:
- Create an article object for the article viewing page.
- Create a newswire object for the newswire or main site page.
- Create a publish object for the publishing page
- Create a contact object for the contact page
- Create a static document object and add the text for the plain help text page
- Create a 'page' object for the newswire page and go back to the newswire object and link to it.
- Create a 'page' object for the article page and go back to the article object and link to it.
- Go back to the contact and publish object and link to them to a 'page' object.
- Create friendly URLs for the above objects. These will be available for semi-automatic creation in a dropdown list.
- Go back to the 'Manage Site Section Configuration' and edit the site object and now setup some of the modules to the above objects under the heading 'Principal Modules of this site' (see section 6.8.1 )
This should create a very basic site. Once this is up and running then one can expand it further adding menus, banner and other things. The admin utility
View Objects (section 5.12) is a useful tool for getting an overview of what objects have been
created so far. For more details see the rest of the user guide.
3. Display Overview
3.1 Introduction
The site layout and design is presented from the point of view of the HTML in order to help understand what the
PHP is trying to draw and because it relates to the original layout of the code and how the sequence of
certain objects must be executed whether in the code cache or not, in order to work correctly. It is also worth
visiting the site www.indymedia.ie because this was the first site to use
the software and it was written for it.
As with many sites, the layout and placement of banners, titles, stories, text and links is controlled through
careful use of HTML tables with some limited use of <div> tags. So in order to understand the layout, it is important to be familiar with HTML
tables. It ought to be noted that when HTML was originally specified, tables were never intended to be used for
layout purposes but instead were primarily for presenting data, but that's history. Over the years the HTML standards
body has encouraged people to control layout through the use of the <div> tag and CSS style sheets as some other content management systems (CMS)
take that approach.
3.2 Basic Layout
Every Oscailt HTML page generally has much the same layout consisting of a top banner and menu, a left hand side area with links, a central area with
either a story or newswire and optionally a right hand section with further links and text and finally a footer usually containing more text and maybe
an image. The only thing that changes from page to page is the contents of those broad sections and occasionally one of the side or top menus missing
since these are actually optional. This basic form is illustrated below. And you will see later
in section 6.6.6: Page Layout object presents these options.
| |
| Menu Bar (can include banner) |
Side Bar
with links
search
and other options |
Page Content
Can be:
Newswire
Article
Event listing
|
Local/Global Newswire Bar
(on certain pages)
|
| Footer Bar with text and optional other banners / images |
Fig 3.1: Oscailt General Page HTML Layout
One of the most important consequences of this is that it imposes a certain order on how the HTML is generated.
So for example, the code needs to generate the header section first, followed by the right menu, then the centre,
then the left menu if included and lastly the footer. In theory this order could be changed by storing the
blocks of generated HTML and re-ordering but in reality no one is likely to code it that way and it would also
happen to make it both much harder to understand and to debug since if certain critical HTML tags are not closed,
it can mean the entire page is not rendered properly by the web browser.
In fact this is one of the main reasons why the public are not allowed publish stories with HTML tags in them
except for a few basic ones, because it would be so easy to break the overall HTML of the page and would require
significant human effort to continually fix it. This is a problem all content management systems have to grapple with.
People building or designing websites with Oscailt should not be limited by these layout options but at least should be aware of them. Some people may
choose to go for a different sort of layout sometimes along the lines of this type of display.
| |
| Menu Bar (can include banner) |
Column 1
Headlines
|
Column 2
Headlines
|
Column 3
Headlines
|
Column 4
Headlines
|
Fig 3.2: Traditional Newspaper Column Type of Layout
The multi-column mode can be achieved through the use of a newswire object by setting it in multi-column mode. In this way it can be seen
that this layout is the same as the previous with the side menus and footer removed and multi-column mode switched on.
3.2.1 Use of (CSS) Style Sheets
The layout of the page is implemented through HTML tables but the colours and fonts etc are controlled through the use of three style sheet files.
To change the appearence and customize it for your own needs, you need to modify these files. Unfortunately there is no clear cut mapping of the
various style classes to given pages although there is some documentation and details in
section 11: Use of Cascading Style Sheets (CSS) in Oscailt.
It is probably best to view the HTML source in your browser to cross check the name of classes and styles. The existing template site style sheets are a
good starting point.
And for more technical information on the design, see the Oscailt design documentation on SourceForge.
4. Management of the Public Site
This section describes how to manage the public side of an Oscailt site by explaining the details of all of the editorial actions available to
carry this out.
4.1 Editorial Actions for Stories and Comments
These have already been listed above but are given again here for clarity.
- Edit -allows the text of a story or comment to be modified. Used for corrections, updates etc.
- Hide/Unhide
- Delete
- Lock -Applicable to stories only.
- Clip -Used for copying stories or if downgrading to a comment.
- Featurize -Applicable to stories only.
- Promote -Applicable to stories only.
- Stick -Applicable to stories only.
- Translate -Applicable to stories only.
These actions can be carried out usually from any of the newswires and or from the page displaying the story itself. Clearly
when applied to comments, they can only be accessed from the story display. The first image shows a snapshot of how these appear in a newswire and
the second is for when they appear over each comment.
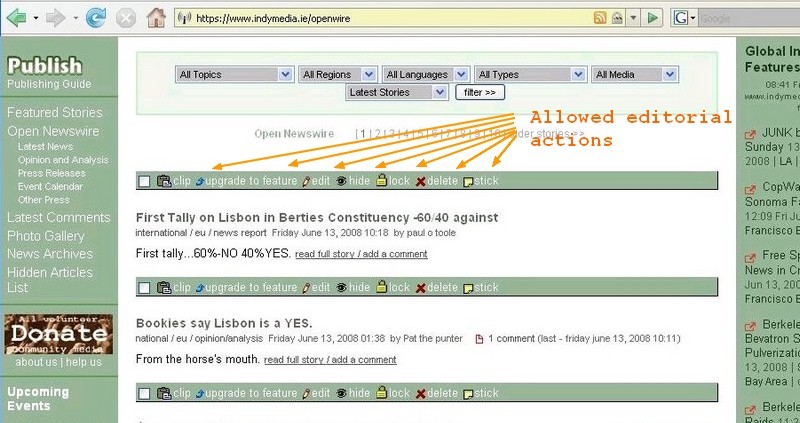
Fig 4.1: Editorial actions for Newswire
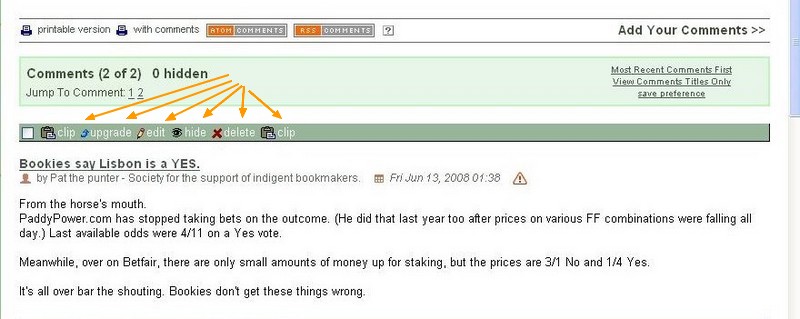
Fig 4.2: Editorial actions for comments
4.1.1 Notification Screen
Whenever any editorial action except for clip, is carried out a notification screen appears which allows the editor to enter
text to give the reason for the action. This text will be written to the editorial log along with the action
and can be viewed via the View Site Logs administration screen. If email notifications are switched on then this
will appear in a generated email. Settings for notifications are controlled through the Site Configuration administration
screen. The image below shows the notification screen that will appear. Notifications form the basis of making all actions on your site transparent.
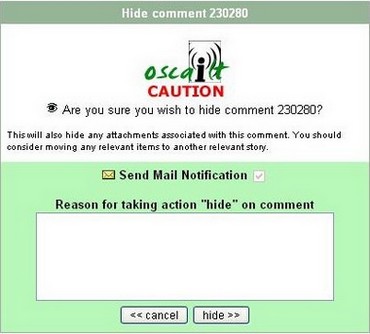
Fig 4.3: Editorial actions notification screen
4.1.2 Display of Hidden Stories and Comment
Hidden comments can be given their own background colour. An hidden story or comment is indicated by the '*' symbol present at the start of the title
field. The div.comment_hidden style class in the common.css file controls this.
From Oscailt 3.5 a similar style class div.story_hidden has been implemented for stories.
4.2 Editorial Actions for Attachments
These have already been listed above but are given again here for clarity.
- Edit -allows the text or caption of an attachment to be modified. Used for corrections, updates etc.
- Hide/Unhide -hides or unhides the image, audio, video, file etc
- Delete
- Featurize -Applicable to images only. When an image is featurized, it can appear in the list of featurized images that
are often displayed on the front page.
- Swap -Swap the display position for an image with another image.
- Image Manager -Go to the image manager page to do basic manipulations of images like rotate and convert from .bmp to .jpeg -See section 5.14 for more details on the image manager.
4.2.1 Display of Attachments (Photos, Videos, Audio & Files)
The default is to allow five attachments per story with a maximum of a further five per comment. This maximum value can be controlled through the
administration configuration screen but only applies to images, audio, video and files and does not apply to embedded video or audio as these are
hard-coded to a maximum of 5.
For images, the first image is always displayed at the top of the story and all subsequent images are display at the end of the story but before the
comments start. The OSCAILT MACRO can be used by editors to control the position and display of an image within a story. Typically this is
used in Features although it can in fact be used in any story type.
All audio files whether saved on the site or just embedded audio which are really just URLs to external audios will be displayed/presented using
the embedded audio player if it is installed otherwise they will appear as icons with a link to the file and an indication of the file size.
Given support for the Flash audio player is no longer supported by most browsers, this is option will end up disappearing.
Previously videos were displayed as icons along with the file size in megabytes but since Oscailt 4.1 can now be embedded as html objects and cover images
can be used if generated. Embedded video will be displayed depending on the configuration, but
in most cases, it will be the same as any other embedded video on any other site, with the cover image. For YouTube videos, Oscailt will attempt to
retrieve the static cover image which is quite small, and display that. Then clicking on it, will display the video as normal. More details of this
configuration are outlined below in section 4.2.3
4.2.2 The OSCAILT MACRO for Controlling Photo Image Display
In the publish form, there are customized options to insert the Oscailt Macros for the images or embedded video into the text. They can also be added manually
following the syntax in the subsections that follow.
4.2.2.1 Photo Placement
This macro can be used to place an image anywhere in a story and also to resize it. If the image is displayed with an macro then it will not be
displayed again in the usual display of images at the end of a story. The OSCAILTIMAGE macro requires an editor to edit the story and add
the following basic syntax below. The second part shows usage of the HTML DIV tag construct to display an image called sample.jpg from a
Sept 2010 story as 300 pixels wide and 250 pixels high along with how you might add a caption.
      The text of a story
      OSCAILTIMAGE(pathname/image_filename, xsize, ysize)
      ...the rest of the story text


      <div class="feature-image-right">OSCAILTIMAGE(attachments/sep2010/sample.jpg 300 125)
      <div class="feature-caption">Replace this text with your image caption </div>
      </div>
Obviously the style classes for feature-image-right and feature-caption need to be defined in the contentstyle.css
files, but they are in the exported full Indymedia site shipped with Oscailt release file. There is also a feature-image-left class defined.
Figure 4.4 below is an example of it in use.
There is a simpler and alternative way to specify the images in the story without having to refer to the exact filename and path of the image and this is by
referring to them by number. For example you can refer to the second image in a story and include it in the macro using this syntax:
      The text of a story
      OSCAILTIMAGE(image2, xsize, ysize)

      <div class="feature-image-right">OSCAILTIMAGE(image2 300 125)
      </div>
And there is a third optional parameter to the OSCAILTIMAGE which can be used to control the alignment. The allowed values are: left|right|center
Here is an example. The alignment value may be overridden by other values you have for surrounding HTML
      The text of a story
      OSCAILTIMAGE(image2, xsize, ysize alignment)

      <div class="feature-image-right">OSCAILTIMAGE(image2 300 125 right)
      </div>
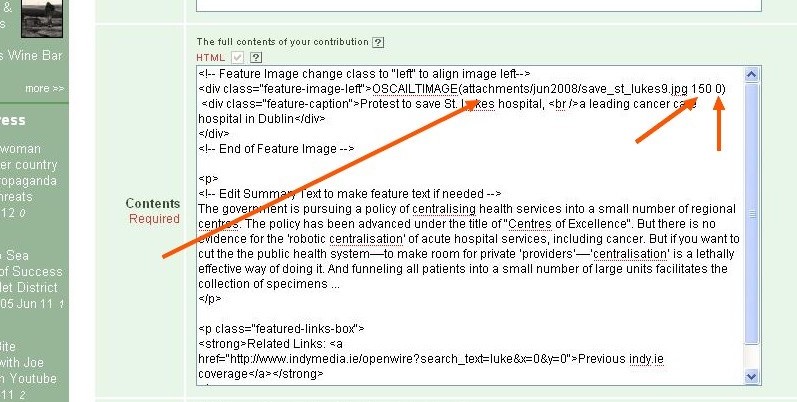
Fig 4.4: Use of an OSCAILTIMAGE macro in a feature
4.2.2.2 Embedded Video & Audio Placement
In version 3.4 onwards the OSCAILTIMAGE macro was extended to handle embedded audio and video. The two examples below shows the usage.
For embedded audio, only mp3 audio files are valid and the URL to it, must be provided. In the case of embedded video, the video type needs
to be specified. It is two digits. For example 01 is reserved for YouTube, 10 for Vimeo and 27 for Politube. The actual list of mappings
can be found in the file: objects/videos.inc and the values themselves should not be
changed. This means Oscailt will generate the correct embedded HTML for these video types. The actual video id, such as vxyzwakp used in
the example below, is then placed after the equals.
      For an mp3 file saved locally to server
      <div class="feature-image-right">OSCAILTIMAGE(embedaudio:attachments/sep2010/audio_filename.mp3 0 0) </div>

      And for an external mp3 file on another site.
      <div class="feature-image-right">OSCAILTIMAGE(embedaudio:URL_to_MP3 0 0) </div>

      <div class="feature-image-right">OSCAILTIMAGE(embedvideo:01=vxyzwakp 300 250)
      </div>
In the case of embedded audio (but not embedded video) the extra two parameters that normally specify the height and width have
no effect in this case.
4.2.2.3 Video File Placement and Video Cover Images
The OSCAILTIMAGE macro can be used to control the placement of video mp4 files in a story and if there is a corresponding video cover file present then
this can be displayed initially instead so that when the user clicks on it, then it switches to the video player embedded in the HTML.
The syntax for enabling it is to specify the word cover for the alignment field in the macro. See for example.
      For an mp4 video file saved locally to server
      <div class="feature-image-left">OSCAILTIMAGE(attachments/sep2010/video_file.mp4 460 0 cover) </div>
      </div>
The video cover file is expected to be the video file name prefixed with cover_. For example the file:
my_video_file.mp4 would be expected to have a cover file called: cover_my_video_file.jpg
4.2.3 Controlling Display Mode of Embedded Videos
In Oscailt 3.3 a new method was added to control how embedded videos are displayed. This was to address the problem whereby if you add the embedded
HTML to display for example a YouTube video, the cover image that you see coming up with the 'Play' icon in it, is retrieved from the YouTube website.
However, this allows YouTube to record your IP address since you accessed it and they can also determine through the HTTP_REFERER field normally
automatically filled out by your browser, from where you are displaying this image. In other words, YouTube would be able to determine that you were
looking at a certain story on your site and accessed a YouTube video that was embedded in that story. You don't even have to watch the video for this
to occur, because the very act of your browser automatically retrieving the cover image causes the communication to the YouTube site to retrieve it.
This is true for any site displaying videos this way.
As a result, Oscailt has two modes of display to deal with this. The first is that it will display a message box, with the YouTube video identifier
or any other embedded video type, if you configure it that way, informing you that there is an embedded video but not retrieving any images from it.
That way no communication is made to the video hosting site (e.g. YouTube) and therefore they can't track you. However if you do wish to view the
video or its cover image, the message box provides a link to click on, which simply swaps in the embedded HTML (using JavaScript). At this point, then
the hosting site can track your IP, but at least you have made the decision and had control over it.
A second mode for displaying embedded video is by making use of retrieved cover images. The idea is that there is a static cover image, and Oscailt
retrieves this in advance (or at least at the point when the first person views the story). This way, you get to have the cover image displayed without
the potential for the IP to be traced. This is possible because YouTube and some other video sites provide an programming API to find cover images for every
video. For those cases where there is no API, you can still create your own video cover image by taking a screenshot and uploading it. This is described in
more detail in the following section.
One last configuration option is to switch off this mechanism described above on a per video type basis. So for example you might trust that say
PoliTube don't do anything sinister with the IP addresses, so you might configure those embedded video types to be displayed like they are on any
other website.
All these configuration settings are controlled in the config/systemconfig.php
file and have to be set by manually editing the file. You can see what the settings are by viewing the Installation Info option
in the Edit Configuration administration screen.
4.2.4 Embedded Video Cover Images
As part of the support for embedded videos and as described above, Oscailt will try to automatically retrieve the cover image for
those videos that provide an API for that. It is retrieved just once and cached thereafter. However even for those video types that do not have a supporting
API or at least one that Oscailt is not using, it will still look for a video cover image. The way it works is that each video regardless of the type will
have a video id and the filename format for the video cover images is specified below. Some sites can return large and small images.
 YouTube:      VideoId_hqdefault.jpg       AND  VideoId_default.jpg
 Vimeo:        vimeo_VideoId_large.jpg     AND  vimeo_VideoId_medium.jpg
 BitChute:     bitchute_VideoId_default.jpg
 Brighteon:    brighteon_VideoId_default.jpg
 BrandNewTube: brandnewtube_VideoId_default.jpg
 Rumble:       rumble_VideoId_default.jpg
 Odysee:       odysee_VideoId_default.jpg   -Odysee videoIds can be very long. For the VideoId cover image file convert all ":" and "/" to "_"
 Others:       VideoId_default.jpg

 Example BitChute Video:    bitchute_vuqivfYdHQMx_default.jpg
BitChute are still developing their application programming interface (API) for retrieving cover images and as of Nov 2020 is not ready yet.
Therefore cover images need to be manually created by taking screenshots and saving as a file with the filename format above. At the moment, these
have to be uploaded through the administration Upload Sites Files linked from the site layout admin pages. From there the files can
be transferred to the video cover images cache directory. The same applies to Brighteon, Rumble and BrandNewTube cover images.
4.3 The Publish Module
4.3.1 Overview
The publish form module is an example of a relatively standalone component of Oscailt and
is relatively easy to modify. However the key to understanding and making any changes to it, is to realize
that it does a number of things and works in various modes. There is the initial edit mode, where data is entered
into fields for the first time, and then a preview mode which previews the data entered so far and allows for
further editing of the form fields.
The publish form is also used by Oscailt editors when logged in to edit stories, features and comments and it
must therefore be able to read the contents of a story or comment and preload the appropriate fields.
The publish form also works in another mode where it can accept input for uploading files. In this mode, one
cannot proceed to the preview mode because of the nature of the HTML form field of type "FILE" which does not
allow the value to be set by the browser in advance or by Javascript as it would be a big security hole. This
means on the preview cycle, the form can't remember and then refill this field.
Then as a further complication, depending on whether story or comment is being published, not all panels or
sections are displayed, with comments having fewer fields to fill in. Lastly, Oscailt allows editors to edit
stories and comments, and to do this it makes use of the publish form. This means that it has to be able
to distinguish between the a new story or comment and the editing of an existing story or comment.
4.3.2 Publish Processing
The pubish form has quite a lot of module and system configurable parameters to check, because it can be
configured to enable or disable the publishing of images, audio, video and miscellaneous file types and can control
the maximum file sizes of each and the number and all these parameters can be specific to stories and comments.
Most of the other form fields are also configurable as to whether they appear or not. All of the text and titles,
prompts, headings and help tips are also configurable at module level (through the admin site layout screens).
This is to facilitate multiple language support and customisation.
Stories and or comments published can also be configured to be automatically hidden and even publishing itself
can be turned on or off for the public but remain active for editors, which makes for a very versatile system.
Lastly the publish form also has multiple levels of anti-spam measures built in to help prevent auto-publishing of
spam by various types of spam-bots. This is a widespread problem encountered by probably every website.
4.3.3 Editorial Edits and Locking
The publish form is used in a particular mode whenever an editorial edit is carried out on a story or comment and it
will be automatically marked as locked. Therefore if another editor is editing the story at the same time you will get an
warning to that effect otherwise the initial screen will look like the following. Note the story id is displayed.
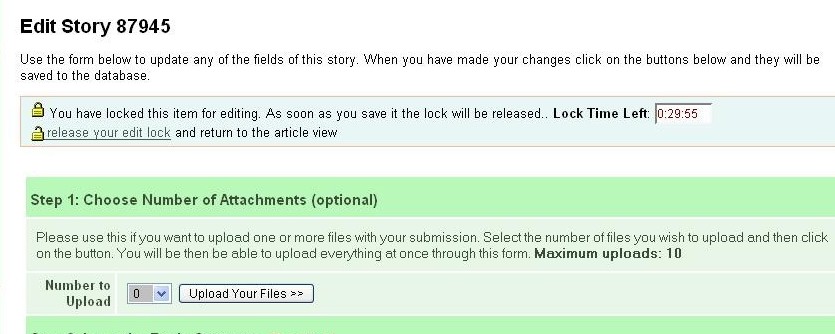
Fig 4.5: Editing a story and the locking information
It is possible to change any of the fields: author name, title, subtitle, summary, content, story type, topic, region or lanaguage. It can also
be used for adding or editing the video id of one or more embedded videos and audios. You may even select the "number of files to upload"
to add an image or file to the existing story. There are also options (checkboxes) to control whether to display to the public any of the fields email,
telephone number and address. It is actually unlikely anyone would fill these out unlike in the early years of the internet.
4.3.4 Publish Form Specifics
The publish form implements a number of security and anti-spam features. If these were not provided your website would be completely overwhelmed
by bots publishing spam. The security takes the form of inbuilt form checking, cookie verification and the optional use of captchas.
For more on these see Section 10.8: How to Turn On or Off Numeric Captchas
For details on the publish configuration options, see Section 9.2.4: Publish Configuration Options
4.4 Editorial Actions from the Newswire
When you are logged in, the newswire page can be configured to display the editorial action icons to allow the
actions to be carried out from there. The screen will look like figure 4.6. The presence of the editorial actions depends on the level of
permissions granted to a given user. See User Roles for more details about these.
Fig 4.6: Editorial actions for Newswire
It is possible to tick the checkbox beside each story in the newswire if you want to hide multiple stories at once. This is useful when you
receive a lot of spam. When using the multiple hide (or delete or unhide), you should scroll to the bottom of the newswire and click on the hide,
delete or unhide buttons as shown in the next image.
4.5 Events and Events Display
4.5.1 Overview
Events at one level are simply another type of story in Oscailt. Events like all other stories get stored in the
STORIES table although there is an a special table column called EVENT_TIME
which is only used for events. All that is really different is that events can be displayed in the calendar.
Originally events were the 5th story type to be added to Oscailt, so there may be places in the code where
it is still hard coded to check type_id==5 although you can specify what id an event is to Oscailt
by configuring the variable $oscailt_basic_config['event_type_id'] in the
file config/systemconfig.php
4.5.2 Displaying Events
Events can be displayed in three different modes which are monthly, bi-weekly or weekly. The latter two are
almost identical. In each month links are generated that allow to user to navigate forward and backward in
time by a month and a week respectively. These modes are illustrated in Figures 4.7 & 4.8 below.
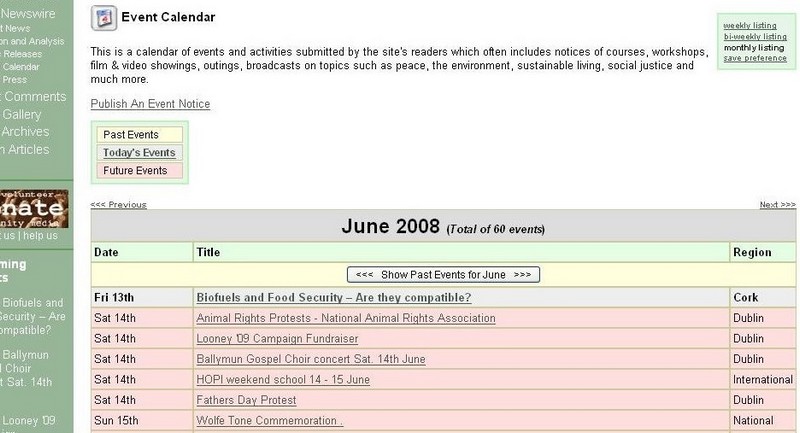
Fig 4.7: Events Monthly Mode Display
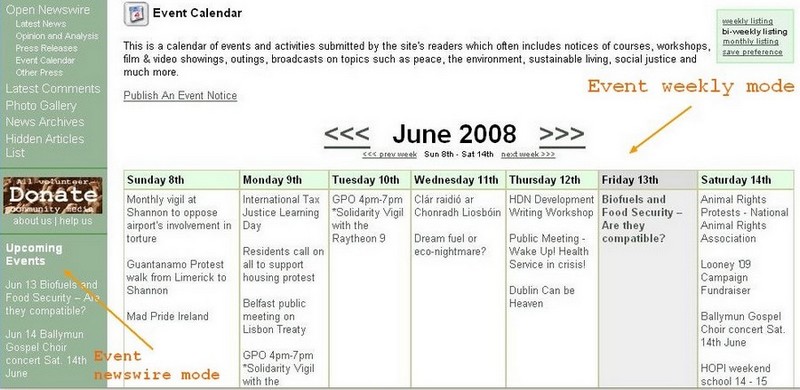
Fig 4.8: Event Weekly Mode Display
In the weekly/biweekly mode current day of the week is high-lighted. The display is from Sunday to Saturday.
The aim of the biweekly mode was to get around the problem of trying to see what events were taking place over the
following weekend. A possible future enhancment would be to to change the start day of the week to better handle weekends.
4.5.3 Events Newswire Modes
By using the existing newswire and headlines modules, they can be configured to just display stories of type Event and in that way
Oscailt can be setup to create simple newswires or listing of events. You can see an example of that on the left hand side menu
in Figure 4.8.
4.5.4 Promoting Events
Events can be promoted (or voted) upon by editors. An event with more than 1 event will be highlighted in bold in
the monthly display. This is a good way to draw attention to an important event. An example of this is the event for
'Biofuels and Food Security' for Friday 13th shown in Figure 4.8
For other ways of highlighting events or any other item, see the section on creating razorwires.
5. Instructions for Oscailt Administration
This section explains the administration functionality and each of the screens. Once Oscailt is setup it does not require too much administration.
5.1 Administration Overview
There are two main adminstration pages. The first is for general administratives tasks like configuration, logs, editors, roles, types, regions,
IP bans, statistics etc. The second is entirely for site layout.
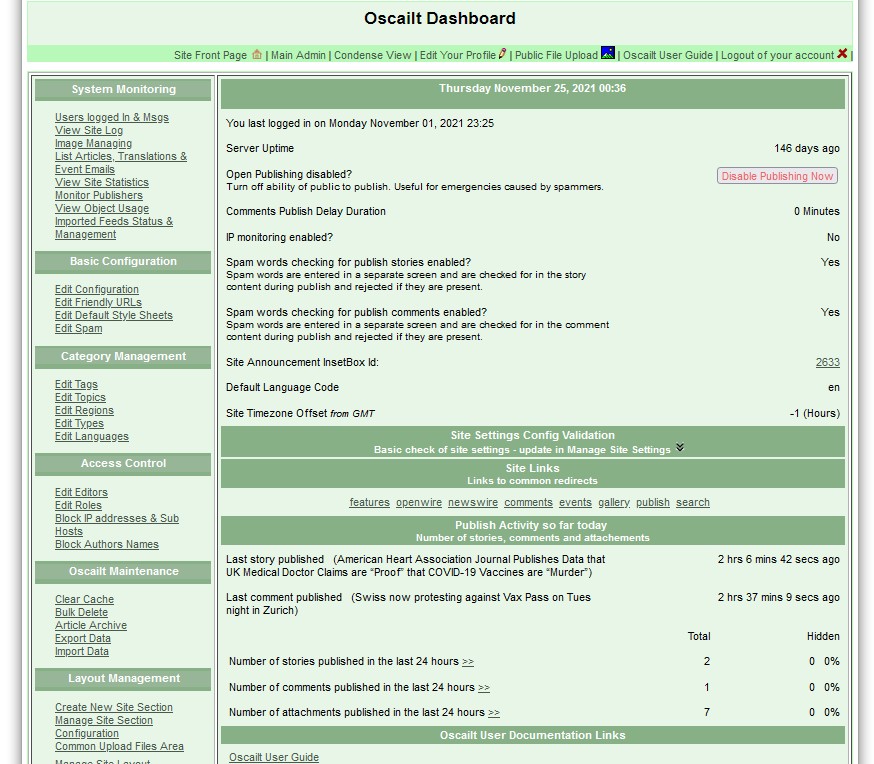
For reference the two sets of images below show the main administration page in it's dashboard mode and in the second set the main admin page in it's icon mode
and the site module layout configuration.
|
|
| Fig 5.1a: Main Admin Screen - Dashboard Mode (Click to enlarge)
|
|---|
|

|
| Fig 5.1b: Admin 1. Main Admin Screen (Click to enlarge) |
Fig 5.1c: Admin 2. Site Layout Admin Page (Click to enlarge) |
Each icon in the main admin page is now explained in following sections.
5.1.1 Upload Site Files
The Upload Site Files sub-page is accessible from the Admin Site page as highlighted in orange circle in Fig 5.1b and is used
for uploading site specific files to the server. They can be then used or referenced in any of the objects which uses images or just directly linked to by
site pages. As of release v4.0 there is also an Common Uploads page which means it is not site specific and is accessible from the main admin
page
The page has options for identifying certain embedded video image covers and for transferring these to the video images cache directory. Files can also be
transferred to the current attachment directory.
5.1.2 Dashboard View
This alternative mode of display for the admin page illustrated above in Fig 5.1a and is a dashboard that contains some
basic operational metrics and can be useful to determine the basic status of the site. You can configure your editor options to use this mode by default.
5.2 Edit Configuration of Site Settings
Fig 5.2: Edit Configuration (Click to enlarge)
Once the site is setup, there will be little need to change anything on this page except perhaps to turn on comment publish delay or
to increase the logging level or add an IP entry to block spam, although thats not the only place for dealing with spam.
When the site is setup initially it is important to enter the correct site URL otherwise logins may not work properly. Some websites are
hosted in such a way that there may be extra path information after the domain name and this can be entered here too.
For example: www.mysite.com/extrapath/
In this screen you can setup the site name which appears in the title of every page, the site description that is filled in the meta-tags and
many other parameters and a sample of these parameters are listed here:
- Short and Long Name -Name that appears in page title inside the HTML TITLE tag and in the meta-tag of the HTML header
- Description -Text that appears int he page meta tag in the page HEAD section.
- Use Friendly URLs -Whether to allow use of names in paths like newswire in www.mysite.com/newswire
- Cache Directories -for objects, image thumbnails and miscellaneous files
- Attachment Directory -This is best left as: attachments/
- Object Index and Data Storage -This is best left as: sql
- Image, Audio and Video Max Sizes -includes allowing publish of these types with further control in publish module
- Comment Max Size
- Story Summary and Content Max Size
- Notification Email Addresses
- HTML tag control -controls whether HTML tags are allowed in story summaries and contents and in comments.
- Object Caching Settings -whether to disable object caching (not recommended) and to enable HTML caching.
- Banned IP and Banned Spam IP parameters -allows bans to complete site from certain IPs and can ban known sites where spambots might have infected and are attacking your site.
- Log Levels
- Miscellanous - Publish Comment Delay -includes enabling embedded Audio player, shared memory, public editing, disable publising, edit lock timeouts and other parameters.
- Timezone offset -useful if you have your site hosted in a different timezone to your target audience.
5.2.1 Installation Info
Within the Edit Configuration screen there is an option to click on the PHP Installation Info link to
display the some of the main or most important settings of the site. They are divided up into the following categories:
- Oscailt - displays the Oscailt version and some key Oscailt hardcoded configuration in file:
config/systemconfig.php.
- Magpie & Curl Settings -lists some constant values used by Magpie RSS code and location of Curl binary
- Webserver & MySQL - displays the Apache server version, MySql version and OS version and some key database settings.
- PHP -Covers key PHP modules installed and summary information from the php.ini file like upload_max_filesize, post_max_size and other PHP settings including its version
- Suhosin -Details of whether the PHP hardeniing module Suhosin is installed and a listing of the the installed modules.
There is a separate link to Db statistics which displays some of the basic database config and performance metrics.
This feature was introduced from Oscailt version 3.2 onwards and added to since then.
5.3 Edit Friendly URLs
This screen allows you to create friendly URLs. These are a way of mapping the module or object ids to names that
people would recognise. In the figure 5.3 & 5.4 below, you can see the screen which maps object id 1977 to breaking_news.
If there was no friendly URL, then you would have to enter something like:www.indymedia.ie/index.php?obj_id=1977 -With the friendly URL this becomes www.indymedia.ie/breaking_news
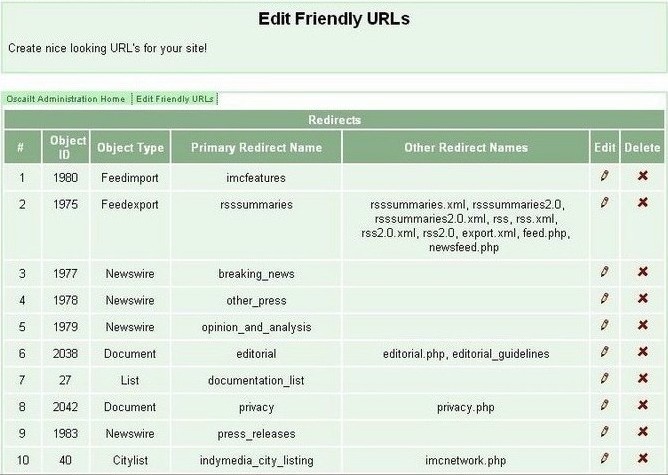
Fig 5.3: Friendly URLs Page
The entry field for additional synoyms allows other strings to be used to map to the same object id. So for example, one could enter: latest_news and this would allow for the URL: www.indymedia.ie/latest_news
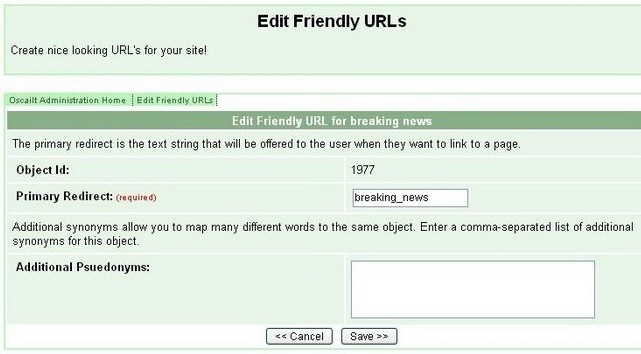
Fig 5.4: Friendly URLs: Edit Redirect Sub-Page
5.4 Edit Style Sheets
Style sheets are used to implement the HTML CSS standard which can be used to control the layout, fonts and colors of
rendered pages in a browser. Style sheets are implemented by defining classes for each HTML tag type. It is important
to have an understanding of both HTML and CSS before using them.
Within Oscailt, style classes are specified for many different areas and modules of the site and at the moment there is no
clear set of rules defining which ones are used where, but in general the class names used are relatively indicative of where
they are used. The best way to figure things out is to use the "view source" option in the browser to look through the HTML
as it will contain some comments to the various objects in use like menus, listings, banners etc and the class names in use
for each part will be easy to see.
The initial Edit Style Class screen is shown in the next image. This is the Oscailt v3.5 version. Earlier versions had less
information presented.
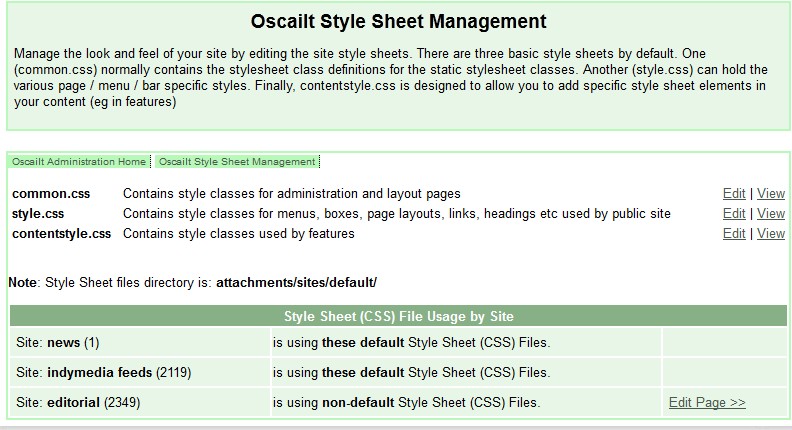
Fig 5.5a: Site CSS Stylesheets edit page
5.4.1 Generate New Style Sheets
Introduced in Oscailt 3.7 is a new feature to generate new sets (of the three) style sheets with different colours. This is accessible from the
Edit Style Sheets page via the Generate CSS link and a screenshot of part of the page is shown below. The page is setup
to allow the colour (only) to be set for different attributes for the different blocks of each of the style sheet and then when the
Generate CSS Files button is clicked, the files are written with a default or specified prefix. To put them to use the files then need to
be renamed and manually moved to the html/attachments/sites/default/ directory.
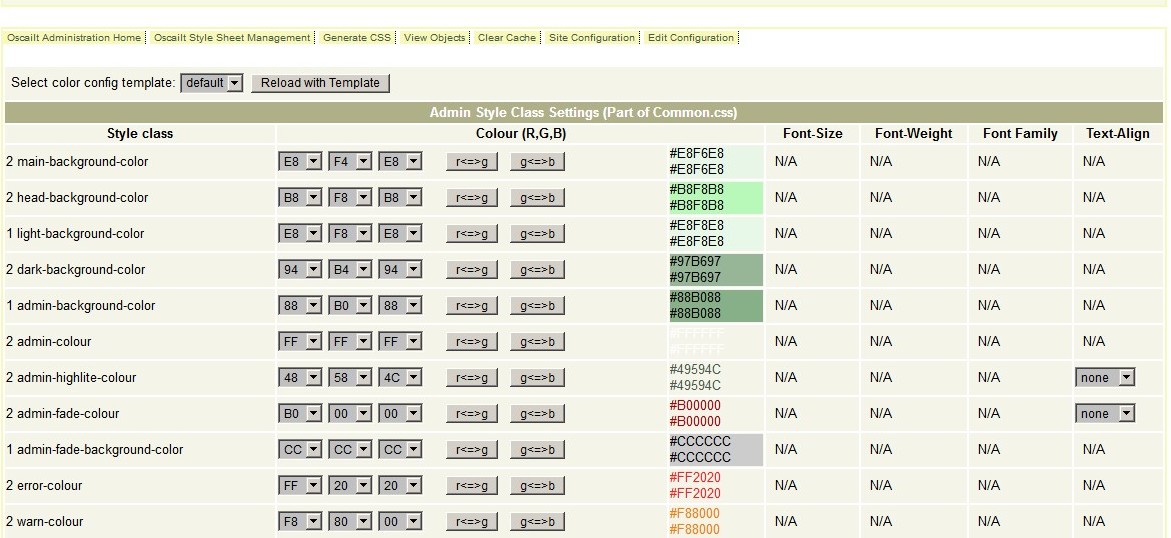
Fig 5.5b: Part of the Generate CSS Stylesheets admin page
5.4.2 Colour Tables
Introduced in Oscailt 4.0 is this new feature to simply display tables of varying colours and it allows the user to select any of the values for any
of the Red, Green or Blue channels and then to see how variations of the other colours look like when combined with these. While this does not do anything
functional for the website operations, it is useful when making changes to style sheet colours or simply trying to select the right colour when perhaps a
coloured background is needed for a featured article or some page design.
5.5 Edit Topics, Regions, Types, Languages and Tags
The administrative functionality of all these are very similar. The files for implementing the screens for these are already listed above and the
tables that they store their data in are: TOPICS, REGIONS, TYPES and LANGUAGES. The IDs
in the first 3 tables are stored in the STORIES table and this is how a story is categorised. This means then the IDs should never been modified
once stories are in the database and to prevent this happening separate permissions can be assigned to editors
to allow for the editing or addition of these attributes.
Note 1: In Oscailt 3.5 Topics, Regions and Types can be translated into all the different defined site languages.
Note 2: In a later version of Oscailt the Topics, Regions and Types categories may be succeeded by tags.
5.5.1 Edit (Story) Topics
This screen allows new story topics to be created or existing ones to be modified or deleted. It is very important
to realize that these should be only updated or deleted after very careful consideration, especially if there
are already stories existing which are using those topics.
If a topic is deleted, then the reference (to the deleted topic) is lost for the story, but worse is that when a new one is created, those stories
categorized in the old topic will now be categorized with the new topic (because it will probably get the id of the old one) which of course may not
be the same. Therefore it is probably best to not delete topics at all and only used the update when the text is clearly
incorrect.
You can define a topic to be protected which means only editors can publish stories with that topic. Generally this might be used for site related
stories.
The screen for editing topics is shown next. The button to create a topic is at the bottom of the page but not shown here.
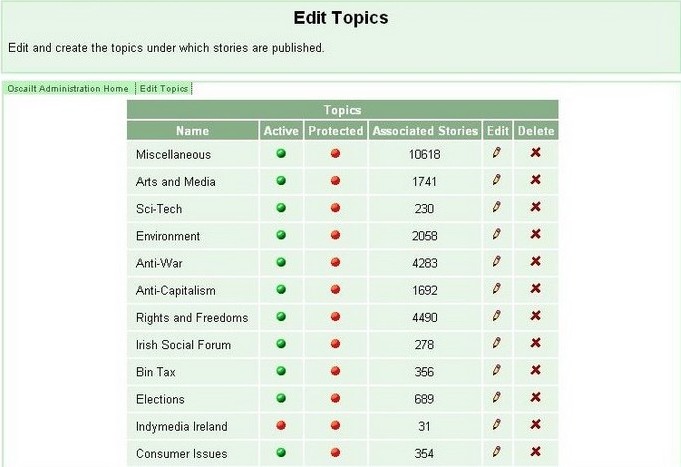
Fig 5.6: Administration screen for managing story topics
5.5.2 Edit (Story) Types
This screen allows new story types to be created or existing ones to be modified or deleted. It is very important
to realize that these should be only updated or deleted after very careful consideration, especially if there
are already stories existing which are using those topics.
If a story type is deleted, then the reference is lost for the story, but worse is that when a new one is created, those stories categorized in the
old type. The first 5 stories types in Oscailt are always predefined during install to be:
- Feature
- News Report
- Opinion / Analysis
- Press Release
- Event
It is possible that if Event is not the 5th entry that the configuration can be made to point to a different value. e.g. the 6th.
The screen for editing types is shown next:
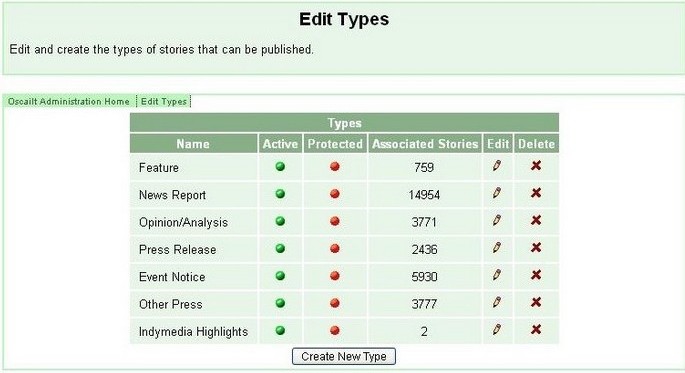
Fig 5.7: Administration screen for managing story types
5.5.3 Edit (Story) Regions
This screen allows new story regions to be created or existing ones to be modified or deleted. It is very important
to realize that these should be only updated or deleted after very careful consideration, especially if there
are already stories existing which are using those regions.
The same warning applies regarding deletion or changing the name of a region as for story topics and types.
The screen for editing regions is:

Fig 5.8: Administration screen for managing regions
5.5.4 Edit Languages
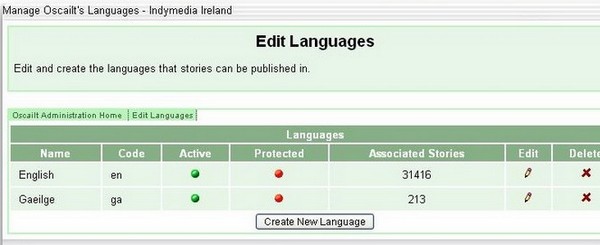
Fig 5.9: Administration screen for managing site lanaguages
This screen allows new languages to be created or existing ones to be modified or deleted. The list of languages here both defines what languages
maybe selected for a story and the languages that the site can support since it is possible to create translations for any of the layout objects
such as help pages, menus, newswires and other objects.
As with topics, types and regions one must take extreme care when deleting or editing these settings and ideally these should be only updated or
deleted after very careful consideration, especially if either there are already stories published in these languages and or parts of the site
have been translated to them.
Currently Oscailt only supports the ISO-8859-1 character set which means only those character sets and corresponding languages are supported. Typically
this means most European languages. Support for Asian languages will require UTF-8 support which is a long term objective.
5.5.5 Edit Tags and Tagging Stories
Tags were introduced in Oscailt release 4.0.
This admin page allows new tags to be created or existing ones to be modified or deleted. It is important to use tags names that are sufficiently
descriptive and are likely to be used to search for stories on particular subjects. Thus often they will be of words that are currently trending.
It is not advisable to use two word combinations for tags as it would lead to confusion when searching. From the page there is a link to another
sub page where the tag can be tagged against a story id. The next two images illustrate each of these pages.
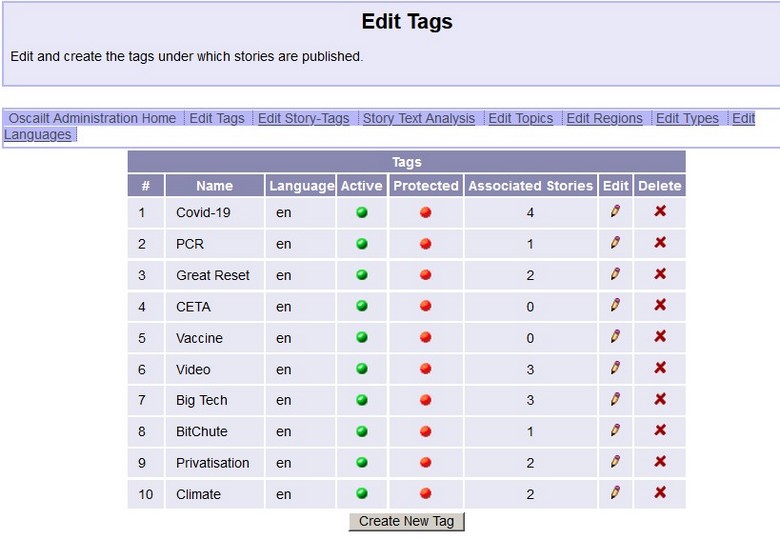
Fig 5.10a: Administration screen for managing story tags
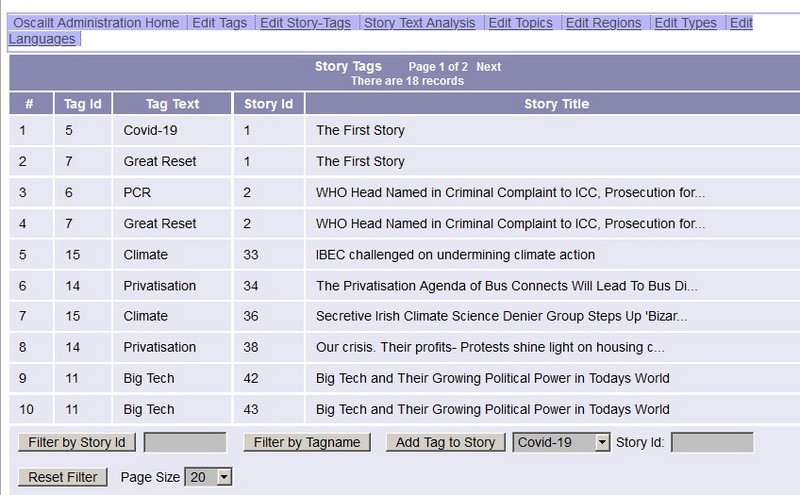
Fig 5.10b: Administration screen for tagging a story
5.6 Edit Editors
This screen allows new editors to be created or the editor profile information to be modified. Most of the information is optional in the profile
and it can contain an email addresses, an additional details text field and of course a password. The last login time is always automatically
recorded. Any create, update or delete will result in an entry being written to the editorial log.
Oscailt 3.7 introduced a basic two factor authentication option with a choice of methods composed of various questions or an option to have an code
sent to your editor email account.
Each editor can modify their own settings through the 'Edit Your Profile' link. From release v3.4 onwards there are
additional options to be notified by email whenever a story or comment is published on the site with or without the contents provided. There is
also an option on whether to display the main administration page in dashboard mode or not and as of release v3.7 an editor has to opt in
to allow their email address and editor details in the freeform editor details field to be seen by other editors in the other admin pages such
as the user messaging one.
An editor with sufficient priviliges can modify any editor profile since you have to have someone who can setup accounts. There is also a link
to 'View your Roles' which will display all the permissions (no access, read, write) for each role (including role name) assigned to you.
As stated before the general idea is to define roles for say editors, feature writers, administrators and so on and then when someone new comes
along it should be easy to assign them the appropriate role. Clearly it does not make sense to give a non-technical person access to the site layout
in case they completely mess it up by accident.
There are three main screens associated with this functionality. The first displays the list of editors, the second is the edit screen and the third
the role assignment. If there are more than 25 editors then the main display will automatically page groups of 25 editors per page. This page
can be sorted by editor name. The images below are screen shots of these these three pages.
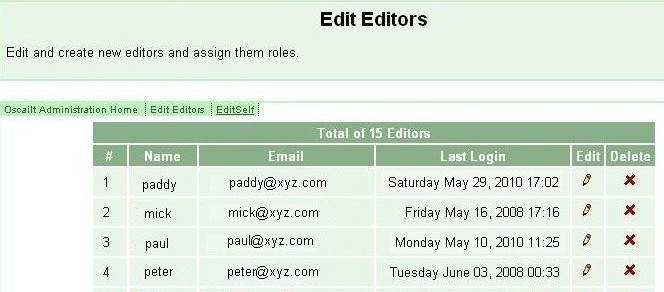
Fig 5.11: Edit Editors Main Page
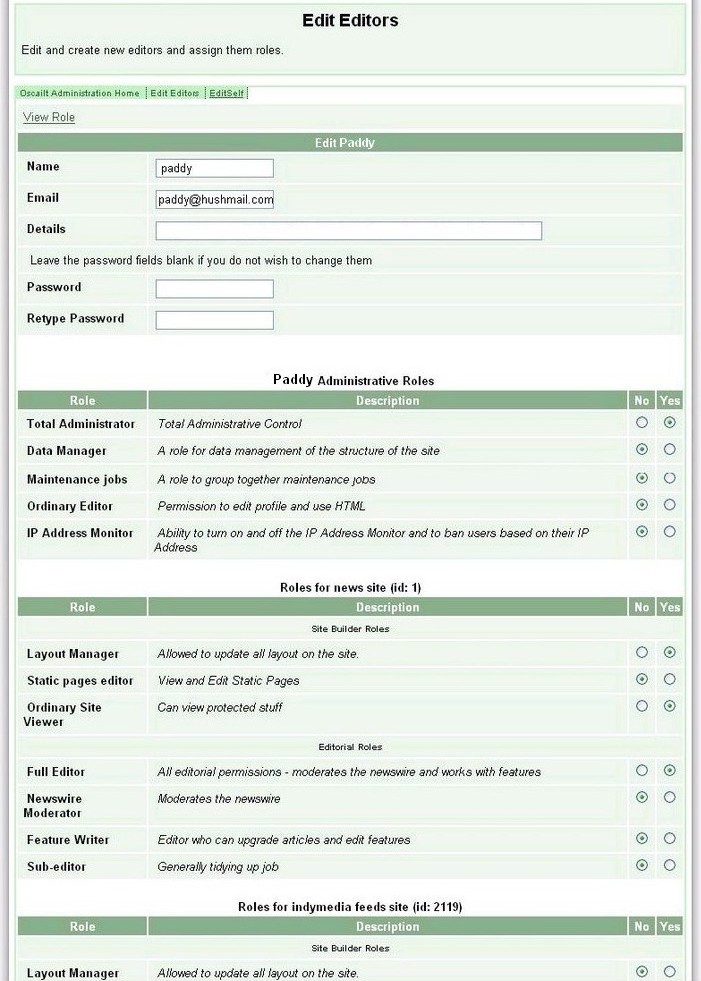
Fig 5.12: Edit Editors Edit Sub Page (Click to enlarge)
5.7 Edit Roles
This screen is used for setting up site roles. Essentially these are site permissions formed into groups called roles and you can name these roles.
Almost every activity has permission associated with it. The site permissions are split into three categories covering the different areas of Oscailt
and these are:
- Administrative Roles - covering access to basic configuration, setup of types, topics, regions etc.
- Editorial Roles - covering permissions on whether an editor can do hides, deletes, edits, upgrades etc on stories and comment.
- Site Layout Roles - covering access to layout screens and creating objects and performing page and menu layouts.
The list and types of permissions are best illustrated by looking over the screen shots for each of the role categories. These only show
the first few entries. To see the full list, it is best to have your own installation and examine them there.
5.7.1 Edit Administration Role
There are two Administration roles setup by the installer and they are:
- Total Administrator - Intended only for administrators
- Public User - This is a very restricted role that allows a public user editor account to be setup and only allows for file uploads.
Figure 5.12 shows part of the screen for administration roles.
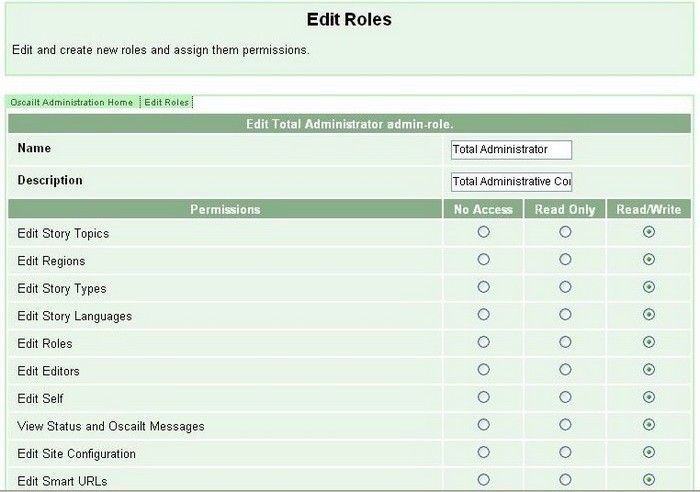
Fig 5.13: Edit Page for Administration Roles
5.7.2 Edit Editorial Role
The Oscailt installer sets up in advance the following role to help get started
- Editor in Chief - role to allow all editorial actions to be performed
Figure 5.13 shows part of the screen for editorial roles.
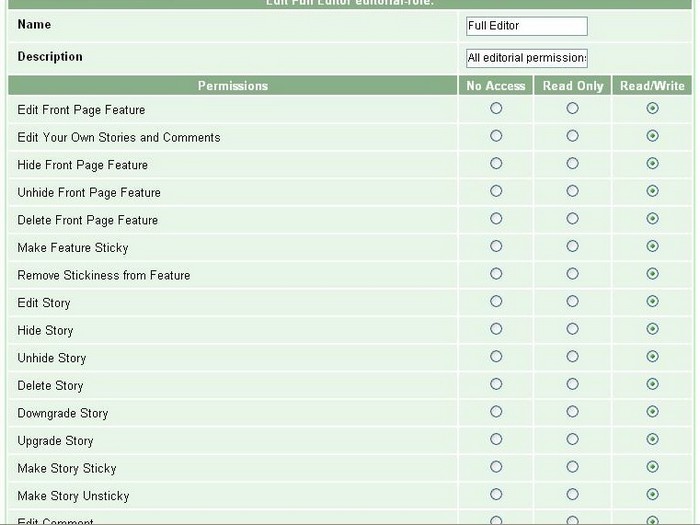
Fig 5.14: Edit Page for Editorial Roles
5.7.3 Edit Site Layout Role
The Oscailt installer sets up in advance the following role to help get started
- Basic Site Layout Roles - role to allow build out of objects to create a site
Figure 5.14 shows part of the screen for site layout roles.
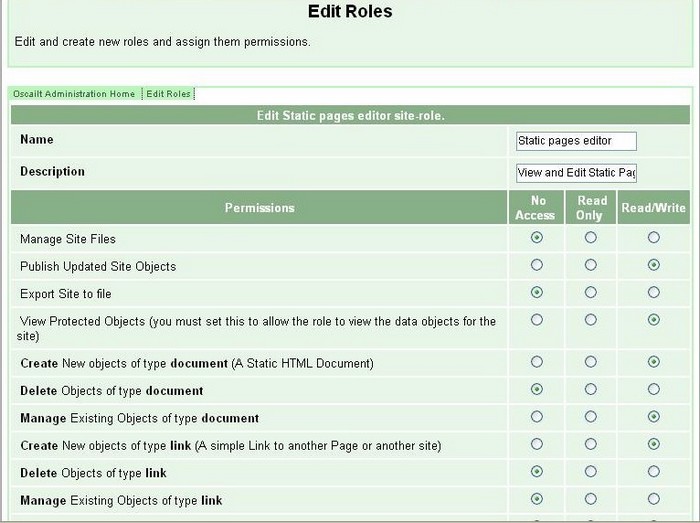
Fig 5.15: Edit Page for Site Layout Roles
5.8 View Site Logs
This page displays the Oscailt log files and the configuration for their automatic rollover. The most important one for editors is the editorial log which is
basically an audit of all site activitity carried out by editors. The set of viewable logs are for:
- Site Log -This is the site log recording various types of errors and informational messages.
- Action Log -This is the text file version
- Action Log -This is the database version which is searchable.
- Reported Posts -If logging is enabled this contains a copy of every reported post providing links to the stories and comments.
- Spam Log -This contains a log of spam requests that were rejected.
- Spammail Log -If logging of spam is enabled for contact form, this contains a log of all contact-form emails rejected as spam. It is useful to confirm it is working as the occaisional legit email will be incorrectly considered as spam and rejected.
- Health Log -One line log entries of very basic info added by Oscailt at intervals to indicate system health.
- RSS Errs Log -This is a listing of RSS feeds with errors appended that failed to parse correctly. This should be used with the RSS Management screen.
The action log contains the Ids of hidden stories and comments and are displayed as URLs allowing editors to quickly jump to those locations.
For the reported posts links are provided to the reported articles and an attempt is made to determine the hide status for the most recent
reported posts.
For the Spam Mail, a method exists to select a message for forwarding to the email lists configured in the main
administration configuration page. This would be used for retrieving valid email that got caught in the spam filter.
5.8.1 sitelog.txt
All major errors are written to this file. Depending on the logging level it can also receive debug
information. Currently it includes information about when the database cache is cleared.
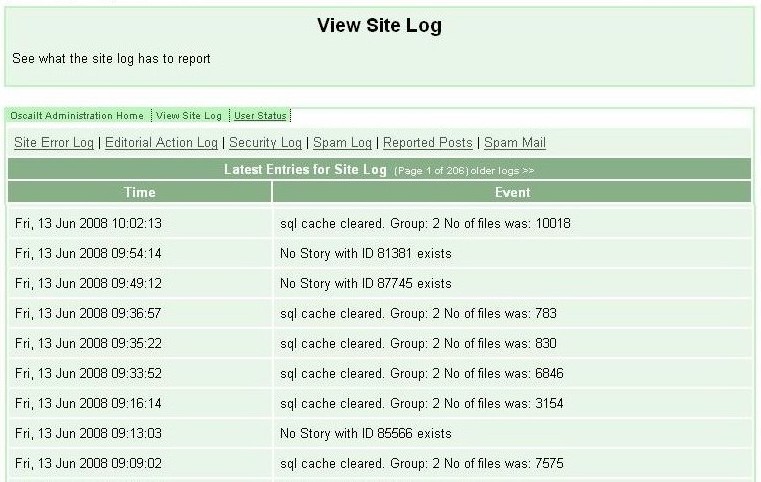
Fig 5.16: Site Logs
5.8.2 actionlog.txt
Every editor action on the public site is recorded here along with the 'reason' given. This covers hides, unhide,
delete, edit, upgrade to story, downgrade to comment and optionally featurize. This is referred to as the
Editorial Log. In this display, it shows the ids of hidden stories and comments as URLs allowing editors to
quickly jump to those locations to view the text.
From Oscailt v3.3 onwards editorial actions have also been recorded in the EDITORIAL_ACTIONS database table and there is a
separate page for displaying the data from it and which has filtering options to help look at particular
actions, items or activity by a given editor making it much easier to search back and see the audit for an action.
5.8.3 securitylog.txt
This records any attempts to add illegal html tags in the publish forms. These are defined in the file
html/config/markupconfig.php.
5.8.4 spamlog.txt
This records any very long requests which tend to be typically spam and simply use up your bandwidth, database
and CPU resources. The cut off length is configurable from the file
html/objects/systemconfig.inc although one should note that legimate requests
generated from the search form or the archives page can generate relatively long and valid requests.
5.8.5 reported_post.txt
When displaying this file, Oscailt expects to read the information in a particular format. The idea of this page
is to help process reported posts as quickly as possible. It displays who sent the reported post, an active URL
to the story or comment in question, the subject line and a button to view the body of the email. It uses Javascript
extensively to hold the body of the generated email and to enable hiding or showing of this.
5.8.6 spamlog_contact.txt
The option for displaying this file in the View Logs page is called SpamMail and it formats the emails
that are considered spam in a similar way to reported posts above. These are generated from the Contact Form module if
the option to log spam mail is considered.
5.8.7 healthlog.txt
This contains very basic info on the health of the system. It can be expanded in later releases.
5.8.8 RSS Errors
This option displays a list of RSS error files. They are generated whenever there is a problem parsing a received RSS feed AND
the logging level is raised above level 1. The file contains the raw RSS or Atom feed and the error message generated by the XML
parser. It is very useful for determining why a RSS feed has failed and it will normally because feed has started pointing to a
HTML page which is not a parsable RSS feed.
There is an associated administration for Feeds Management and there is an option to make minor corrections to
incoming feeds which can be used to fix errors. Since the information from RSS Errors provides the details of any parsing errors,
then from these rules can be defined for the corrections. See section 5.17 for more details.
5.8.9 File Rollover Config
The file rollover is currently hard coded in the objects/adminutilities.inc file. Not all files are configured
for rollover. Files can be rolled over either every month or year. There is a minimum file size before which the file will be rolled over.
The configuration can be viewed by selecting on the Rollover Config.
5.9 View Site Statistics
There are generally two types of website statistics people are interested in and these are figures related to page visits and
downloads, country of origin and browser type. These are real time statistics and are best collected by Apache server and there
are numerous freeware programs like webazlier to analyse the files. If shared memory is installed and enabled,
Oscailt can be used to gather related statistics on page hits but otherwise does not collect these types of statistics.
The second set are the ones available in this admin page and these are for figures like the number of stories, comments and
attachments published each day, week, month and year. And it may be further subdivided into the number of hidden items and further
broken down by categories such as topic. Actually these are the statistics generated by Oscailt. The various options and links
on the main page should give access to these figures.
Figure 5.17a below shows what the general summary statistics look like whilst Figure 5.17b shows the monthly mode of the display.
The first figure shows what the monthly statistics look like whilst the second is the expanded form of this display which breaks
the statistics down by category.
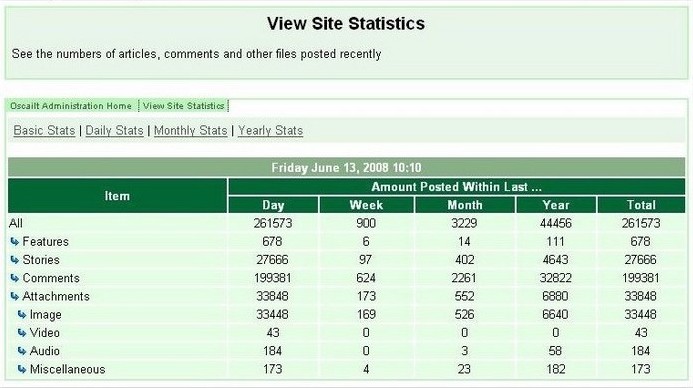
Fig 5.17a: General Summary Site Statistics
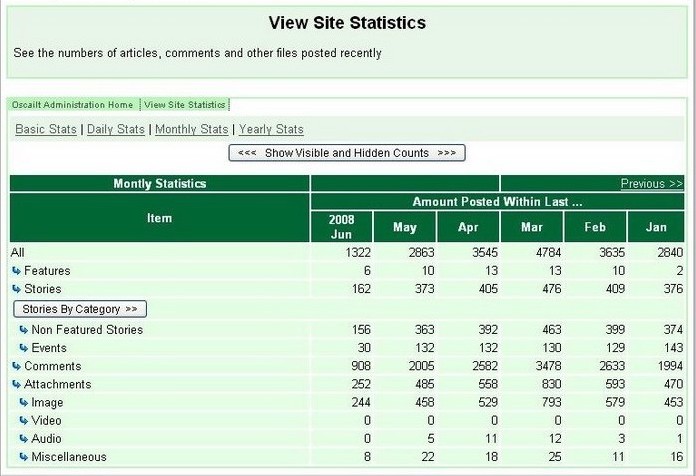
Fig 5.17b: Monthly Statistics
In Oscailt 3.3, shared memory was introduced, although it may not be enabled on all hosts/servers. This area of the code is not complete but the
preliminary implementation can record the number of hits to separate objects like the newswire, event page, front page and so on. It can also record
the number of requests that resulted in a database request.
In Oscailt 3.5, some basic MySQL statistics were added. These are derived from the SHOW VARIABLES and
SHOW STATUS queries and can be used to try and determine the overall performance of the database. The key metrics
would be the key reads ratio and key writes ratio.
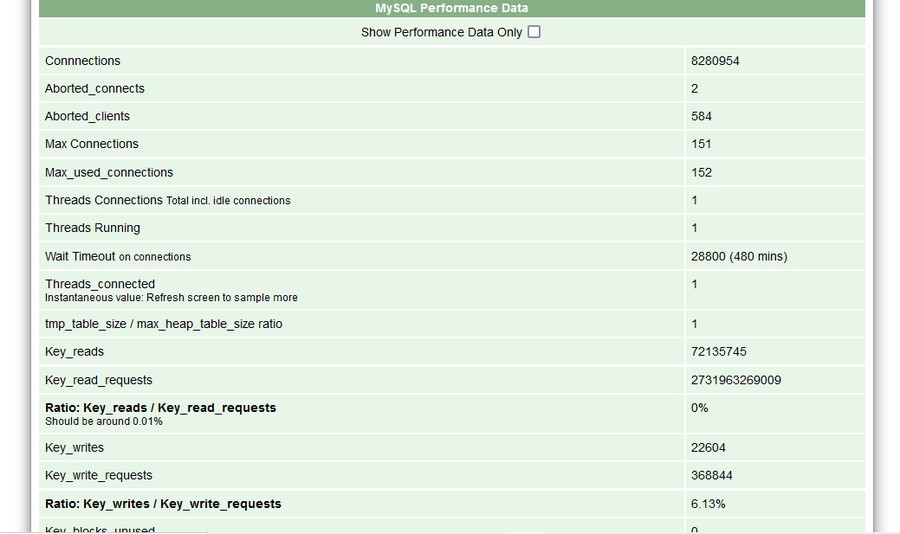
Fig 5.18: General MySQL Performance Statistics
5.10 Bulk Deletes
It is unlikely this option would be used much. The idea is that at some point, say after a year, you may want to automatically delete any stories,
comments or attachments that were hidden on the site. This will depend on the policy that those running the site have decided. It will also help
reduce the size of your database if it is growing too big.
On entry to this screen it will generate basic statistics on the number of hidden stories, comments and attachments. Be careful using this option
because once your hidden stories are deleted, there gone. And one should be aware that when a story is deleted, all comments and attachments
belonging to that story get deleted along with it. When the action is complete, Oscailt should return with the totals deleted.
In Oscailt v4.0 an additional level was added for hiding stories and comments to mark it as spam as opposed to regular "hide". For those items marked
as spam the Bulk Delete can now selectively delete those instead. This is now the default setting.
A bulk delete will result in an entry being written to the editorial log.
In Oscailt v4.3.1 a further feature was added where hidden stories and comments since the given selected time to the present which is the reverse of
the original mode. This allows for exmple for more recent spam comments to be deleted.
5.11 Clear Cache
There are a number of caches in Oscailt all of which are there for performance reasons. There are caches for the:
- Database -designed to speed up database queries and cut down on database activity.
- RSS Feeds -Used to cut down reduce the number of fetches to other sites to once every 30 mins approx.
- OML -Indymedia city listing rss feed cache. This will not be active if this feature not used.
- HTML -There is a basic HTML cache for a few pages like the front page and some of the newswires.
- Images -used for storing thumbnails of images and avoiding regenerating these on every access. Includes embedded video cover images. These should not really be cleared at all and by default are not.
- Site objects -these are the layout objects quasi-compiled.
- Object Names -for internal use.
Whenever a new Oscailt upgrade is carried out you may want to clear these caches, especially 1) and 4). The database cache is split into groups
but the biggest grouping is for stories, comments, newswires and attachments and this will be refreshed whenever a new item is publised or edited.
The site objects cache should probably be cleared whenever there are any significant layout changes.
The RSS feed is best cleared when you are trying to figure out whether a RSS feed is broken or there is some kind of problem.
The Clear Cache admin page is relatively simple and a screen shot is shown below.
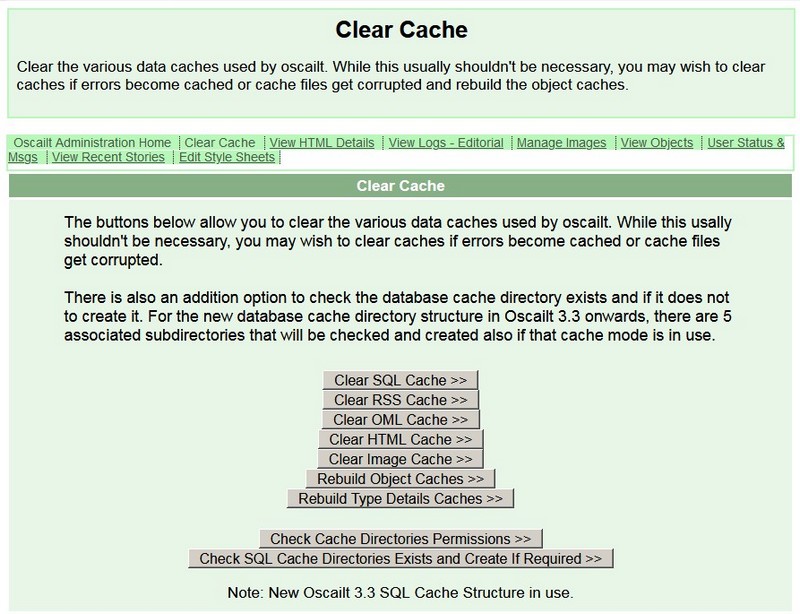
Fig 5.19: Clear Cache Admin Page
5.12 View Object Usage
The purpose of this admin page is to provide some basic diagnostic and summary information to the objects created on the site. It provides
a list of all the site objects giving the object id, name and type and some other basic information. This gives a quick way to get an
overview of what exists already. For a site with more than one language defined, it will indicate what language versions of an object exist.
So it is useful if you are translating all the banners, menus and pages and wish to track progress. There are options to apply basic filters
to help display the data more clearly and in figure 5.19 the object type filter drop-down list is shown. Selecting the
object type filter displays more specific information to that particular object. So for example the box type will show
the date activation information if it is enabled and the list of contained objects, the feedexport type would display
the type of exported feed whether RSS, Atom or Javascript and the newswire type will display the page layout used.
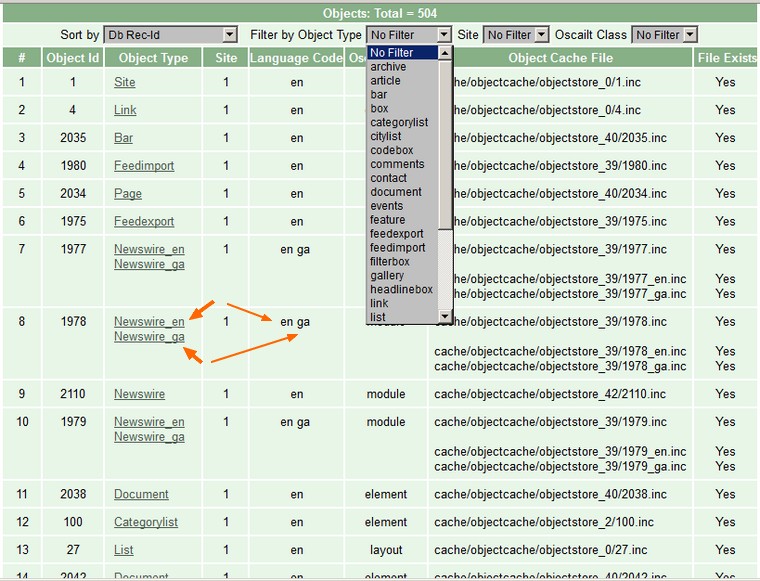
Fig 5.20: View Objects Admin Page
The plan is that at some future point is that this can be expanded to generate a tree structure of the relationship of obects so as to quickly
understand the layout and hierarchy of pages, menu ad banners.
5.12.1 Object Date Format
In Oscailt 4.2 the PHP code was updated to stop using the strftime() form of date formatting and to switch all usage of that
function to use the date() function. However a subset of Oscailt objects have fields where this date format can be specified
to control the date format. The form of this string needs to be changed when upgrading to Oscailt 4.2. The reason for the change is because this old format
for dates is deprecated in PHP 8.1.0.
This sub page can be used to display those date formatters for all those objects where they can be specified and it willl auto suggest equivalent strings
that use the new format. It also has an option to update all the objects to the new format.
5.12.2 Template Listing
There are two types of templates which are displayed on separate subpages and these are object templates and
html feature templates.
The template part of this page is that it can list all the site object templates. Templates are designed to be used in
conjunction with object definition. For example the number of fields to fill out in the publish module is large. When the first instance has been created, you
can then save a template version of it, then anytime you wish to define other types of customised publish modules, you can specify that it uses the
template during creation and this will automatically fill out all the fields. Since in most cases, only a few fields will change between versions,
then the use of the template can save a lot of work and effort.
There is one html feature templates which is used when a story is upgraded to a feature and it is stored in the
config/ and is called featureskeleton.html. It has two keywords which can be used and
these are:
%IMAGE% - replace this with the Oscailt image macro for the first image. e.g. OSCAILTIMAGE(image1 300 0)
%SUMMARY% -replace this with the text of the story summary
5.12.3 Object Table Size Listing
This feature is useful because the contents of objects as opposed to stories is limited to qa size of 64 kb and can easily be exceeded
especially by document objects. This page allows a filter -defaulted at 40 kb to be set that lists all those objects with a size bigger than that and
thereby allows one to spot and troubleshoot any problems in that regard.
5.12.4 HTML Templates
This sub page displays the HTML template html file used for features and lists the various macros available. This feature template html file can be edited if
one has access to the server filesystem. A default version is automatically suppplied.
5.12.5 Website Theme Images Listing
The View Object Usage administration screen View Theme Images administration screen has an option to list the images
used by the objects defined so far. This is useful when updating the site graphics as it is a useful way of finding most but not neccesarily all the
graphics files in use. In most cases the picturebox object is used for displaying images.
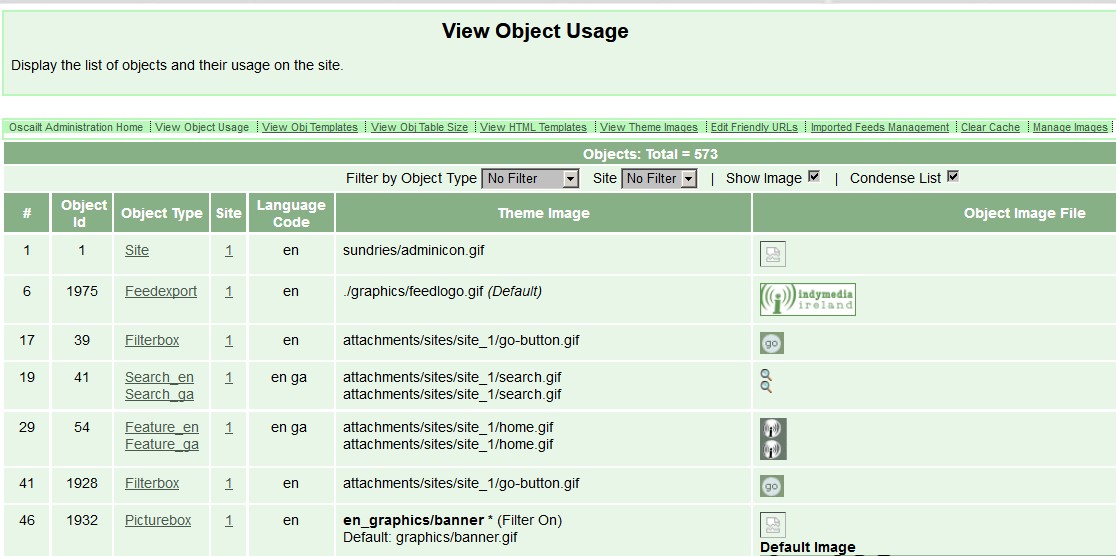
Fig 5.21: View Theme Images tab in the View Objects Admin Page
5.13 The Image Manager
The Image Manager is a tool to allow you to browse all the images for a given month since images are stored in directories
divided by month and year. The original idea was to provide a way to quickly view all images available on your site thought to be useful when preparing features,
but it is also useful for debugging problems. For example sometimes users will upload images in bmp format which are not normally
displayed properly by most browsers and usually this will be noticed when Oscailt is unable to generate a thumbnail image for it. The
image manager will display the true image format even when the filetype is marked incorrectly and you can then correct it by converting
it to a jpeg image and Oscailt will then take care of making the appropriate internal updates.
This page will also list other types of attachments such as video, audio and regular files and if the ffmpeg tool is installed it can show
and generate video cover images.
From version 3.9 onwards and with PHP 7.1 or later installed, it can now recognize webp format types of images and convert them to jpg if
required.
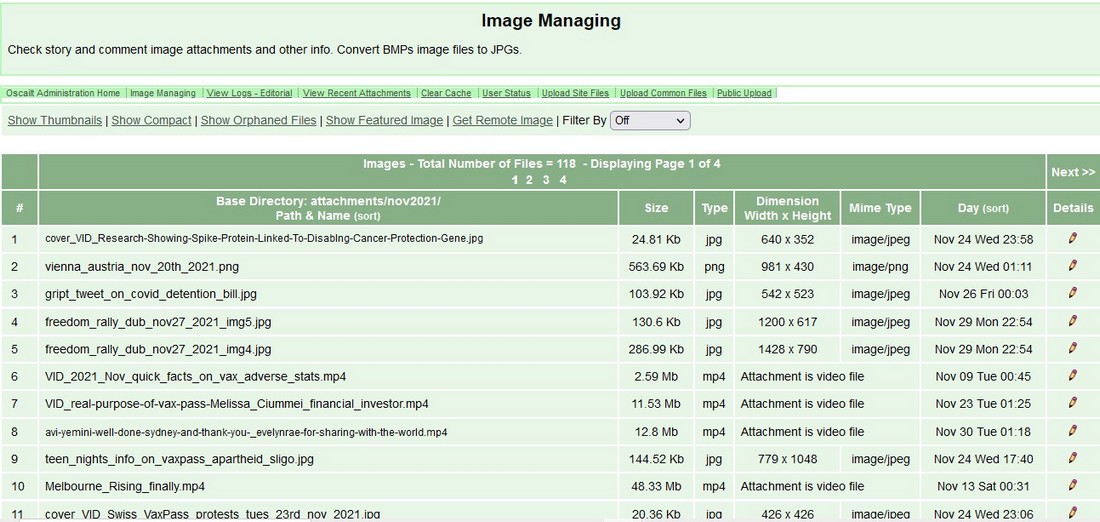
Fig 5.22a: Main Image Manager Page
5.13.1 Browse Mode
There are two modes of display in the Image Manager and the initial mode allows you to browse through all the image files in a given
directory and you can switch on thumbnails to view the images. Images are stored in monthly directories with the year in the name. So
Jan 2010 would be jan2010. This mode allows you to select the month and year.
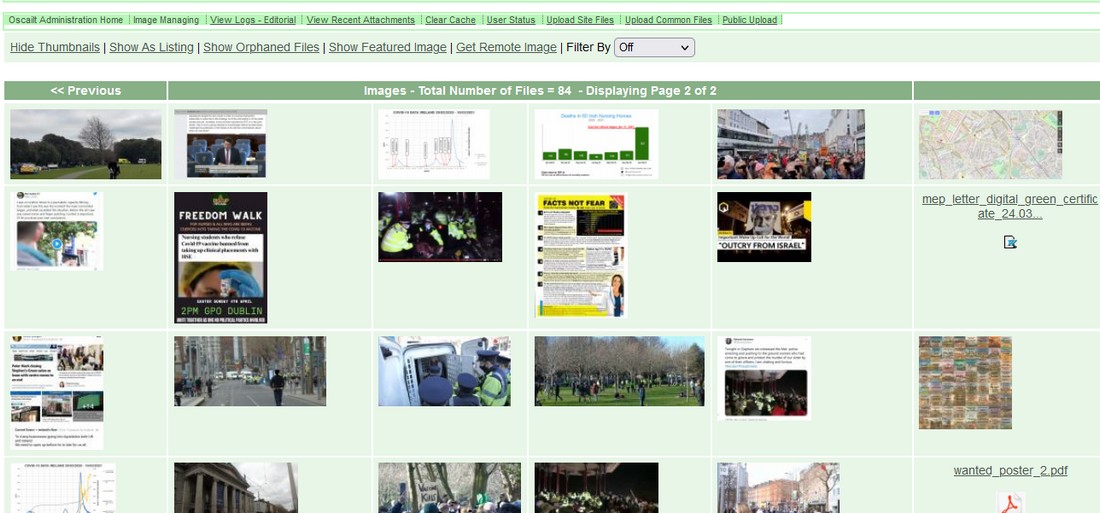
Fig 5.22b: Main Image Manager Page - Thumbnail Display Mode
5.13.2 Detail Mode
In this mode, when an image is selected and basic details such as file size, number of pixels and image format, and links to the story or
comment where the image was originally published, are all displayed. On Linux/Unix systems it will also display the camera EXIF
data if it is available. In this mode it is possible to:
1) rotate the image left or right
2) rebuild the cached images
3) convert from one image format to another. This is useful for converting bmp images to jpg format.
This sub page can now also be used to attach orphaned images to a given story or comment.
5.13.2.1 Video Files
In this mode, when a video is selected and ffmpeg is installed, it can show the video header and there are options to Generate Cover image
and Cut Video by specifiying a new start position and duration. In effect to clip it. If the size of the video file is very large then this
operation may time out, so it is probably best to do this with relatively small videos.
5.13.3 Orphaned Images Mode
When images are uploaded sometimes there may be an error or the upload timeouts for some reason and the images to now get attached to the
story. This mode will check all the image files in the directory and list those which are not attached to any story or comment. At
this point it is probably safe to delete them if required and unused by any other pages -e.g. document pages.
5.13.4 Show Featured Images
This subpage simply shows the current featurized image. It will be the most recent image that is featurized.
5.13.5 Get Remote Image
This page allows images to be retrieving remotely by specifying the URL and saving it to the current attachment directory. There is an option to replace
the remote file name with a more meaningful local name. This can be useful since the remote files can have very long and cryptic names.
5.14 The IP Monitor
The IP monitor is a relatively simple display available as part of the administration toolkit. It simply displays
the IP number, story or comment author and URL, time posted along with status of whether the IP is banned or not.
It is possible because the incoming request contains the IP in the HTTP variable $_SERVER['remote_addr']
The display can be sorted by IP or time. In IP sorted mode, it will highlight all sequences of IPs that are the same value.
Note: In Oscailt 3.1, code has been added to specify a duration to keep the monitor turned on, after which
period it will shut off automatically.
5.15 IP Banning
There are two forms of IP banning which are a) banned reading the site and b) banned from publishing. The former
is likely to be much rarer than the latter.
In the first method, the IPs to be banned are entered as a list in the Edit Configuration screen and as each request is received, the
incoming IP address is matched for any of the entries in the list and if they match they get no response from the site.
The most likely situation where this would be used is where some site is hitting your site hard with commerical spam or there are a huge
number of junk requests placing a heavy load on your server. In a varient of this incoming requests can be redirected to another
(preconfigured) site. This is configured in redirect banned url field in the Edit Configuration page also and in this
scenario it might be used for when some kind of spammer is hounding the site and you want to send them somewhere else.
In the second method, IP banning works just for attempts at publishing a story or comment. The user will get a response message warning them
that they are banned. This message is currently hard-coded into the source code and probably should be configurable. Long term bans should
be discouraged since IPs get changed anyhow.
5.15.1 Block IPs Screen
This screen is accessible from the main administration page and is used for setting up publish bans. The interface is fairly straight forward
and usually you will need to have the IP monitor on in order to get the IP address of the user who is causing the problem; e.g. publishing spam
or consistently publishing abuse etc. To implement a ban an editor must have the corresponding permission. This is best setup in one of the roles.
To ban a user, you simply enter the IP address, select a time period from the drop down list that is appropriate and click on the "Ban IP" button.
You will then be presented with a confirm page and be requested to fill out the ban reason.
From within this admin page, bans can be terminated early or extended where the is a screen presented to fill out
the reason. Whenever bans are put in place, they generate an automatic message to the internal message system (with the username of the editor that
implemented the ban) and can also be configured to generate an email.
5.16 Editor Status and Messaging Screen
This page actually has a number of features besides displaying internal Oscailt messages between editors and editors most recent login status.
It can also show what editorial locks are in place, the last login time for every editor and setup automatic reminders to the messaging system.
5.16.1 Messaging and Status
The idea of the Oscailt message is to help improve the sense of presence and to allow editors to send simple one line text like messages between
each other. It was envisaged these would be used to help co-ordinate the editing of features and also as a fast communication method when important
events or stories are taking place. As a side effect it was necessary to try and track who was logged in and logged out and determine whether a
given editor had read the last message posted. When a message has been posted that Oscailt thinks the editor has not seen, then while browsing on
the main part of the site (non-admin pages), an one line notification message will appear at the top of the screen.
The screen shot below shows how it looks and operates. The appropriate permission must be given
to an editor to enter this screen, but it is probably best that it is given to all editors.
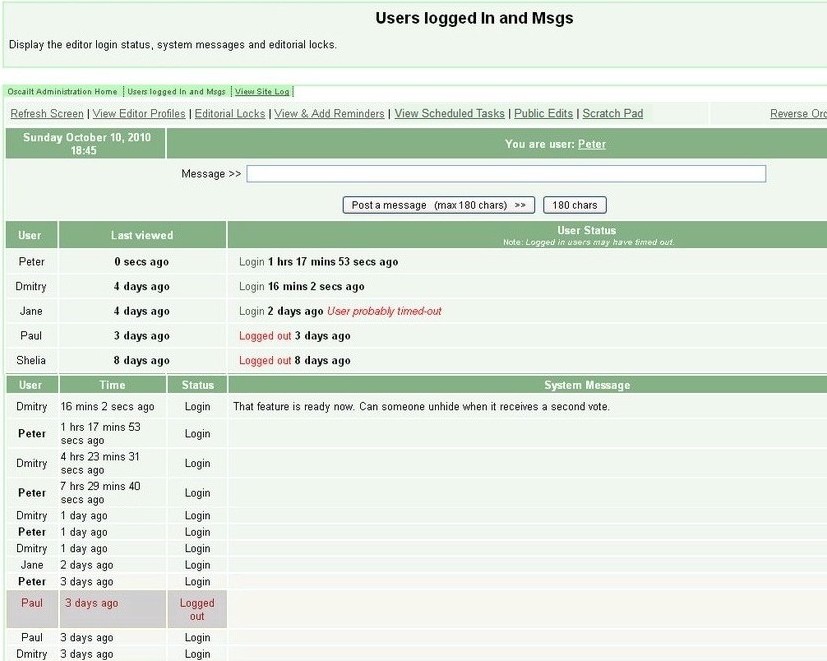
Fig 5.23: Users Logged In and Msgs Page
5.16.2 Reminders
This is probably not used very much but it allows you to enter a message that you want to have triggered automatically on a certain date and time.
For example you may want to remind editors that a meeting is taking place two days before a meeting. Multiple reminders can be set in place. When
they are triggered they will appear to have been posted by 'system'. Reminders can be setup trigger once or to recur on a monthly or yearly basis too.
Through the Edit Your Profile link you can setup to receive these reminders via email.
5.16.3 Scheduled Tasks
This sub page will display any pending scheduled tasks indicating the time they are due to be triggered. These can be events to automatically unhide
stories or features or when to make stories sticky. Other types may get added in subsequent releases.
5.16.4 Last Login
This screen shows for each editor the last time that they logged in. It also shows the 'additional details' entry for the editor profile. It is
useful for determing who has been active and who hasn't logged-in in weeks or months. The list can be sorted by the last login which is even more
useful. If there are more than 25 editors, the display will automatically be broken into pages of 25.
5.16.5 Editorial Locks
Whenever a story ie being edited by an editor there will be an editorial lock in place which is simply a row in a database table. The idea is to
prevent other editors from editing the same story at the same time and this indeed works because Oscailt will check for locks before trying to
edit a story. However if nothing has happened in 30 mins, e.g. like saving the story or previewing it, then the lock will expire.
The editorial locks panel/screen within the main User Stats and Messaging Screen will display all story locks and the editor username that has
locked it. When th site layout is being worked on, the objects also get locked and these locks will be displayed too, but it is far less likely
to be a conflict here.
5.16.6 Public Edits
In Oscailt 3.5 a feature was added to allow the public to edit their own stories that they have published in the last few hours and this is
made possible through the use of sessions. After a configurable amount of time, (hardcoded in the file objects/publicedits.inc
), this option expires. This screen lists all these stories and their editing expiry status but it can also be used to set a password that
can be given to the author to use for further editing past the expired time. In Oscailt 3.6 public edits were extended to comments as well which are
now listed in this screen too.
In Oscailt 4.1 a new feature was added where on this sub page an editor could enter a message to display over a comment published by a particular user
session.
5.16.7 Scratch Pad
In Oscailt 3.4 a simple scratch pad was added to this screen. It basically allows you to enter a block of text that can be seen by other editors.
You could use it for say sharing a draft email or summary text for a story or anything really. Currently there is no locking on this which means
if two people write to it at the same time and hit save there will be a conflict. The code can be updated in the fure if it proves useful.
5.16.8 Jabber Test Page
In Oscailt 3.8 Jabber integration was added and if installed and configured then this page can be used to test your connection and view the configuration.
Jabber is used for sending notifications when stories or comments are published. It can also be used to process some basic editorial commands.
5.17 Imported Feeds Status and Management Screen
This page allows you to see the status of any RSS or Atom feeds that you have setup and to carry out some basic debugging. It displays
name of the feed, feed type (RSS or Atom), Oscailt Object Id, timestamp, status which is one of okay, parse error or fetch failure, number of retries,
time of last retry and cache filename. There are some basic filtering options to display the status of the feeds which
are: okay, parse failure and fetch failure.
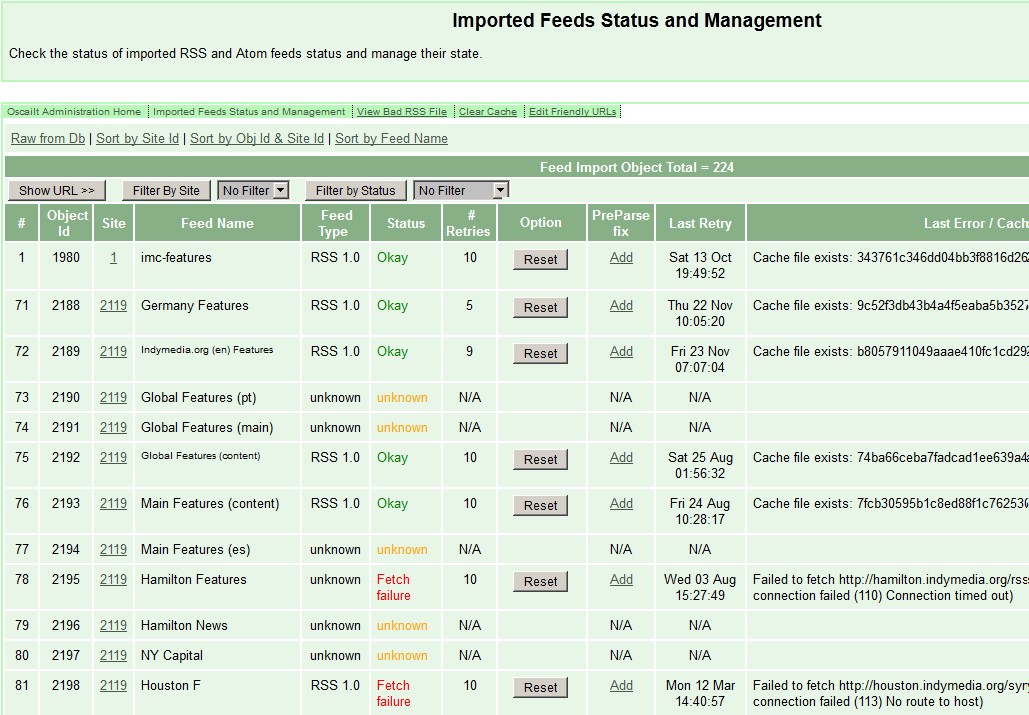
Fig 5.24: Imported Feeds Status and Management Screen
5.17.1 Imported Feeds Repair Rules
There is also an unique feature to add 'rules'. These are basically corrections to apply to the incoming RSS or Atom XML feed. The reason is that
small errors can cause the XML parsing to fail and it can be very difficult to get the originating site owners to fix the errors in their feeds as
in some cases the technical people may be different to the people running the site. Thus by applying our own corrections, Oscailt effectively fixes
it for itself.
A rule would normally be applied when a parse error is showing for the feed and inspection of the source feed through the View Logs RSS Errors screens
shows an minor deviation from the XML standard such as an extra blank line or unclosed tag. When a rule is added it is generally recommended to
clear the RSS cache (via the Clear Cache admin screen) to force a refetch of the feed.
5.18 Edit Spam
5.18.1 Story and Comment Spam Word Detection
From Oscailt 3.4 onwards a new administration page for spam control was added. In this screen you can configure the settings
for turning on automatic spam detection for publishing of stories and comments. It is based on word lists and a set of rules around them.
There are two main modes of detection. The first is for counteracting commercial type spam and there is an associated word list for that
and the second is for bogus types of stories that you want to catch and there is another word list for that. There is also a facility to
set a threshold for the number of links that appears.
In each mode, there is an option to test your configuration against any target story by simply entering the story id into form. This is useful
as you can test it against actual stories that you know are spam.
There are two additional modes for configuring spam words for the contact form for whether they appear in the generated email content or subject line.
5.18.2 Story Text Analysis
In Oscailt version 3.9, a new feature was added to carry out a basic text analysis of a given story by generating character, vowel, word
count and multiple word and unique word analysis.
5.19 Export Site Page
This page allows you to export any part of an Oscailt website to XML files for importing again later or into another Oscailt installation.
There are options to export any portion of the entire site and this is all managed through checkboxes to select which entities and objects you want
to export.
So for example you could export your RSS imported feeds into one set and your site (static) help pages to another and thereby divide up the different parts to
make it more re-useable. means you can just exports certain parts and or objects of a given Oscailt installation.
Exports generate a master control xml file and a sub-directory containing all the exportd site xml files. For example the exported site named SampleSite
would have this desciption control file and directory:
      xmldata/exports/SampleSite.xml
      xmldata/exports/SampleSite
The exported XML files saved to the relative directory: xmldata/exports/ can be transfered / copied to the relative
directory: xmldata/imports/ of the target Oscailt installation where you want to import them. And for the example above
you would copy over SampleSite.xml and the entire contents of: xmldata/exports/SampleSite/
5.20 Import Site Page
This page shown in the sceenshot below allows you to import a previously exported Oscailt installation. When import site is choosen it will bring you to a
subpage showing all the componets of the import site and it's objects. It can contain configuration elements such as the story types, topics, regions and
languages. You can selectively import those parts which you want but within reason because some of the objects may be co-dependent so judgement should be used.
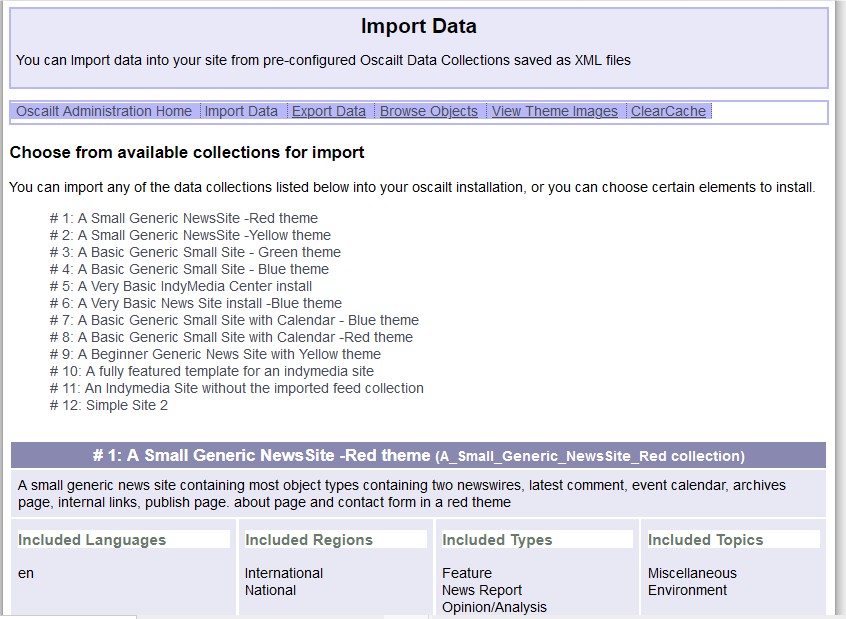
Fig 5.25: Import Data Main Page showing listing of sites for import.
Oscailt will read the XML file contents and present options to allow you to import the full contents or any portion of it. Exports files, as described in the
previous section, should be placed in the xmldata/imports/ relative directory where they are read by Oscailt and presented as a
list of possible object sets to import.
Ideally imports work best when imported into a empty installation because otherwise objects may get overwritten.
Other possible uses of this facility would be to transfer new objects from a test site to the live site or single objects such as help pages worked on
elsewhere.
5.21 Public Upload
This new page introduced in Oscailt 4.0 allows public restricted users to upload files to the website and leave a message too. The purpose is to allow larger
files to be uploaded especially for stories or features which are still being written and is also a means of sharing them with editors.
There is a special restricted editor defined Oscailt role with just the correct set of reduced permissions for assigning to these public users. By defining
them with this "Public User role", it automatically classes them as a public user. The public user can then be assigned a username and password and can login
through the admin page where the only option presented is the Public Upload admin page.
When a full editor or editors with more permissions access this same page they have more options to manage the uploaded files.
6. Instructions for Configuration of Site Layout
This section covers configuration of the site layout. (see Fig 5.1b above) This is where the various menus,
headlines, banners, links, filters, images, forms and page layouts are defined and put together to make up site pages and make the whole thing live.
6.1 The Site Building Blocks
Many news sites are modelled to some degree on the traditional (non-tabloid) newspaper. If you look carefully you will see that it has a number of
features or building blocks. There is normally a banner at the top and possibly some kind of footer at the bottom. Then there may be short summary
headlines that are either on the left hand side (LHS) or right hand side (LHS). The front page typically has one prominent image along with a main
story that is assigned quite a lot of page space. There will be usually other stories in smaller fonts, or perhaps in two or three columns
in a newswire style format.
Oscailt consists of a set of components that fit this layout model. There are basic predefined modules or objects for creating listings,
links, menus of links, horizontal bars for headers and footers, vertical bars for LHS and RHS columns. There are headlines objects which can be
setup to provide short summaries or longer ones, with or without thumbnails of images. Additionaly there are filter and search form objects,
publishing modules, contact forms, newswires, event listing pages, a gallery module and an ability to manage static pages containing just HTML
with no code for querying databases for stories. The latter would be useful for help and information pages.
For some of these modules or objects, they can be used in several different modes. An example is the headline object where you can have headlines
with just titles or headlines with titles and short summaries, with small images as optional. For menus there are several modes for displaying
links to other objects that can display the short names or long names or even just the icons of other objects.
To get the most of out software requires some level of understanding as to how it works. It is worth re-reading
Section 3 to understand how the HTML layout constrains the way Oscailt has been designed for the
handling of layout.
6.2 Layout Administration Pages Overview
The Layout Administration screen is accessible from the main administration via the option labelled Manage Site Layout. If this is a new
installation with nothing defined, then you may need to go to the Create New Site Section screen and create a 'site' first.
The Manage Site Layout section of the site can seem complex but in order to provide flexibility to the layout it necessary to introduce this so as to
be able to handle as many different scenarios as possible. The main Layout page is divided into three parts and these are:
- Basic Elements - consisting of supporting components like static pages, filters, links, picture boxes, headline box, preferences and Indymedia
Centre (IMC) listing since Oscailt was written for an IMC website. These are the type of objects that might go to make up a full Oscailt site page.
- Site Modules - consisting of components like newswires, featurewires, article viewer, search, gallery, events, and RSS/Atom feeds modules. These would be used for generating output to a page and displaying the data.
- Layout Elements - consisting of menus (vertical and horizontal), listings, inset box and actual page layout modules. The menus
and listing will tend to be made up of objects from the basic elements and along with modules like newswires, then page layout can be used
to define how these are brought together into a single page that is generated by Oscailt.
Note: The full list of items in the above object groupings are listed in Section 2.4.
There are also two Menu Options displayed at the top of this page which are Upload Files and Publish Changes.
The Upload Files option leads to a page where you can upload files and are stored in a specific location which is indicated. The intention
is that (CSS) style sheet files and images used for site layout could be uploaded and stored here.
The Publish Changes option is simply used for rebuilding the 'object' cache because since a given site web page is made up of a collection of
objects then it is quicker to have these partially pre-processed in the form of a cache and thereby makes it quicker to build a page and respond
to requests for that page.
To setup and create a site with Oscailt, it is then necessary to decide what pages you want and what they will contain. A typical site will probably
at a minimum contain some kind of newswire page, an article viewing page, an about page, and publishing page.
6.3 Creating Objects
To build your site, you need to create and configure objects with the options that you want. Some objects have a lot more options than others but
most of them are for specifying the actual text to use for various labels and headings. The reason for this is to make it flexible and translateable.
Each object is automatically given an Object-Id by Oscailt but you can also enter a name for each one to help you remember what it is and for.
When you create an object you have an option to specify what language type to designate it as. Basically you can have different language versions
of an object and the idea is that you might create one set of objects in English and a parallel set in Spanish. For the Spanish objects you would
have the text labels specified in each object in Spanish and thereby give you a dual language site in that case.
Some of the fields will already have defaults. The defaults can be set by adding them into the corresponding xml file definition of an object which
are stored in the html/xmldata/indydatatypes/ directory. Currently defaults can only be set for text and radio button fields.
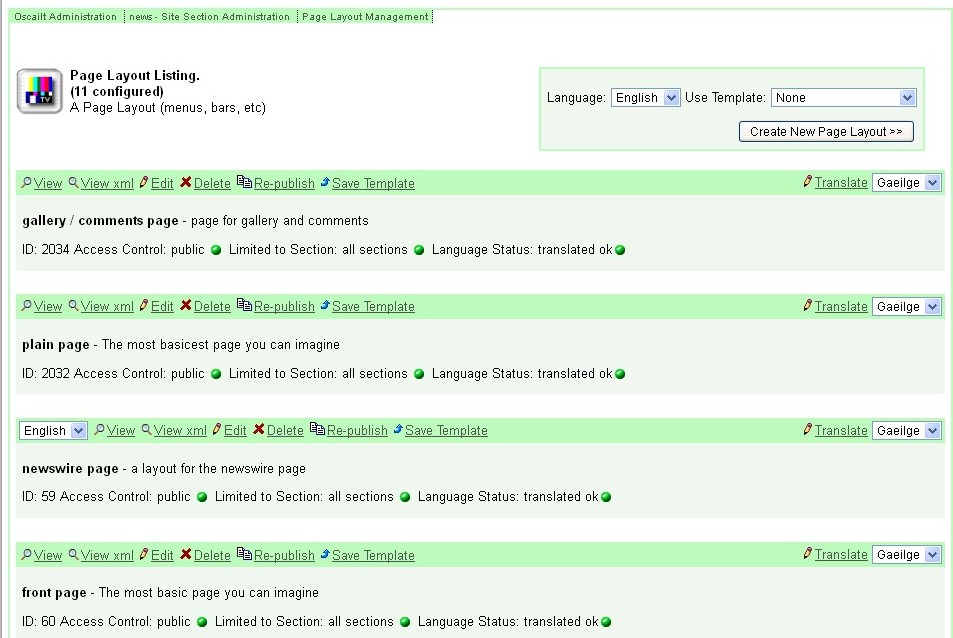
Fig 6.1: Object Listing Page (Click to enlarge)
6.3.1 Master Objects
Oscailt provides the option to create Master Objects which have two main uses. One is to use them as a type of template to effectively
pre-select an object's configurable option so that if you are creating multiple copies of an object you don't have to repeately make the same
selections. The second use is to control the settings on one or more configurable parameters so that they can be set to the same consistent value
or that you might want lock the parameters to certain values to avoid them be inadvertently changed accidently later.
To create a master object, you need to select 'Master' in the drop-down menu of the object listing page before clicking on the Create button.
6.3.2 Templates
Oscailt has another facility similar to Master Objects in that it can be used to pre-fill all the configurable parameters of an object.
The advantages of templates is that they can be used for helping to create objects based on a saved version of another object and it saves
filling out all the configurable options again. A template is basically an object that has been saved off and is stored in a xml file format so that Oscailt
can use it when creating other objects and read the data in it.
When you are in the create or edit object page, there will be a menu option to save the current object as a template. Clicking on
this leads to a page when you are asked to enter a name for the template and if notifications are enabled then also a reason for creating the
template which is recorded in the editorial log.
6.3.3 Previewing and Saving An Object
When you are creating an object or even editing it, Oscailt initially only provides an button at the bottom of the page to Preview it. When
you click on this, Oscailt will attempt to display the object in its various modes and only after that is a Save confirmation box
displayed.
Many of the Oscailt objects have different modes of display. For example a newswire module can be displayed as a full newswire which shows the
full title, author details and the story summary. There is also a headlines more where just a fixed number of words such as the first 20 words of
the story summary are displayed with the option to display much smaller thumbnails of any associated images. You can also specify to display for
example just the first few stories rather than a larger number like 20. In the case of a menu or listing object, there are modes to display just
a short title, a longer title or even just a link to the item. The preview mode then shows how all of these modes will look.
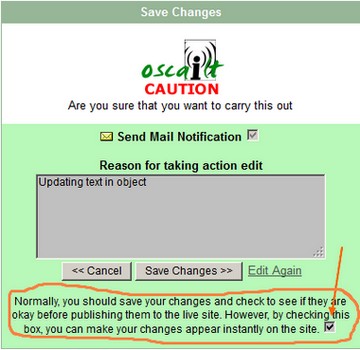
Fig 6.2: Object Save dialog box with checkbox for live update
When the object Save confirmation box is displayed (see figure 6.2 above), you will notice a checkbox with text beside it saying that
you need to tick this to update the Live site. What this means is as follows. Web pages seen by users are created on the fly (in realtime) by
reading and combining the contents of cached versions of Oscailt objects and the output from database queries to retrieve stories and comments
from the database. Therefore if an object has been saved but it's cached version HAS NOT been updated then that update will NOT appear on the
live site.
6.4 How to Put Objects Together - Layout
When creating a website with Oscailt, it can seem a bit daunting at the start when there are very few objects created. It is important to have
an rough plan of what you want to create and how you will create it. With Oscailt, it is neccessary to create all the lower level objects like links,
static pages, menus and listings, categories, picture boxes first and then to move onto more complicated objects like newswires, article displays,
gallery and RSS feeds later.
6.4.1 Layout of a Simple Page
In this section, we describe the steps to layout a simple page which is illustrated below in figure 6.3. It has a header on top and just a left hand
side column and then the rest of the page which can be used for displaying either the full contents of a story/article or a newswire listing.
| |
| May include a banner image and or a menu horizontal bar |
Vertical Side Bar
with links
search
and other options |
Page Content
Can be:
Newswire
Article
Event listing
Document etc
|
Fig 6.3: Simple Page Layout
Even though that is a relatively simple layout there is still a lot of flexibility in terms of what can be put into the header and the left hand
column. Typically a header would create a banner image perhaps with a set of links either above or below the image. The left hand column could
consist of many items such as links, logos, headlines and even imported RSS feeds. These horizontal and vertical menu objects are made up of
other objects in turn. This relationship is illustrated in figure 6.4. The View Objects admin page can be useful for listing all
the objects created so far. It is described in section 5.12
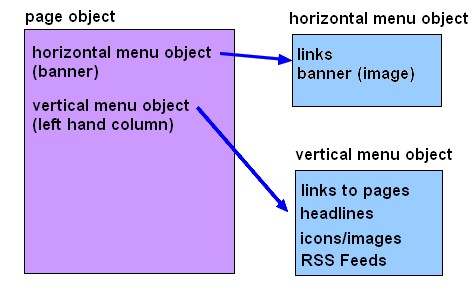
Fig 6.4: Relationship between page object and its contained objects
Clearly then it is obvious that these sub-components of links, headlines, banners and any other types of objects must be created first.
6.4.2 Layout of a Horizontal Menu Object
A horizontal menu object is simply a means to contain a set of other objects and these are displayed horizontally in
the order that they appear. Figure 6.5 below is a snapshot of a horizontal menu that contains two components; a link to a picture box
object named 'site-banner' linked in turn to an image and a link to a gallery object called gallery. The relative position of these
objects can be easily changed by entering numeric values into the position box also shown in the image below.
Since most objects have serveral modes of display, there is an option to specify which mode to use and in the example below, it is set to
'picture Inline' for the site banner and 'Banner' for the gallery object.
Additional objects can be added to the menu and in the lower panel marked 'Add New Objects to this Horizontal Bar' by clicking on the drop-down
box and selecting the type to display and then clicking onthe show >> button which will then display all the site objects of that
type.
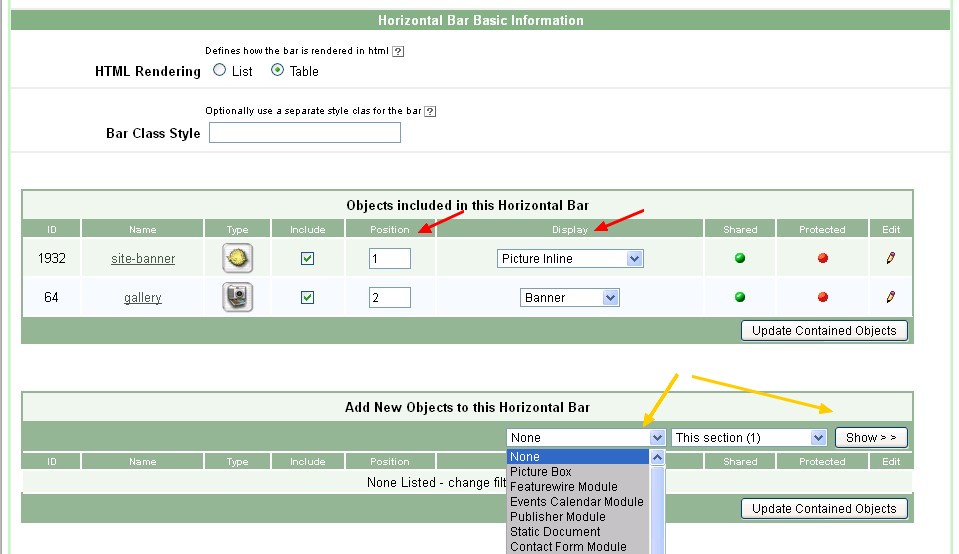
Figure 6.4: Relationship between horizontal menu and its contained objects
6.4.3 Layout of a Vertical Menu Object
A vertical menu object is almost identical to a horizontal one except the objects are displayed vertically.
6.4.4 Selection of Modes of Display
The modes of display referred to above are only evident when these objects are included in other objects. Not all objects have the same set of
modes because of the nature of each module. So for example an newswire module has headlines listings whereas a menu object might tend to have
title, link and listing options. The list below gives some examples of what is displayed when the particular mode is selected for use.
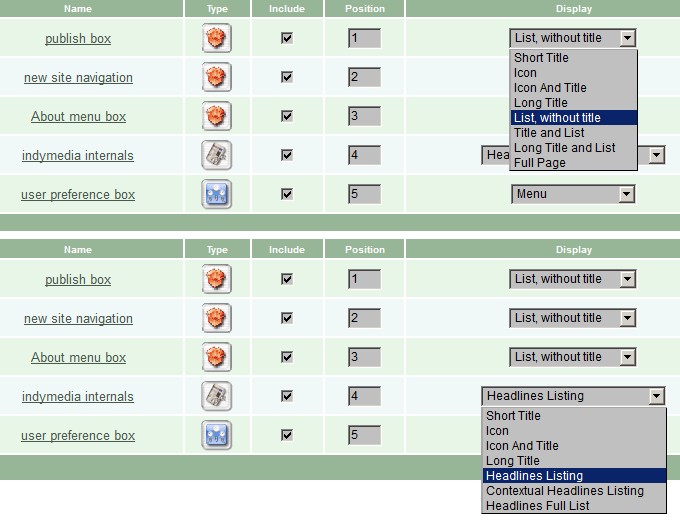
Figure 6.5: Example of object selectable display modes
- Short Title -Only the title name of the object is displayed.
- Icon -Only an icon representing the object is displayed.
- Icon and Title -The icon and title name of the object is displayed.
- Link -A link to the object is generated and displayed.
- Long Title -Only the long form of the title name of the object is displayed.
- Title and List -The title and a listing generated by the object is displayed.
- Headlines Listing -A listing of headlines generated by the object is displayed.
- Title and Headlines -The title and a listing of headlines generated by the object is displayed.
- Full Page Title -The full page contents are displayed.
In Figure 6.6 to the right, there are two examples shown of how the modes are selected. The first is for an object of type listing layout and
the second is for a headlines element. Notice the different options for the different object types. Clearly these modes add considerable
flexibility and greatly increases the number of combinatons in the way menus, headers, footer, newswires and pages can be put together.
6.4.5 Layout of a Newswire Page
In this section, it is explained how to layout a newswire page since this is likely to be one of the first types of page that anyone building
a website with Oscailt would want to do.
There are two parts to the layout of a newswire page and they are a) defining the newswire module and choosing the various options such as the
story types to use and topics and regions it is applicable for. Then there is other details around author, date, display comment counts, attachment
counts, show thumbnail photos and so forth. The second part b) is placing this newswire module inside a particular page layout. This is a separate
task and requires create an instance of a new object in the Page Layout section. This page is then setup to consist of various
other components as desired and typically it might include a header with a logo or banner and some links, a set of side menus or possibly just one
and a footer section. This follows the same pattern as outlined above in the Section 6.4.1: Layout of a Simple Page
except now it should be clearer when the object display modes are taken into account in the setup of the sub-components like menus and listing
of the page that it allows a much richer set of choices.
Incidently once this page is defined, then you need to go back to the newswire module and under the 'Page Layout and relationships' section,
beside the option labelled Page Layout, select from the drop-down list of page layouts which should contain the page layout just defined
previously in step b).
6.5 Basic Elements
This section briefly describes the Basic Element objects. These combined with modules are used to build a site. In a typical site
6.5.1 Document Element
A document element also known as a static document is a way to make static html pages in Oscailt and
to link them into the overall site. They are easy to make and you can specify a page title, subtitle, summary and the actual contents.
Any valid HTML can be entered into the summary or contents and it will be displayed as is. It is important to ensure that all HTML
tags are properly closed as this can effect the overall page that it sits in. For example not closing a bolding tag can result in the
rest of the page be in bold font.
For each document the Page Layout needs to be selected because this controls the type of outer page that the document
itself sits in. For example you may want to create a help page or about page and have various links and menus on the top and sides.
These would be defined and controlled by the page layout so that the creation of the document in unaffected by these. See
Figure 6.3 above for an illustration of this.
6.5.2 CodeBox Element
A CodeBox is similar to a Oscailt document except that PHP code can be included as well and only has a contents field.
There is no reference to layout modules. Codeboxes are displayed by including them through menus or page layouts although their
primary means is through an Inset Box layout element. They are mainly used for creating announcment or razorwire
banners. See creating razorwires
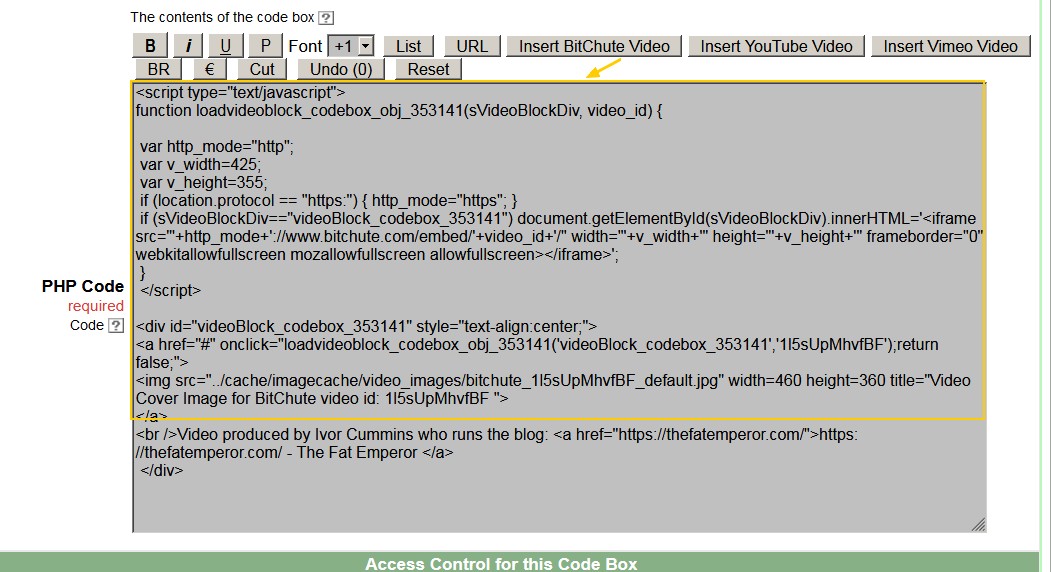
Figure 6.6: Oscailt 3.9 CodeBox Layout Custom Btns
As of Oscailt 3.9, the CodeBox layout now includes some custom buttons for helping format the contents and includes an option to insert a block of
javascript for displaying BitChute, Vimeo or YouTube images with inclusive of a video cover image. All that is needed is to update the video id.
And from Oscailt 4.2 there is an option to do the same for mp4 video files and their cover images.
6.5.3 Picture Box Element
A PictureBox is an object for displaying an image but it's use comes from the fact that since the object
can be contained within many other objects such as headers, it is then easy to change the image by simply updating the object rather than
multiple objects.
The other main feature is that this object has a filter option which when enabled means the object will look for any of region,
topic and or language specific versions of the image. For example if you set the filename as banner and the filter is ticked, it can
look for different language versions of the image such as en_banner.jpg, es_banner.jpg or fr_banner.jpg for English, Spanish or French.
It does this by reading the language setting. If region or topic is specifed then the full list of file checks are:
	region_topic_code_banner    where code is the two letter language code.
	topic_region_code_banner
	region_topic_banner
	topic_region_banner
	region_code_banner
	region_banner
	topic_code_banner
	topic_banner
	code_banner
	banner
6.5.4 IMC CityList Element
The CityList element is used for retrieving the Global Indymedia "IMC City Listing" which is an XML file containing the
global list of Indymedia sites and basic information such as their URLs. This element can be used for displaying this data in various
formats. It also has an option for filtering out dead IMC links. See
Section: 10.24 - How to Filter Out Dead IMCs from IMC City Listing for more details.
This object has a rich set of display modes to choose from when including it in other objects. The modes are:
- Short Link
- Long Link
- Icon
- Icon and Title
- Drop-Down List
- List
- Long Link
- Intro and List
- String
- Paragraph
- Intro and Paragraph
- Full Page
6.5.5 Link Element
The Link element is simply for creating links in Oscailt and integrating them into other Oscailt objects such as Menus.
Another example is they could be used would be to create a set of links for the site exported RSS and Atom feeds and then to include this set of links
in an Oscailt Listing object. The links themselves would refer back to corresponding sets of friendly URLs which would
map the actual object ids of the feedexport module instances to the URLs.
6.5.6 FilterBox Element
The FilterBox element is used for defining Filter objects that contain a series of drop-down menus for (story) topics, regions,
types and languages and as of Oscailt v4.0, it includes Tags as well. They would normally be displayed at the top of a Newswire and would be added to the
Page Layout object that a given Newswire Module is setup to reference.
The Newswire would need to have context Sensitive To Topics/Region/Type/Language/Tags options enabled in order to work with the selections made in the
Filter object.
6.5.7 Headlines Element
The Headlines element is really a smaller version of the newswire module. It is designed for displaying short headlines
including small thumbnail pictures and it is very useful for building front pages and side menus where you might want to have a couple of
sets of headlines covering different topics or regions since headlines can be made specific to these and other parameters.
6.5.8 User Preference Element
Fig 6.7: User Preference Box
The Preference element is a user specific object and it can apply to both ordinary readers and editors of the site.
It makes use of the inbuilt features of PHP for handling session cookies and is used for saving options on language settings, comments
display settings, text size and other similar types of fields. It includes a full page mode that displays a page where the user can select
and save these settings themselves.
The condensed view shown in figure 6.7 would typically be part of a side menu and has options for bookmarking and setting language and controlling the font
size. It will also have a link to the full page mode.
For editors who are logged in, it has extra options for displaying links to the administration pages and setting the mode of display of the site used for
interactive layout of objects. There are also links to the Admin page, editing your profile and to editor message board page.
In the admin page for configuration of the User-Preference module, there is some degree of control over the items displayed in the condensed form of the
user preference box as shown in figure 6.7
6.5.9 JavaScript Marque & Ticker Tape Element
This element object is used for defining a Javascript Marque otherwise known as a Ticker Tape. It mimics the display of the original Ticker Tapes which
is a moving text string.
The Marque/Ticker Tape will scroll story titles and through this element you can control the number of stories in the buffer and apply filters for topic, region,
type and language. You can control scroll direction, speed and the width and height of the Ticker Tape itself. You can even limit story titles to a maximum
number of characters. When it is complete then the object should be added to some kind of layout object such as an Inset Box, Container or the Vertical or
Horizontal Bar types. These in turn would be defined as part of Page Layout object.
6.6 Layout Element Objects
This section briefly describes the different Layout Element objects. These are used for controlling page and menu layouts. These are used with site modules.
For example if you create a Newswire Module then you create a separate page layout and reference the page layout from the Newswire Module which will determine
how it is displayed as a webpage. The Page Layout can be defined to contain headers side menus and a footer typically.
6.6.1 Inset Box Layout Element
The Inset Box layout element is a generic object that can be included almost anywhere. It tends to be used for
including code boxes for use as announcement banners but it can be used to create other useful features. One example
is to define an inset box to include a headline element that is sensitive to the author and then to display this inset box in an article
layout page. This means whenever an article is viewed, the definition for the (article) layout page now says to include this box
which will then give a short listing of other related stories written by the author of the current story.
Recent releases added these new options to Inset Boxes which were:
- Date Activation of inset box by date whereby a start and end date can be specified for making the inset box visible or active
- Enable Panel to control whether all included objects are display a set of panels or slides. This can be used for displaying a slide deck
of code boxes on a front page containing for example videos or announcements
- Panel Autoplay -Whether to display each panel automatically after a few seconds.
- Enable Collapse -Whether the Inset Box should be initially not displayed -hidden by JavaScript
- Collapse Mode -the various modes control whether the Inset box is displayed, hidden or only displayed a certain percentage of the time
These new options greatly enhance the layout of pages making this an important layout component. For example the panel mode allows a set of images
and videos to be displayed in a type of slide deck on the front page by including sets of CodeBox objects with each one
containing a video and or image. See 6.5.2 CodeBox element for more details on that.
6.6.2 Container Box Layout Element
The Container layout element is a generic object very similiar to the Inset Box and was primarily introduced for stacking
multiple document objects to overcome the 64k limitations for document content size.
6.6.3 Listing Layout Element
The Listing layout element is used primarly for creating a list of links to other parts of the site to go into one
of the side menus. It is a useful way of grouping sets of links together so that they can be re-used in the construction of other
menus. So for example you might have a set of different types of newswires like breaking news, press releases and events.
It has an option to display the list in a HTML ordered or numbered list or none at all.
The available display modes are:
- Short Title
- Icon
- Icon And Title
- Long Title
- List, without title
- Title and List
- Long Title and List
- Full Page
6.6.4 Horizontal Bar Layout Element
The Bar layout element is used for creating horizontal components for the page layout which can contain images, links
and other items. It is described above in Section: 6.4.2 - Layout of a Horizontal Menu Object .
6.6.5 Vertical Bar Layout Element
The Menu layout element is used for creating menus typically containing links, icons and other items.
It is described above in Section: 6.4.3 - Layout of a Vertical Menu Object .
6.6.6 Page Layout Element
The Page layout element has already been partially covered above in
Section: 6.4.1 - Layout of a Simple Page. Each website will have at least three or four page layouts.
These would be for front page, general newswires, article viewing page and help pages. If a module is not associated with a page layout
object then it will appear bare and have nothing surrounding it in the form of headers, menus or footers.
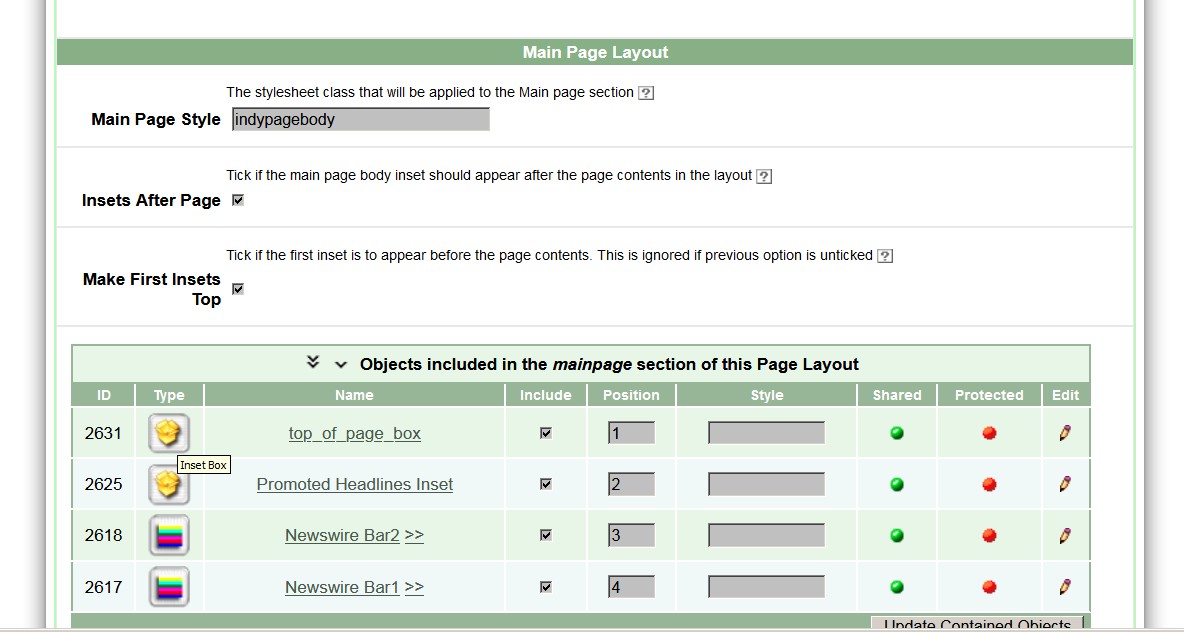
Fig 6.8: Page Layout options for Inset Boxes
There is a slight problem with designing the first page layout because you need to have menus, listings and other Oscailt components
defined first before they can be assembled into a page layout and for modules like newswire and article where the link to the page layout
is made the page layout needs to be already defined for a given page layout to appear in the drop-down list of page layouts in these
modules when linking them together.
Page layouts have can include Inset Box layout elements in the center or main body of the page layout where the main content
will normally appear. This is the content from the object that is referencing the page layout. However, you can include more than one and recent releases give
the option to specify the first one appears before the main content and the others after. Thse options are shown in figure 6.8 and an example of the
capability it gives is where the first inset box might include a panel of video slides and the second inset might includes collections of headlines objects.
This would then appear in the order shown in the example layout in figure 6.9
| |
| May include a banner image and or a menu horizontal bar |
Optional Vertical
Side Bar
with links
search
and other options |
Top Inset
Could be:
Slide Panel of Embedded Videos
Announcement etc
|
Page Content
Can be:
Newswire
Article(s)
Event listing
Document etc
|
2nd, 3rd Insets etc
Examples:
Headlines
Specific Headlines etc
|
Fig 6.9: Page Layout with one Inset at top and all others after page content
6.7 Site Modules
This section briefly describes Site Modules. These objects are used to add capabilities to the site and each module does specific tasks. For example you
could have different types of Newswire modules. Some might be for displaying Press Releases others for Breaking News. Then there are separate modules
for publising, contact forms, article display and so on.
6.7.1 Feedimport Module
The Feedimport module is used for importing RSS and Atom feeds. Most Indymedia sites provide RSS/Atom feeds of their
features or newswire pages. Through the use of this module the feeds from many sites (one per module) can be defined and these
can be grouped together with Oscailt lists, menus or other ways and displayed on the site.
The Feedimport module allows a lot of control over the feed in terms of how often it is retrieved, whether it is
decoded as UTF-8 or not, language filtering, the feed type which can be RSS 1.0, RSS 2.0, Atom 1.0 or Atom 2.0. Then there is a list
of attributes like date, description, image, language, icon, content, author, headline that can be selected to be displayed or not.
For headlines and content the maximum headline length and image dimensions can be specified too. There are four modes of display
and these are:
- Link
- Headline Listing
- Title and Listing
- Full Page
6.7.2 Feedexport Module
The Feedexport module is the method by which Oscailt exports it's own feeds and it provides three methods. These
are RSS 1.0 or 2.0 and Atom 1.0 or 2.0 and the third is as a JavaScript feed.
The first two methods are XML standards that are widely recognized and supported. The JavaScript feed is a way for a user to add
a small piece of JavaScript to their own webpages and to receive feeds from Oscailt although they are more limited than the other
methods and images cannot be provided with this method.
This module gives you the ability to setup multiple types of feeds and from the various parts of your sites. So you could have
ones for features, the newswire and even events.
Some of the options available with this module to control what is exported are use of an icon, logo, title, description, license
string (i.e GPL), feed length (number of articles), summary length, format -plain or HTML, various itune attributes such as category,
author, owner, owner email, title, subtitle, keywords and image.
The URL of the feedexport is controlled through the separate administration task of defining Friendly URLs. See
Section: 5.3 for details of this.
6.7.2.1 Exported JavaScript Feeds
In the case of the JavaScript exported feed, Oscailt effectively generates a JavaScript file which can be included
by other websites which then call the functions in that JavaScript to display the contents of the feed. To set it up in the feedexport
module, the type is set to Javascript and all other details are filled out. Then in the Friendly URL edit administration
page, a link something like newsfeed.js should be generated and that is all that is needed on the Oscailt side.
Then on the website that is going to import the feed, it just needs to include two pieces of JavaScript. The first is to include the
above newsfeed.js and the second is to call functions in it, which will cause it to be displayed. There are two basic formats available
which are marquee and a table. For the marquee which is a scrolling display the JavaScript code
to add in the webpage would be:
<script src="http://www.indymedia.ie/newsfeed.js">
</script>
<script type='text/javascript' language='JavaScript'>
writeStoryMarquee();
</script>
For more examples, see the page on Indymedia Ireland JavaScript Examples
6.7.3 Newswire Module
The Newswire module is used for creating different types of newswires. For example you might have a separate
newswire for each story type such as news, press releases, opinion & analysis, other press and events. You can further break
that down by language, region and topic if you so wish. This module contains a large set of configuration options from specifying
surrounding text, to whether attributes like author, date, attachment count, comment count, summary, subtitles and so on are displayed.
This would be one of the most important modules since most sites are going to be centered around a newswire or set of them. The
Headline module is strongly linked to this because the display configuration settings apply and the headline module
merely controls the headline display mode of a newswire module.
The set of display modes available are:
- Short Title
- Icon
- Icon And Title
- Long Title
- Headlines Listing
- Headlines Full List
- Full Page
6.7.4 Featurewire Module
The Featurewire module is used for creating newswire consisting of featurized stories. This would would typically used on
a front page. While the module by default will display features in a listing like an newswire it also has an panel mode where it can
display a single feature at a time with navigation buttons and links to the other ones in the 'buffer'.
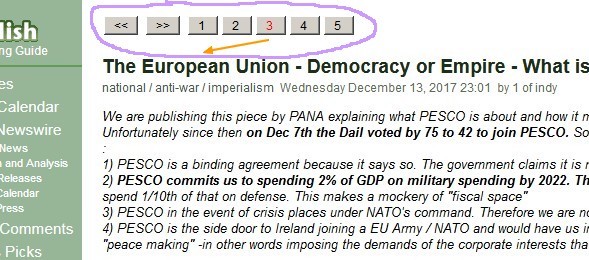
Fig 6.10: Example of panel mode for the featurewire module
The option is enabled by the Buffer Stories in Pane checkbox in the section under the Content Limits heading.
In this case the Page Size option determines how many features are stored in the panel buffer.
Similiar to the newswire module it has options to filter by topic, region and language and allow for sticky features as well as configuration
options from specifying surrounding text, to whether attributes like author, date, attachment count, comment count, summary, subtitles and so on are displayed.
The display modes available are:
- Short Title
- Icon
- Icon And Title
- Long Title
- Headlines Listing
- Full Page
6.7.5 Article Module
The Article module is used for controlling the display of all article types although events have an additional mode
where they are displayed in a calendar too. There are many aspects to controlling how the page is displayed and what is displayed.
In general each article has an author, date, title, subtitle, summary and contents. There can also be attachments in the form of
photos/images, audio & video files and embedded audio and video. Then there are the comments which can also include the same
types of attachments and some of these may be hidden.
The article display has to handle all the editorial options for edit, hide, unhide, upgrade to feature, lock, delete and annotations
and it is optional whether to display these extra icons and links for a given article layout object.
There is only one display mode which is full page mode.
The title of each article is limited to 255 in length but this will be less for languages where HTML entities are automatically
encoded like Greek. For example an HTML entity coding for one Greek character normally uses 6 characters, therefore a story published in Greek
is likely to be limited to having a 255/6 or 42 characters in length.
6.7.6 Comments Module
Oscailt provides a mechanism to display the latest comments posted and the Comments module is
designed to do this. It is a useful page to have on a website because it gives an indication of which stories are most popular
at the moment. The configuration of the module allows for surrounding text and labels and the placment of links and filters and
of course linkage to the page layout for display. In most cases it is likely that only one instance of this object or module will
need to be created per site.
6.7.7 Gallery Module
The Gallery module was primarily designed for displaying photos although it has been extended to include additional
modes to create galleries or lists of audios and miscelleanous uploaded files like PDF documents. It has an embedded video gallery
mode where the cover images of embedded videos (for BitChute, Vimeo and YouTube vides) are displayed in the same form as photos.
In all cases the displayed items also act as links to the stories or comments where the attachments were originally posted from.
The gallery module has a banner mode which is very useful for presenting a series of photos in the header of a page and it
includes a buffer mode whereby you load for example 10 (thumbnail) photos to the page and just display 4 and through the use of
buttons and JavaScript, the user can scroll through them. There is an option to specify whether to only include featurized
photos. These are photos which editors have specifically selected to be featurized photos.

Fig 6.11: Example of Gallery Banner of Featurized Images in Header
The full set of display modes available are:
- Short Title
- Icon
- Icon And Title
- Long Title
- Banner -includes buffering mode
- Menu Listing
- Full Page -items displayed in a matrix of rows and columns
Figure 6.8 shows an example of a photo banner mode of featurized images in a header generated by the Gallery module. It is enabled for
buffering and the scroll buttons are visible. The gallery module automatically generates the Javascript code for this.
There is an option in banner mode to display just one image at random. The idea is that this would be use for a larger image and by setting the page size to
for example 4, then each image has a 25% chance of being displayed. And this is controlled through the javascript and so each page hit can result in a
different outcome or display.
6.7.8 Archive Module
The Archive module basically displays a calendar with links for each day and week back into the configured newswire or
feature module that it is linked to, to display either the contents of the newswire or features for those dates. A gallery module can also be configured to
support the gallery mode of the archives. Most of the other configuration parameters are text and labels to allow for easy translation.
It also provides navigation through previous years and months.
In Oscailt 4.1, a new option was added to the archive object that allows it to be configured to display a headline listing of all features for the current
selected year in feature mode. It is not expected to handle more than 100 features per listing and would need paging if any larger
6.7.9 Event Module
The Event module is used for display stories classifed as events in a calendar and it allows configuration control of
mainly the surrounding text and labels used. The display aspects of it are described in
Section 4.5: Events and Events Display
6.7.10 Publish Module
See Section 9.2: The Publish Form
6.7.11 Contact Module
See Section 9.1: Contact Form
6.8 Defining a Site: A Collection Objects
Oscailt has the concept of different sites where a site is a collection of objects. The original idea was to help with the design and modularity
of setting up sites. For example if you have a lot of imported RSS and Atom feeds, then these could be defined (in objects) that belong to a second
site and where the first site would consist of the main layout of the site. For an Indymedia site this scenario could easily arise because you may
wish to define the many different imported feeds from other Indymedia websites.
The advantage would be if there were several Indymedia sites using Oscailt because the 'imported feeds' site could be exported and imported by the
other websites and save on the considerable effort in setting these up. There may be other reasons for creating different Oscailt sites.
Another advantage is that a different set of editor permissions and roles can be assigned for the different Oscailt sites as this could also be
useful in certain circumstances.
6.8.1 Oscailt Site Settings
In Oscailt each site can be assigned certain settings that apply to all objects in that site. Some of the settings like Site Notice and
Site Footer, displayed by Oscailt are not actually used or implemented. The categories filter allows you to limit certain categories in
a given site. The Principal Modules of this site are used for setting up the object links for some of the navigation between
objects and these need to be set after you have created a few basic newswire, article, publish, contact and page modules.
- Use default or customised CSS
- Categories filter for topics, regions, types and languages.
- Principal Modules of this site.
- Newswire Module
- Article View Module
- Feature View Module
- Latest Comment Module
- Events Calendar Module
- Gallery Module
- Archive Module
- Publish Module
- Search Module
- Contact Module
- Layout Module
- Notifications levels (none, low, medium, high or all) for
- Site Updates to Site Objects
- Editorial Actions
- Notification email settings -to & reply address and subject prefix
7. Language Translation
There are several aspects to language translation in Oscailt and with version 3.x a fairly big effort has been made
to make it easy to translate most of the text strings visible on the public site and to translate some of the administration
screens. This has been done by allowing much of the text to be configurable through XML files. This is generally the standard
way in software of doing this these days.
There is also a mechanism to try and tie translated stories together. The idea is that if you have say a story
in English and a French version too, then you want to say that story X is a translated version of story Y. Oscailt
allows you to create a link between the two and when either story is displayed, it shows the link for the other and
indicates the language too. The translate option that appears with the other editorial action options is the mechanism for tying translated
stories together. See section 7.9 for more details.
7.1 Defining Languages in Oscailt
Languages in Oscailt are defined by adding entries with the Edit Languages administration page and
these get stored in the language table which stores the language id, name and code.
When a page is requested, Oscailt tries to determine the language by seeing if the variable userlanguage
is set in any of the $_GET, $_POST or $_REQUEST variables. If not it will try and use the value, (if set), in the
HTTP header via $_SERVER['HTTP_ACCEPT_LANGUAGE']. This means that you can override your browser language setting
if say it was set to Spanish, by adding 'userlanguage=en' to the request URL to request an English version of a
page.
In general Oscailt will then use the language two character code to look for language specific files in the
object cache to serve back the appropriate language version page. This requires that they have been generated
in the first place in the Oscailt administration and layout interface. For more about this, see the sections
that follow.
7.2 Master Pages, Language Specific Pages: How to Translate Oscailt Public Pages
The Oscailt public (layout) pages can be translated by having language specific instances of each module where you just enter
all the information requested (e.g. for labels and text strings) in that particular language. You can do this
from the Oscailt administration layout pages. It is first necessary to have added the language to
Oscailt via the Edit Languages administration page. These instances are then stored in the
database in the DATA_OBJECTS table. So for example if you had an English, French and Spanish version of (module)
object 54, the entries in DATA OBJECTS for the OBJECT_ID and LANGUAGE_CODE would be:
     OBJECT_ID   LANGUAGE_CODE
     54          en
     54          fr
     54          es
As part of this mechanism to support languages, Oscailt has introduced for each object type, the concept of a
master page and then individual language specific pages. The master page can also serve as a type
of reference and there is some overlap between this functionality and the language specific functionality.
Internally for every instance of an object created; a single entry is made in the MASTER_DATA_OBJECTS table and
then as described above, for each slave or language specific version of that object there are entries in
the DATA_OBJECTS table. So if there is only one language in use, then the number of rows in each table will be
the same.
There may be some confusion between language versions of the modules themselves and language versions of the
administration screens for configuring each of the modules. For the latter see the section
7.3.1 Language Versions of Administration Layout Pages below as the method used for
translating these is slightly different.
Note: There may still be a few strings in the modules that are hard coded in English and later
versions of Oscailt will have to deal with these.
If you plan on using character sets other than the default character set iso-8859-1
then see the section on 7.7 General Language Support Background and
7.8 Unicode Support below on why this is not so easy and would require lots of changes to Oscailt.
7.2.1 Default Language
If you want to make the default language anything other than English, then the existing XML files in
xmldata/*.xml and xmldata/indydatatypes/*.xml can be translated directly.
To specify a language default other than English, you need to edit the file config/systemconfig.php and change the line:
$oscailt_basic_config['default_language_code'] = 'en';
to say French, it would be
$oscailt_basic_config['default_language_code'] = 'fr';
Changing this configuration value, will trigger Oscailt to use the appropriate language translations for date related strings in the Events and Archive
calendars.
7.3 How to Translate Oscailt Adminstration Pages
The administration pages can be divided up into two groups. The first group consists of all those admin pages for things like
statistics, logs, editing topics, regions, types, IP blocking, user messages, friendly URLs and so forth. The second group is made
up of the site layout pages for each of the different modules like picture boxes, links, static pages, newswires, search modules, publish
modules, vertical menus, inset boxes and page layouts and so on.
These administration pages do not have full language support as this is still in progress as of version 3.5 and about 80% of the
administration pages can be translated at this point.
Finally there is a third set of items which are translatable but which are not full pages and these are the set of editorial
actions that appear over a story or comment like hide, edit, delete, unhide, swap, clip and so on. These can also be translated.
The individual administration screen/pages that are translatable have their correspondng XML files in the
xmldata/*.xml directory.
The main files where text exists that needs to be translated are as follows:
- xmldata/itemcache/*.inc -contains 'actionData' strings that are used by editorial actions and icons.
- xmldata/universal_config_options.xml -strings used in the main administration page.
- xmldata/site_management_options.xml -strings used in the main administration page.
- xmldata/editoroptions.xml Apparently not used
- xmldata/indydatatypes/*.xml -Module layout pages.
This covers some of the following areas:
- Administration Pages -includes menus, titles, headings, links etc
- Headings, action text etc in public side of site.
- Administration layout pages.
When changing these files, rename the translated file to contain the two letter language code. So translating
xmldata/universal_config_options.xml into French, then you should have a file name:
xmldata/universal_config_options_fr.xml
And as before remember to modify the language code in the first line or two to the correct value. For example:
<indyItemSet language="fr" name="universal_config_options">
Likewise for the editorial action pages xmldata/itemcache/hide.inc in the French version would
be xmldata/itemcache/hide_fr.inc.
7.3.1 Language Versions of Administration Layout Pages
As mentioned above, the main files where text exists that needs to be translated is as follows:
- xmldata/indydatatypes/*.xml
These files contain all the labels, titles and description text strings for the different modules such as
article, newswire, comments, features etc display modules. To create for example a language
specific version of the administration layout page for the newswire module, in say Spanish, you need to have a
Spanish version of the newswire.xml file.
Then when Oscailt recognises that a browser's language is set to Spanish it will automatically display those
versions by looking for XML files with the 'es' suffix.
So for this example using the language code es for Spanish, you need to create a XML file (for the
newswire) with the name:
- xmldata/indydatatypes/newswire_es.xml
And in the first line, one must remember to change language code to es. The English versions
will have en here instead.
<indyType type="newswire" name="Newswire Module" language="es" version="1.0">
To translate the other modules, a similar pattern is used and for other languages, you use the languge code
in both the filename and within the file for the language code. It is important to make sure that it corresponds
to the language code that is configured in the Edit Languages administration page and it makes sense
to use the defacto standards such as fr for French, de for German and so on.
There may still be a few strings in the modules that are hard coded in English and latter versions of Oscailt
will have to deal with these.
Note: Sometimes the two letter code 'ca' is used to denote Spanish instead of 'es' although doing that leaves you no
code to use for the Catalan language.
7.4 Translation of Topics, Regions and Story Types
From Oscailt v3.5 onwards, it is possible to translate topics, regions and story types into any of the defined site languages. The option to
do this appears in their corresponding administration screens when you select to edit the name. If you add a language to the site it is advisible
to fill in the values for that language for each topic, region and story type even if initially the values used are the same as the default language.
Otherwise the item may not appear in the dropdown list in the newswire filters or even in the publish form for the language specific instance of
that module.
7.5 Translation of Calendar Days of Week and Month Text String and Numbers
By default Oscailt has translations built in of the most popular languages for the days of the week and month text strings and for the first ten numbers
which are used in the numeric captcha optionally configurable in the publish form. To update these to extend to other languages simply edit the
objects/languagedates.inc file and follow the pattern there.
7.6 Translation of Editoral Actions
The editorial actions are those shown in Fig 4.2 for actions like: clip, edit, hide, lock stick etc. The
text for these and the descriptions shown when the mouse is put over them comes from the set of files in the xmldata/itemcache
directory where there are PHP files for each action such as clip.inc, edit.inc, hide.inc, lock.inc etc and then there are
language specific ones such as clip_en.inc, edit_en.inc, hide_en.inc, lock_en.inc etc.
Thus to translate these into other languages like French or German, you would simply copy the existing language specific versions to ones with the endings
of _fr.inc and _de.inc etc for each file and simply edit the file and translate the text into
the appropriate language. The language code would match the language code configured for Oscailt language configuration.
7.7 General Language Support Background
This section covers how other character sets could be used to support a wider range of languages but unfortunately Oscailt currently does
not support them and it would require a lot of work to do so because many of the string functions would have to be changed and the
database character set may have to be updated too.
Language display and character sets are quite a complicated thing for a php site.
In most cases the Latin character set should be enough for most if not all Spanish character sets, but generally
UTF-8 is the best choice for any multilingual application.
To get it working correctly, you need to:
- Make sure the database is using the correct character set and
- Make sure our script (php) is reading the data correctly.
- Make sure the Web Server is sending the data correctly.
- Make sure the HTML page is displaying the data correctly.
- Make sure any HTML forms send entered form data back correctly.
- Make sure the script (php) sends new data to the database correctly.
- Make sure the database stores new data correctly.
If you go wrong at any point the data will end up getting messed up.
You can tell what the web server is using by checking a page downloaded from it and in the case the FireFox browser
right click and View Page Info and look for Encoding which may well be set to
UTF-8. To find what the HTML is using, one can view source and the HTML may have a line
something like, but there is no guarantee that it will be set.
<meta http-equiv=Content-Type content="text/html; charset=iso-8859-1">
To change this to UTF-8, then the header needs to be changed and in the case of Oscailt, this would require changing
the file header.inc to:
content="text/html; charset=UTF-8"
Make sure that this meta tag is before the <Title> tag in the HEAD section.
The rest is tricky. See the links to language resources in the next section.
Note Oscailt does not used UTF-8 yet.
7.8 Unicode Support
It is planned to use Unicode for multi language support by Oscailt sometime in a later release. This would
enable for all languages simultaneously.
However, this requires changing the code to use the multi-byte string functions in
PHP which is implemented in the PHP module mbstring. This is not installed
by default. These are essentially replacement functions for all the text functions in PHP.
Moving to Unicode would mean adopting the UTF-8 character set throughout Oscailt including the
MySQL database. This would mean all pages served would use the UTF-8 character set and all form input, RSS feeds
and data storage as mentioned already.
It is very likely that hosting server would have to have PHP 5+ installed as any earlier versions
could potentially create too many problems. Also carefull consideration would be needed for migrating data on
existing sites especially if any of this data is stored in any character set other than the (default) ISO-8859-1.
For more background information and resources on UTF-8 and PHP, see the links below.
7.9 Text Not Easily Translated
Clearly the code is written in English as are any of the comments. The code also contains some, but not much
debugging messages. It has quite a few error and log messages and all of these are embedded throughout the code.
There would be no easy way to make these configurable for the sake of translation. Another area of the code is
the numerous references to types, options and meta-data. Often these point to the values of particular entities
which themselves are available for translation and will be automatically picked up if the language settings
provide it.
The set of files in html/objects/indyruntime/*.inc which deal with the display
side of most of the module classes also contain a fair amount of displayable strings that should be
translated but at the moment are not separated out, into a form that would make this task relatively easy.
7.10 Linking Translated Stories Together
To translate a story, simply publish a new story with the translated text of the original. At this point an editor
who is logged in, can click on the "translate" link (found alongside other editorial action links) in the story display page
and add the story id of the translated version. Now when the story is display again, it will automatically display a link to this translated version.
The link works both ways and for a site with multiple languages you can link to the multiple languages, one at a time but the software
then will generate all the links.

Fig 7.1: Example of the Translate link to link to a link a translated version of the story together
In the "Debug Articles" administration screen there is a way to list all the translated links for a given story
as sometimes it is not clear what is going on and these allows you to figure it out.
8. Editor Roles and Permissions
8.1 Overview
In Oscailt 2.x, if you were an editor of the system you then automatically had the same permission as everyone
else and could do any administration task, which basically was configuration, hides/unhides, deletes, edits,
feature upgrade and downgrades and whatever other things were possible.
With Oscailt 3.x this was expanded by introducing the concept of roles or levels of permissions. These work by
assigning one or more roles to each Oscailt user account. You can define a role for different types of users and
then easily assign and maintain these roles, otherwise you would have to keep track a lot of different permissions
for each user. Therefore it is important to clearly name and describe the roles otherwise it can make things even
more confusing and complicated.
8.2 Permissions
Roles are collections of permissions for different components and types of actions on the site and there are 3 types of permission which are:
- No Access
- Read Access
- Read & Write Access
8.3 Roles
This scheme is made even more flexible because roles are divided up into one of three types. These are:
- Administrative Roles
- Editorial Roles
- Site Builder Roles
The roles are then assigned to users according to different sections of the site.
From an administration point of view (for the Indymedia site) there are 3 areas. These are:
- Administrative Roles -contains only Administrative roles
- Site 1 - News site Roles -can contain either Editorial and Site Builder role types
- Site 2 - RSS Feeds Roles -can contain either Editorial and Site Builder role types
It is possible with Oscailt 3.x to add further 'sites' which are basically different sections of the site
that are divided up for ease of layout and maintenance.
So to help explain this further, we might have 3 types of users. Lets say we have an Administrators (admin_user)
with access to everything, a site moderator (mod_user1) who can hide, delete, edit and featurize stories and
a feature writer (feature_user1) who writes just features. Then for this example, we might define 3 roles as:
total administrator, full editorial, moderator and a
feature writer. We then would assign the roles to user as:
- admin_user -has Total Administrator and Full Editorial roles
- mod_user1 -has Moderator role
- feature_user1 -has Feature Writer role
and in turn Total Administrator will be given permissions for all Administrative and Site Builder
roles while the Full Editorial role would contain all the permissions for editorial actions (like
edits, hides, deletes). The Moderator role will most likely be only given permissions for Editorial roles
and Site Builder sections. The Feature Writer will most likely be given a smaller subset of permissions within
the Editorial role only. For example they would have permission to edit and see hidden features, but not to hide or
delete comments.
8.4 Granting of Roles
Only an administrator will have the permissions to allow the granting of roles to other users.
Each user can view their own roles (assigned to them) when they click on the edit self link when editing their own profile.
See also 5.6 Edit Editors and 5.7 Edit Roles.
9. Contact and Publish Module Specifics
9.1 Contact Form including Reported Posts
The contact form is the basic contact form module and is currently used in two basic modes to act as a basic
contact form and to act for the reported posts facility.
As with the other core modules, the contact module needs to be specified in a page layout to control where and
how it is displayed. For example whether it will have top menu and banner and side bars. The configurable
parts of the contact form are controlled via the XML in the administration site layout section.
(See Figure 5.1).
In the Contact Form object you can specify some key parameters for the form are listed below:
Similar for other modules as outlined above.
- Short and Long Title
- Notice at top of page and bottom of page.
- Introductionary text.
- Form header text.
- Text for the 'Name', 'Subject' and 'Contents' field
- Email address to send contents of form.
- Setting for email reply address.
- Whether to log emails. Useful when anti-spam measures are in place because if the email is automatically
rejected, a copy will be in the log and now and again legitimate emails will be caught in it by failure of
the anti-spam measures.
- Text for the 'AntiSpam' field
- Text for the 'Submit' button
- Option to enable Preview mode -added in release 4.0
- Text for the 'Preview' button for preview mode if selected
The contact form has had extra functionality added to it to improve the validation and to implement anti spam measures. Dealing with spam is a moving target
and this area needs to be continually updated. Also added are configurable options to log requests that have been determined to be spam and when
operating in reported post mode, it will log these requests in a special format that can be viewed by the view logs page from within
the administration side of Oscailt.
As of Oscailt v3.6 there are further options to change the size of the contact form field sizes.
For the contact form to work email must be enabled on the server. It may also mean you need to setup your DNS to handle email to or from your site domain name.
9.1.1 Reported Posts
The reported posts is the facility whereby a (public) user can from any story or comment click on a icon which
will bring them to a contact form with the URL and title to that story and or comment pre-filled and enable them
to report posts that they think break the guidelines or whatever. When this form is submitted, it is then
emailed to the pre-configured email list. There is an option to log these to a file also.
9.2 The Publish Form
9.2.1 Overview
The publish form module is another example of a relatively standalone component of Oscailt and
is relatively easy to modify. However the key to understanding and making any changes to it, is to realize
that it does a number of things and works in various modes. There is the initial edit mode, where data is entered
into fields for the first time, and then a preview mode which previews the data entered so far and allows for
further editing of the form fields.
The publish form is also used by Oscailt editors when logged in to edit stories, features and comments and it
must therefore be able to read the contents of a story or comment and preload the appropriate fields.
The publish form also works in another mode where it can accept input for uploading files. In this mode, one
cannot proceed to the preview mode because of the nature of the HTML form field of type file which does not
allow the value to be set by the browser in advance or by Javascript as it would be a big security hole. This
means on the preview cycle, the form can't remember and then refill this field with the filename.
Then as a further complication, depending on whether story or comment is being published, not all panels or sections are displayed, with
comments having fewer fields to fill in. Because Oscailt allows editors to edit stories and comments through use of the publish form, this means
that it has to be able to distinguish between the a new story or comment and the editing of an existing story or comment.
And lastly in Oscailt v3.5 the codebase has been extended to allow the public to edit their own stories for up to
a hour or two after it was initially published. This makes use of the session data to ensure only the original publisher
can edit the story besides Oscailt editors.
9.2.2 Publish Form Custom Tags
The publish form field for editing story or comment contents has a number of Custom Tag buttons above that part of the form which can
be used for helping with basic editing and are shown below in Fig 9.1

Fig 9.1: Example of the Publish form Custom Tags for basic HTML editing
The custom tags were added because over time two attempts were made to add third party HTML editors to the publish form but they never really worked properly
so the solution was to create our own basic set of tags to provide basic HTML editing and over which there was full software control.
The tags added can be used to: bold, italics, underline text, add paragraphs, change font size, as well as quote, blockquote,
generate a bullet list, URLs and add line breaks and insert an Euro and half symbol. You can also cut text. There is a feature when the story already contains
either images or embedded videos to insert Oscailt macros for these at the cursor postiion.
The custom tags are quite powerful given the overall limited set, because if you highlight say two or three separate blocks of text, it can detect the
presence of blank or empty lines and when using the P (paragraph) button it can add the HTML paragraph tags to make a paragraph for each
text block. It can do more or less the same for multiple lines using the BR button to add multiple line breaks on each natural line.
9.2.3 Story Types, Topics, Language and Region
When the publish form is in "story" mode there is an option to categorize the story according to the type, topic, language and region . These
are all configured elsewhere as described in section 5.5 Edit Topics, Regions, Types and Languages
and in the publish layout you can restict any of these fields although it is probably unlikely.
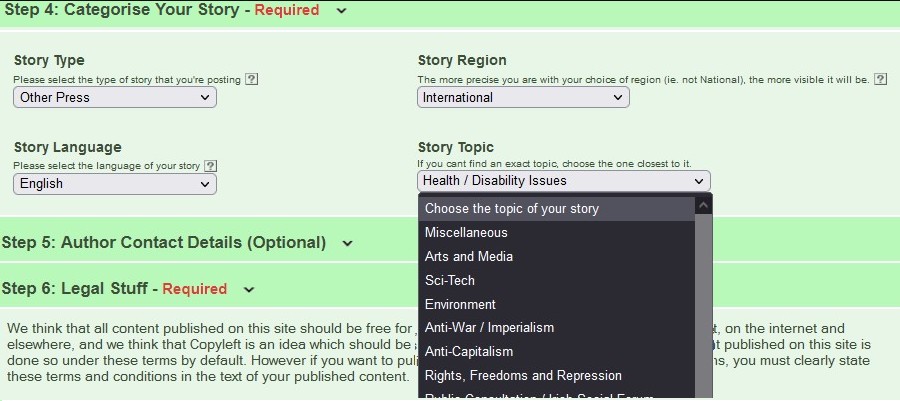
Fig 9.2: Publish Story Categories
9.2.4 Adding Embedded Videos and Audio
Regular video and audio files can be uploaded in the same way as images / photos but given embedded video are so popular, Oscailt can add these too to a
story or comment. Originally YouTube was by far the most popular but due to increasing censorship by them, a whole range of other video hosting sites
are growing in popularity. The list of supported embedded videos is listed below.
The general idea to using an embedded video is simply to specify the type -e.g. Youtube, BitChute etc and then add the unqiue Video Id. Once
published then Oscailt does the rest in displaying the video because each type has a standard way of doing so. The preview mode should confirm whether
you have entered the correct video Id.
The supported embedded video types currently are:
Youtube, BitChute, Vimeo, BrandNewTube, Rumble, Odysee, Brighteon, Google video, Veoh, Dailymotion and a few others less well known.
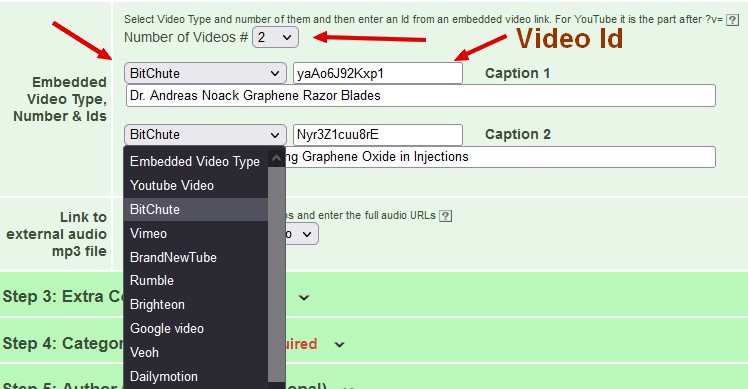
Fig 9.3: Publish Embedded Video
9.2.5 Language Related Aspects
As with most objects or modules in Oscailt it is possible to update all of the strings so that if you have a multi-language site or even a site
using a language other than English, then it is possible to entered the translations for almost all of the text strings that you see in the
publish form. The controlling files work as follows -and this is broadly similar for other modules as outlined above.
- xmldata/indydatatypes/publish.xml -This file contains text strings for all the publish object fields
displayed in the page layout for this option and includes strings appearing in the actual publish page.
This file has to be modified if new functionality or other options are to be made available in the module definition. For the publish form,
this is quite a big file compared to the other ones because of the large number of items.
- objects/indyobjects/indydataclasses/indypublish.inc -This is used
during code cache execution to populate the various arrays of choices and options made during the module
definition for a particular instance of this class.
- objects/indyruntime/publishdisplay.inc -This file implements
the bulk of the publish form functionality. It handles the display and all related requests such as
when the form is submitted and then the validation and final sending of the email. The configuration
and associated string objects which are contained within the code cache file for that object are read
from within this.
See also section 7. Language Translation
9.2.6 Publish Configuration Parameters
The form has quite a lot of module and system configurable parameters to check, because a (publish) form can be
configured to enable or disable the publishing of images, audio, video and miscellaneous file types and can control
the maximum file sizes of each and the number. In addition this can be specific to stories and comments.
Most of the other form fields are also configurable as to whether they appear or not. All of the text and titles,
prompts, headings and help tips are also configurable at module level (through the admin site layout screens).
This is to facilitate both multiple languages and customisation.
Stories and or comments published can also be configured to be automatically hidden and even publishing itself
can be turned on or off for the public but remain active for editors, which makes for a very versatile system.
When a form is submitted for preview there are multiple checks that have to be made from validation on all the
fields to ensure that they are filled in, checks for banned IPs, checks for a valid publishing token, to edit
lock checks and checks on attachments sizes.
10. General How To Section
10.1 Overview
This section covers things that do not fit in any one category and span multiple features of Oscailt.
Examples are how to setup newswires, razorwires, fundraising graphs, menus and help pages. It can be used
for trouble shooting problems.
10.2 How To Create Razorwires / Announcement Boxes
Razorwires or announcement boxes are those boxes or banners you often see on websites announcement some important
upcoming event or perhaps latest breaking news.
In Oscailt, you can create these, although they are a little tricker. The best way is to have a set
of razorwires pre-made, so that when an important story breaks or event is happening, you can just update the text
in it and quickly make it live.
In Oscailt, a razorwire is essentially a box in a box, set in a page. What this means is that you need to create
a CodeBox, then place this in one of the Inset objects which is just another
box and then include it to one or more pages. This way you can control whether it just goes on say the front page and or the events page and so on.
To include an Inset box in a page, you need to edit that page object and under the middle column section you can select the Inset box.
In fact you could add it to either the right or left hand columns, but it would not make sense there.
The idea of the Inset box is to allow you to stack them together and easily swap them in or out. So lets suppose
you want to advertise a big protest next month and at the same time have another razorwire either above or below
it with your fundraising box, then in that case you just include the two separate CodeBoxes for the protest and the
other for your fundraising in the Inset box. Once the protest has passed, you can drop it out of the Inset box
and nothing else is required. You still have it in the background but not displayed, and you can just change the
text for the next big event.
10.2.1 How To Make Razorwires / Announcement Boxes Date & Time Dependent
In Oscailt 3.4 a new feature was added to the Inset boxes wich allows you to make their display dependent on date & time.
Using this feature, you can simply enable date activation checkbox and specify and start date and an end date to control when the contents
of the Inset box will be displayed. Since a razorware is just a codebox sitting inside a Inset box, you can set things
up such that your important site announcement automatically appears first thing next Monday morning and remains visible all week.
10.3 How to Create Promoted Newswires
Promoted Newswires are simply normally newswires but with the option ticked to pay attention to the number
of votes that a story has. The rule is simple. If it has more than one vote, it gets included.
Promoted newswires have the word "promote-" prefixed into any of the style sheet classes used. You will need to
look at the source HTML in your browser to see what is meant, but the result is that you have to add extra style
sheet classes to cover the display of these. The best thing is to simply copy over the existing classes used for
normal newswires. After that it is just like any other newswire.
10.4 How to Create Menus
Menus come in two flavours, either vertical or horizontal. A menu can include a link or a list of links. List
of links can be generated by creating an Oscailt listing object.
You can stack (vertical) menus on top of each other. So you might have one for the different types of newswires
on your site, another for help pages, and another with links to a number of blogs. It is easier to just define
three separate menus and then add all three into the page type that you want them displayed in.
10.5 How to Create Help Pages
Static (unchanging) or Help pages are generated by creating Static objects in Oscailt. It is done this way to keep
things consistent rather than shipping Oscailt with a whole load of additional html pages. The Static object is
fairly straight foward and allows you to add regular html. Then you assign a page type to the page, create a
friendly URL to the object and call it something meaningful like "about_us" or "help". You then also need to add
a link into one of your site menus to this new page. In the Menu object you can include links to most types of
Oscailt objects including static pages. So you just do that, and it should work.
10.6 How to Create Fundraising Bargraphs
Oscailt contains a basic set of functions (or API) for creating bargraph for fundraising. The idea is that most sites
will want to do this and you will need a basic bar in two colours, one showing how much money you have raised so far
and the second color to highlight how much you need to raise. For example here is one below.
The way to do this is to make use of a CodeBox because from a code box you can add some PHP code and you need this in
order to generate the image of the graph.
This show shows how the API can be used to generate a fundraising type bargraph that will look something like this:
Sample Fundraising Appeal for 2010
Funding target is 1000 euros. |
| Funds Raised So Far 700 Euros |
|
The generated bargraph is a jpg image.
To use the API, just create a codebox object and add the following lines of PHP code:
	<?
        include("objects/generatebargraph.inc");
	$barGrp = new GenerateBarGrp();
        $barGrp->setTitle("Sample Fundraising Appeal for 2010");      ---Set the title
	$barGrp->setFundText("Funding target is");
	$barGrp->setWidthHeight(500, 120);                            ---Set width and height pixels.
	$barGrp->setBackgroundColor(200, 215, 255);                   ---Red, Green, Blue. Range 0-255
        $barGrp->setTargetFundColor(255, 144, 144);
	$barGrp->setFundRaisedColor(20,  160,  20);
	$barGrp->displayBarGraph(1000, 700, true,false);             ---Target funds (1000), funds raised so far (700).
	?>
Defaults are set for the title, width, height, fund text and the colours. So in the above example, only
the first two lines and the last lines are needed which are in bold are needed.
The last two parameters to displayBarGraph are whether to draw a compact graph and whether to make the image
a HTML link. The default link page is donate.php which means if you set this last parameter to true, then
clicking on the image will bring you to a "donate.php". The value for this link can be overridden by the
API call $barGrp->setLinkPage("donations"); There are a few other functions available
and it is best to look at the code which is in the file objects/generatebargraph.inc
10.7 How to Use Templates and What Are They For
Templates are designed to save you lots of work. If you look at the Publish object, there are
an awful lot of things to fill out and if you want to create a second type of publish form for some reason or another then you
would have to fill out all those fields again even though most of them are probably going to have the same values. The same might be
true for all the different newswire (objects).
So what you do is create say your first form and fill out the details and save the object. Then go back and save
the object as a template giving it an obvious name like "publish_template". Now it has saved all your values as defaults.
Then when you want to create another instance of the (publish or newsire for example), just select the option to
"Use Template" and select the template you just created and then click "create". Now it will go to the new page,
but you will see many of the fields pre-filled out, saving you a lot of work!
If you have imported templates from elsewhere then you can use templates to even create the first copy of your objects.
Templates are probably most useful with publish form and newswires because these contain a lot of fields to fill out.
See also Template Listing. Figure 10.1 shows an example of a set of templates for use
with creating new objects in for the Exported Feeds module because Indymedia sites can potentially have imported feeds
for over 100 sites and many will be similar in their object configuration parameters.
There is a template html file used when stories are upgraded to features to automatically fill out some basic html structure. For
more details see the section on template listing referred to above.
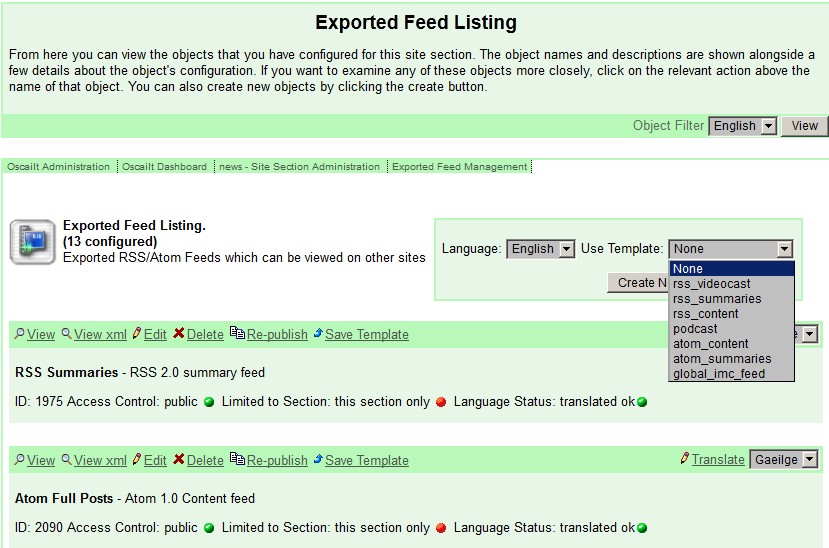
Fig 10.1: Example of Templates Usages With Exported Feeds Module
10.8 How to Turn On or Off Numeric Captchas
A numerical captcha can be switched on in the publish form. It is a basic anti-spam measure. Most of the time you may not
want to use it and keep it switched off but if the site is getting lots of spam you might want to turn it on.
You can turn it on or off separately for stories and comments. To switch it on or off, go to the publish objects
in the administration site layout section and edit the publish object. If you scroll down you will see the object to enable
these for either: stories, comments, both or none. Pick the appropriate choice then preview the object and then save it, remembering
to tick the box that is juat above the Save button so that it is immediately updated to the live site.
10.9 How to Control Publishing of Images, Audio and or Video for Stories and Comments
These are controlled separately for stories and comments and there are two main areas of control. There is a general configuration
which is set in the 'Edit Configuration' administration screen that is like a global setting to allow whether images, audio, video
or files can be published. These section also controls the upload size in megabytes (Mb). Usually you will want to modify this
depending on how much disk space your site has and the bandwidth available.
The second area of configuration is at the module or object level which means you can enable or disable publishing of these on
a per publish form basis. Typically most sites will only have one type of publish form, but in theory you can have a whole set of
different ones and all in different languages too and you could vary these settings in each one.
10.10 How to Generate Nice URLs
All the nice URLs are controlled through the 'Edit Friendly URLs' screen accessible from the main administration screen. For example
if you want to have a URL like: www.mysite.org/breakingnews you decide which newswire module this is going to be displayed by
and then you find that object id in the list on the Edit Friendly URL page, then edit it and add the word 'breakingnews'. You can have
multiple URLs pointing to the same thing. So for example you could also add 'breaking_news' and say 'latest_news'.
10.11 How to Schedule Reminders
You can set Oscailt up to post a simple reminder message to the internal message system for a certain date and time and everyone
logging in will be alerted to it. A typical use my be a reminder to yourself to pay your hosting bill and set it to trigger one
week before. You can also setup monthly or yearly recurring reminders too.
As of Oscailt v3.7 you can configure your editor profile to receive these reminders by email too.
10.12 How to Show List of Hidden Posts
There is a mechanism to generate a separate page that will list the most recent hidden stories and comments. The story or comment
title will be displayed along with the author and hide reason. Displaying the actual hidden stories or comments is a separate issue
and is not covered here.
The way to do this is not very direct and it requires that a CodeBox element with just one line of PHP is added
to do this. The reason is that all the editorial hides are written to a log file and the last part of this log file is read and
then formatted and displayed. There is an inbuilt set of functions to make this easy. The sample contents to add to a codebox is
given below. So all you have to do is to create a codebox and call it say hidden_posts, then add the text below, setup the codebox
so that it uses one of your page layout objects, create a friendly URL for it and you are done. You will of course need to tick the
box for 'update to live' site when you save the codebox object / module.
	<?
        include("objects/showhidelist.inc");
	?>
10.12.1 New Oscailt v3.5 Hidden Listing Display API
With Oscailt v3.5, this section of Oscailt has been upated to be more flexible and have extra functionality.
writeHiddenListing: Parameters: PageSize, Mode, Grey Period, Use Stipple for Background on Title
where:
- Page Size -is the number of items to display. A typical recommended value is between 10 and 20.
- Mode -is any of: 'comment', 'story' or 'both' which means to display a listing of either recently hidden comments, stories or both.
- Grey Period (seconds) -if this is above zero, then Oscailt will provide a link to hidden comment and allow to be display for the defined grey period of time. As the time progress, the background becomes progressively darker.
- Use Stipple - this is either true or false and if set it will set the background of the hidden comment display to a stipple making it hard to
read.
This new API is contained in the same file as above and so the same include needs to be done, followed by the API call with the correct parameters.
So in this example, the new API call is used to display the most 25 most recent hidden stories and comments, and readers get 2 hours to view hidden
comments but a stipple background is applied to the background of the comment title text.
    <?
    include("objects/showhidelist.inc");
    writeHiddenListing(25,"both", (2*60*60), true);
    ?>
10.13 How to Create a Video Gallery
Video galleries are like the image gallery except of generally embedded video since these are likely to be the most popular type of video
on any given site. For YouTube videos, Oscailt is able to retrieve the cover image and then display these as part of the gallery.
To create a video gallery, go to the site layout section of the administration pages and click on gallery module and then on 'Create'.
Fill out the details and select the display type radio button for 'videos'. The value for the page size should match the number of rows
and columns of videos listed. A good value to pick is 21 (=3x7). Once that is done and all mandatory fields filled out, preview the module
and then save. Then go to the Friendly URLs administration page and generate a friendly URL for it, like 'video_gallery'.
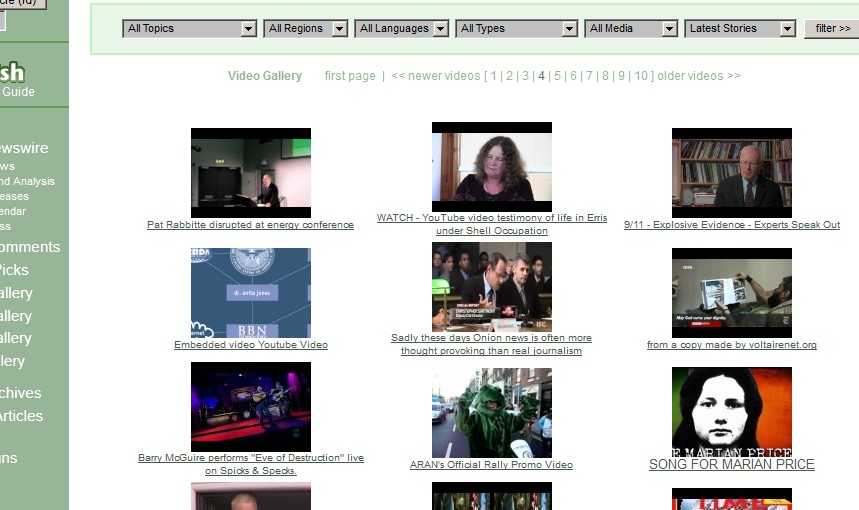
Fig 10.2: Partial screenshot of a Video Gallery
10.14 How to Use the Oscailt Image Macro - OSCAILTIMAGE
For details, see section 4.2.2 above.
10.15 How to Select an Image for the Front Page Header
You will see on some sites running Oscailt, that the front page often has three or four small images side by side in the header part of the page.
These are 'featurized' images and are controlled by use of the 'gallery module/object' when displayed in 'headlines' mode with the
'Only Featurized Images' option ticked. In other words the page layout uses a gallery object and displays it in headline format.
To select an image for display, an editor must featurize the image which is very easy. All you have to do is select any image as viewed in
a story or comment whilst logged in and click on the 'featurize' link.
10.16 How to Featurize Audio
In Oscailt 3.5, the ability to featurize audio was added. The mecahanism is the exact same as above for featurizing images. The gallery module
pays attention to whether an audio is featurized or not when used in banner mode where a list of audio icons and links is displayed with the number
controlled by the page size specified in the gallery module.
To select an audio for display, an editor must featurize the audio by clicking on the link which is displayed under the attachment when viewing
a story or comment whilst logged in.
10.17 How to Create a Video, Audio and File Gallery
The gallery module since Oscailt 3.4 has been extended to generate video, audio or file galleries. The video gallery consists of the cover images of
embedded images and the audio and file galleries are listings of audio and miscellaneous files. To create any one of these galleries, you simply
create an gallery module object and select either photos, audios, videos or files under Display Type and fill in all other details.
10.18 How to See Which Layout Objects Have Been Translated
On Oscailt sites where more than one language is used and there are different language versions for help pages, menus, banners and other components
used for the layout, it can become quite difficult to remember which pages have been translated and which have not. The View Objects
admin page in section Section 5.12 can be used to help with this because for each object it will list all the
language two character prefix codes that it exists for. And by using the various filter options it should be relatively easy to get a clear overview.
10.19 How to Turn On or Off Editorial Notifications
Any editorial action on a story or comment such as an hide, edit, unhide, delete, upgrade or downgrade can be configured to automatically
generate an email to the 'notification email address' and the contents of the email will contain a copy of the story or comment.
The email will also contain the username of the editor who carried out the action and the reason if any given by them which is filled out in
the confirmation box when the action is triggered.
This setting are controlled on a per site basis. Normally there will be only one site. To see this settings and modify them, you need to go
to the 'Manage Site Section Configuration' administration screen which is accessible from the main administration screen. It is usually along
the bottom row of icons. You may need the proper roles and permissions to either access and or modify the contents of the Site configuration.
The 'notification email address' is set in the 'Edit Configuration' screen in the section 'Email Settings'. See the field:
Notification To Address
10.20 How to Setup RSS Feeds by Category
There are two ways of doing this. The first is that you setup the exported feed to export for all categories (e.g. all topics) and allow
the user who is importing the feed to add in an extra parameter in the URL to limit the feed to a particular category. One example
could be as follows: Modify the URL by adding any of topic_id, type_id, region_id and language_id although you need to specify the ids for
these as it can't handle the item names. So for example if you want all events and of topic environment then if event type is type_id = 5
(which is default) and environment is say topic id = 4, then the URL for Indymedia Ireland would be:
    www.indymedia.ie/rss.xml?type_id=5&topic_id=4  OR same thing
    www.indymedia.ie/rss.xml?topic_id=4&type_id=5
The second method for defining a RSS feed by category is to edit the feedexport object for the (exported) RSS or Atom feed and select a
particular category for any of topic, region, type and language. With this method, the categories can be hardcoded. And as part of defining
an exported feed it is important to go to the Edit Friendly URLs page and map the URL of that object id to a 'nice' URL
like rss_events.xml or whatever.
10.20.1 Specifying Character Set for Exported RSS and Atom Feeds
By default exported RSS and Atom feeds are exported with the UTF-8 character set. Since the release of Oscailt 3.6 it is now possible
to add either: charset=iso-8859-1 or encoding=iso-8859-1 in the URL to the feed.
An example would be:
http://www.indymedia.ie/rss.xml?charset=iso-8859-1
The advantage is that the same feed can appear as UTF-8 to one user and ISO-8859-1 to another.
10.21 How to Import Blog RSS Feeds
Most blog software is capable of generating either RSS or Atom feeds. Therefore all that is required is to look for the RSS feed icon on
the blog site(s) that you want to import and click on it to get the URL. Then in Oscailt for each blog feed, create an feedimport
object for each one and give it a name, fill out the various details and use the URL from the blog site. It make take a view iterations
to get things right like the RSS feed version and whether to decode it from UTF-8 or not.
When you have a set of objects created for the different blogs, then just create an Oscailt Listing layout object or
a vertical menu might be as good and add in the each of the blog importfeed objects. Try out various combinations of the
display options to get the type of display that you want.
10.22 How to Setup Exported JavaScript Feeds and Import Them
For details, see section 6.5.12.1 above.
10.23 How to Secure Logins
For details, see section 13.4.2 below.
10.24 How to Filter Out Dead IMCs from IMC City Listing
There is a special module called CityList that is used for retrieving the Indymedia City Listing of Indymedia websites
which is available via an RSS feed through the "contacts" list XML file. The module can then be used to display the contents of this
list in various forms within Oscailt. However this list is not being maintained very frequently
and it has entries for Indymedia sites which have long since closed or disappeared.
Oscailt has a feature that allows you to enter the names of these dead sites and it will then filter these out of the list of sites
when displayed. To do this simply go to the module in the Site Layout administration screen and in thewhen displayed. To do this simply
go to the module in the Site Layout administration screen and in the text box labelled Dead IMC List add in a comma
separated list of sites using the names used by the citylisting XML file. There are three modes of operation which are: 1) No filtering
2) Filtering and 3) Mark dead sites with a red asterisk. The latter is useful for testing.
10.25 How to Make a Feature Story
Features can be published directly, although by setting the permission it can be setup so that only editors can make features. In general,
the front page is reserved for features although your site can be designed differently. The original idea is that as stories are published
and appear on the newswire, editors would select stories they want to promote and add more editing and formatting to. When creating a
feature this way, an editor would click on the upgrade to feature link on a story and Oscailt will then automatically
take a copy of that story and give it a story type of feature and make it hidden. This then allows editors to work on the story.
The process of upgrading results in Oscailt applying a feature template into the story which provides a placeholder for an image using
the CSS feature-image-right class and another placeholder for a set of links. This is controlled through the contents of a file called
config/featureskeleton.html which can be modifed by the site owner. This template file can be view via the
View HTML Templates subpage on the View Objects administration page. There are also HTML comment tags
inserted into the story to split it into further logical blocks which are referred in the publish form as the content
and extra content. The summary field is a little complicated because it will appear on an ordinary newswire but
not a feature newswire and will not be displayed in the main story unless the hide_summary_on_feature_page option in
the publish form is unchecked. It is checked by default. There is a similar option hide_summary_on_story_page
when it is displayed as just a story.
When the feature is complete and is ready, then it should be unhidden and at this point Oscailt will transfer all the comments from the
original story from which it was created and get rid of the original.
10.25.1 How to Schedule a Feature for Automatic Unhide
From Oscailt 3.5 onwards it is possible to schedule the automatic unhiding of a feature. This might be useful if you want to have
an article that appears at a certain time; perhaps very early in the morning and there may be no-one logged in to do it manually.
The option is accessed through clicking on the unhide link over the feature article and the dialog box presented
has the feature and this is shown in figure 10.3 below. To enable the schedule, just click on the Schedule Unhide Later
option and then select the dates from the drop down menus.
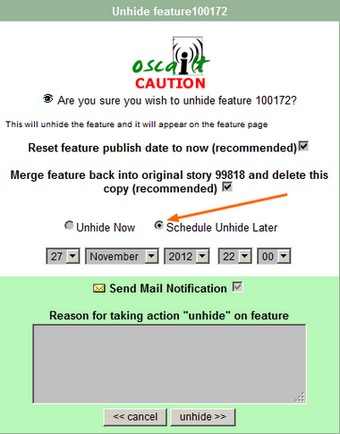
Fig 10.3: Automatic Scheduled Feature Unhides
At any time later you can check the View Scheduled Tasks link which is available in the Editor Status and Messaging Screen
previously described in section 5.16
10.26 How to Install the Embedded Audio Player
In Aug 2010 a modified version of the Fabricio Zuardi XSPF embedded flash audio player was released and Oscailt was updated to handle
this automatically including generating all the associated HTML around it. To install it there are a few steps to take and these are:
- Download and install the separate release for the Audio Player from the Oscailt SourceForge page. In the release directories
see the folder for FlashAudioPlayer_v1.0 and the actual file is in there.
- In the Edit Configuration page, check the tickbox for Embedded Audio Player
- In the Article module layout page in the section forImage and Audio Presentation Settings tick the
- Optional: If you want to display the audio player in the newswire then there is an option in the newswire module to enable it's use there
The Audio Player will be automatically displayed (if the above is configured) within the article display (of a story) for the
following cases:
- For audio links to mp3 files entered into the embedded audio form field in the publish form. The link
can be to audio files either on and off your site.
- For audio mp3 files attached to the story. By definition these are stored on your site.
A different color scheme is used in the player depending on whether the audio file is local or external.
Note: The use of Adobe Flash used by the Player has now been phased out and some browsers do not support it anymore
10.27 How to Install the TinyMCE HTML Editor
Support for the TinyMCE HTML editor was added in Oscailt 3.5. The TinyMCE WYSISYG Javascript editor is open-source software from
http://tinymce.moxiecode.com/ and implements a (what you see is what you get) WYSIWYG HTML editor written in Javascript. This software allows
you to configure it in many different modes from the simplest formatting where bolding is just allowed to a full HTML editor. Depending on how your style
classes are setup, you may not find this editor useful. It will also tend to add a lot of blank paragraphs which may not suit the layout of your site. There
may be other similiar types editors that can be used instead although further changes might be required.
Given this is only open source rather than freeware, it is not really recommended to install it but if you can identify an equivalent editor
that is freeware then please notify the Oscailt mailing list at: oscailt at lists.indymedia.org
There were a few modifications made to the Oscailt publish form to allow integration of the TinyMCE editor (version 3.4.1).
The label story_mce was added to the TEXTAREA for story content and comment content and this id becomes a selector to TinyMCE.
There are a few limitations with the more advanced HTML options which are mainly that it does not handle
nested <div> tags very well which interferes with the use of these in the production of
features. Extending the options from just the basic HTML options for Oscailt users would mean updating most of
the default allowed HTML options and this has not been followed up but could probably be implemented relatively easy.
To install TinyMCE in Oscailt, set the configuration option enable_wysiwyg_editor documented in the previous section and
setup and install it to the relative directory below. The Apache file html/.htaccess needs to be updated as
documented above in section 3.4. You will also need to modify the file html/config/markupconfig.php to add the paragraph
p and span tags to the public tags array otherwise Oscailt will raise a validation error in the
publish form during preview. This is because the TinyMCE will automatically add a p and for underline it makes use of the
span tag with underline style. TinyMCE will generate tag open and close pairs for these.
Note: These updates may have already been made to config/markupconfig.php
One other variable in the markupconfig.php file needs to be changed which is to public_attributes Change it to or extend it with
this if it already contains entries.
$public_attributes = array('span' => array('class','style'));
Install TinyMCE to directory
	html/
	html/tinymce
Note: Ensure the Unix permissions on all files in the TinyMCE directory and the directory itself are set to read-only.
10.27.1 Oscailt TinyMCE Files
There are two files which configure TinyMCE for Oscailt for the basic mode for ordinary users and one more advanced for Oscailt editors and they are:
	html/tinymce/basic_set_mce.js
	html/tinymce/medium_set_mce.js
Beware when using the advanced more and the DIV tag as you may need to switch off the TinyMCE editor and make some corrections.
10.28 How to Install the OpenWYSIWYG HTML Editor
Support for the OpenWYSIWYG HTML editor was added in Oscailt 3.5. The OpenWYSIWYG Javascript editor is open-source software from
http://www.openwebware.com and implements a (what you see is what you get) WYSIWYG HTML editor written in Javascript.
The version used and integrated with Oscailt is v1.4.7. Like the TinyMCE, this software allows you to configure it in many different
modes from the simplest formatting where bolding is just allowed to a full HTML editor.
There were a few modifications made to the Oscailt publish form to allow integration of the OpenWYSIWYG editor (version 1.4.7) in the form of
adding a file called openwysiwyg/basic_setup.js to configure it. With this editor there are alot more options that can be enabled in addition
to basic bolding, underline and italics features. In the publish form the story and comment content TEXTAREAs are given the id="story_mce" which
is used as a selector by the OpenWYSIWYG to activate the editor.
To install OpenWYSIWYG in Oscailt, set the configuration option enable_wysiwyg_editor documented in the previous section and
setup and install it to the relative directory below. The Apache file html/.htaccessneeds to be updated as documented
above in section 3.4. The file file html/config/markupconfig.php automatically handles control of the proper
public HTML tags. If not all the tags are correctly added to public tags then Oscailt will raise a validation error in the
publish form during preview.
Note 1: This browser is disabled for the Safari and Chrome browsers as they did not seem to work with it.
Note 2: When enabled, the editor is temporarily disabled and the user must click on a button which will result in the editor being
enabled on the next preview.
Install OpenWYSIWYG to directory
	html/
	html/openwysiwyg
Note: Ensure the Unix permissions on all files in the OpenWYSIWYG directory and the directory
itself are set to read-only.
10.28.1 Oscailt OpenWYSIWYG Files
There is one file which configures OpenWYSIWYG for Oscailt and it is:
html/openwysiwyg/basic_setup.js
This file could be changed to add or remove some of the allowed HTML editing options.
10.29 How to Configure Public Editing for Stories and Comments
Public editing for stories and comments can be independently control. To turn this on, you need to go to the Configuration administration
screen where the option appears near the bottom of the page allowing you to select: none, stories, comments or both. You MUST ALSO enable it in the
publish module object that is used for creating the publish page which of course must be republished which means it's cache page must be
rebuilt.. That's it.
10.30 How to Setup Imported Image Feeds
The idea for this was to treat external images in the same way Oscailt imports RSS or Atom feeds. There are now many instances on the Internet where
one might want to check an image every day as it may be tracking something of importance. This new feature allows you to setup an image import in the
same manner as any other feed except the configured URL points to the external image URL.
Oscailt will then import a copy of this image every day and can present a thumbnail version and or the full resolution copy. There is a basic archive
mode too where the filenames are given date stamps. The configuration for this appears as an extra icon in the Admin Site Layout pages as an Imported
Image Feed. Then as it with RSS or Atom feeds the Imported Image feed object can be included in a list or menu object as part of a page layout.
Note: There is an internal limit to the image size set at 900k in the magpie.inc file.
10.31 How to Determine Oscailt, MySql, PHP and Apache Versions
See Section 5.2.1 for details on how to do this.
The database character set should be set to Latin1 and not to UTF-8.
10.32 How to Configure Events Automatic Emailing
This feature was added to give the ability of Oscailt to automatically send out emails with the contents of upcoming events to a single address.
The idea is that the single address would be the address of an email list which allows the management of the email list to be handled separately.
The configuration for this can only be made by editing the configuration file html/config/systemconfig.php
and so requires direct access to the file.
- send_event_emails -This is number of days prior to an event that an email should be sent out. Currently only one email is
sent per event. If this is zero then event emails are disabled.
- send_event_addr -This is email address to which event emails will be sent. Ideally this should be the address of an event
email list to which people are subscribed and so can be managed separately.
The View Articles admin page contains the management screen which enables one to see for which events emails have already been sent and
those pending. It is possible for an editor to reset the status so that a given event is re-included in the list for sending.
The scheduling is implemented by checking on every 50th request (or so) to the server the status of the entries in new event_emails table.
See the file oscailt_init.inc to change this value.
The layout or format of the emails is fairly basic and can be changed by making changes to the emailstory.inc which has
basic functions for adding a header block and footer to the email. The contents of each event are displayed in the same format as the
article display. However, images are not included.
10.33 How to Configure Feature Stories As A Slide Panel
Many news sites now present their top 5 stories as a deck of slides to basically compress them into the top of their page. A similiar feature
now exists in Oscailt for "feature" stories and not ordinary stories. It is implemented with Javascript and will display the subsequent panels
as numbered buttons along with other ways of navigating through them.
To enable this, you have simply tick the checkbox for "Buffer Stories in Panel" in the Features module and then re-cache the page.
This is described in Section: 6.5.14 - Featurewire Module
10.34 How to Show or Hide HTML Entities When Editing With Publish Form
For some languages like Greek most of the letters or characters have to be represented as 'HTML entities'. For example: λ is represented by
λ in HTML entity form. When you go to publish or edit a story with the publish form, depending on the Oscailt configuration,
it will display the actual characters or the HTML entities. The current default setting is to turn off the display of HTML entities for Greek
and Turkish. To see the settings, see the Oscailt installation configuraiton in the Edit Configuration administration page. To change this,
you need to edit the PHP config file: config/systemconfig.php and near the end of the file there is a line like:
var $special_languages = array("gr", "other", "tk");
To remove Greek replace it with:
var $special_languages = array("other", "tk");
Or to add say Bulgarian so that you have Greek, Other, Bulgarian and Turkish, then change it to:
var $special_languages = array("gr", "other", "bg", "tk");
The language codes are the recognised international codes used for signifying a given language, as in En for English.
10.35 How to Turn off Open Publishing for Stories and Comments
Open publishing can be selectively turned off for stories and comments. It is controlled through settings in the publish object layout page. There are
two checkbox options which are: Hide New Stories and Hide New Comments. If either of these options are ticked then the object needs to be
saved and re-cached to make that instance of the object live. Ticking both will disable all open publishing and whenever an story or comment is published
it is automatically hidden and a copy is emailed to the notification email -if it is setup.
To setup the automatic notification of this, you must tick the checkbox on the option Notifications for submitted articles?
There is a further option to disable all publishing to effectively shutdown the site and this would be most useful if the amount of spam is excessive.
This option is controlled through the Edit Configuration administration and or Dashboard screen and is controlled by the Disable Open Publishing option.
10.36 How to Make A Story Sticky
Stories can be made "sticky" by an editor by clicking on the stick editorial action that should appear at the top along with other
editorial actions. This brings one to a screen with a dialog box allowing the number of days to be selected for which the story will be sticky. There is
an option to schedule when the stickiness begins so that for example you could make an event sticky a number of days before the event. All such scheduled
events can be viewed through one of the tabs on the User Status & Messaging admin page.
There are two parts to making a story sticky. The first is marking the story and the second part is configuring newswire objects to page attention to
sticky stories and place them at the top of the list. For this you need to edit the newswire or
headlines objects that you want stickiness enabled and tick the Allow Stickies under the
Content Viewing Settings heading. You may need to also tick the Show Sticky Stories option too. The configuration is
something that only needs to be done once probably when the site is being setup.
10.37 How to Create a Photo Essay
The article object used for displaying stories has an option for displaying an article in photo essay
mode whereby if the article has more than 3 images, it generates a slide panel where one can click through each image in a slide show format.
It can 'Play' the images too with a configurable time period.
To configure Oscailt, there is an parameter called: photo_type_id in the file The config/systemconfig.php
file with a default value of 7.. Then under the story types a new type needs to be added which can be called
photo essay with a Db Id matching the value of photo_type_id above. Then when the story is published it must be set to this
type. Otherwise the mode will not work.
10.38 How to Create a Multi Column Newswire
Traditionally newspapers used to have multiple columns with headlines or very short articles on their front pages. A similar type of feature exists
in Oscailt for the newswire object. When editing or creating the object under the Page Layout and relationships
heading there is select field with title Number of Columns which normally defaults to 1 but can be increased for the
multi-columns up to a value of 8 columns.
10.39 How to Find All the Graphics Banners Used by the Site
Somestimes it is useful to find out what are the graphics files used by the website and where they are either because a new website is being created
or the current one is being updated. There is an option for this in the View Objects admin page. More details can be found in
Section 5.12.2
10.40 How to Publish or Edit with Foreign Letters and HTML Entities
When publishing articles in languages other than English such as Greek for example, there are many characters which need to be stored as
html entities. For example the Greek characters Lambda, Beta, Gamma and Delta (Λ; Β Γ Δ)
are represented by these HTML entities: Λ Β Γ and Δ or in their numerical form as:
&923; &914; &915; and &916;
and when editing such as story there will be an need to display these characters in their displayable mode or in HTML entity form.
To cover this situation, Oscailt has a mode to do this in the Publish form / object and it appears as a checkbox with the title
Display HTML entities in form beside the Preview button.
By default Oscailt, will display the HTML entites, but there is a default configuration for the Greek (gr) and Turkish (tk) languages. This
configuration can be added to for other languages by adding into the array below the two letter code for other languages.
The variable $special_languages/ = array("gr", "other", "tk"); config/systemconfig.php.
10.41 How to Control HTML Tags Used in Publising and Editing
HTML tags are controlled and limited on most websites because if HTML tags are not closed properly then it is very easy to break the HTML of a
page and result in broken pages. The set of HTML tags that are available depend on whether it is for public use (i.e. not logged in) or for an
editor. The underlying assumption is that editors should know what they are doing and should be more careful. Therefore there are more HTML
tags available when publishing or editing while logged in.
There are two sets of tags stored in arrays in the code. These are hard-coded and can only be changed by editing the file
config/markupconfig.php. The array for controlling the set of tags used by the public are
$public_tags. Default entries are: ('strong', 'small', 'em', 'b', 'u', 'ul', 'ol', 'li', 'p', 'blockquote');
and the array used for editors is merger of $basic_tags and $public_tags. $basic_tags
has the default values ('a', 'b', 'i', 'strong', 'small', 'em', 'u', 'p', 'hr', 'tt', 'h1', 'h2', 'h3', 'h4', 'h5', 'img')
You can see what the current values are by clicking on the System Installation Info in the Edit Configuration
admin page and they are found under the Oscailt information heading and Settings for allowable html tags and attributes sub-heading.
10.42 How to Make Web Links / URLs Active
Sometimes when web addresses (i.e. URLs) are added to the text of an article they do not appear as active links. Normally the act of publishing them
turns them into active URLs. This is because if the html code checkbox is ticked whilst editing in the publish form, all the text
is assumed to be already in HTML form and therefore no automatic conversion occurs.

Fig 10.4: Using URL button to generate a link from highlighted text
To fix this, just edit the text and highlight the link text with the mouse and click on the URL customized button and it will insert
the HTML tags to convert it to an active link. And then save it.
If multiple lines are highlighted the action is applied to each line. Thus several links can be generated at once.
10.43 How to Align Site Banner to Left Corner
Most websites have a banner at the top of the page that is aligned to the left hand corner. It may not be clear on how to do this. For exmaple you might
have already created a horizontal bar containing a PictureBox object with the link to the actual banner image and included
it in your page layout. If no style sheet class is specified it will automatically be given the indypage style. To over-ride
it and click on the advanced tab near the top of the page layout admin page and then a text box will appear on re-display beside each included
object. Then enter something like: banner-left. The style class has to exist and if it doesn't, it can be added through the style class editor.
The contents of style specifies the actual alignment.
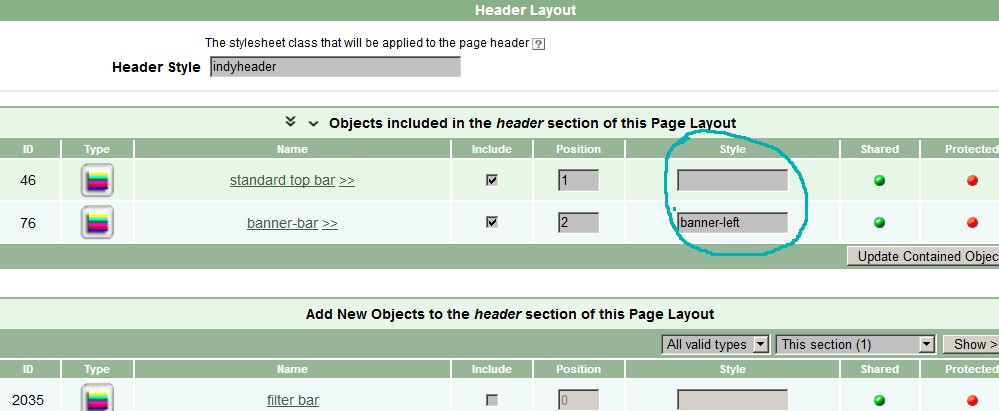
Fig 10.5: Specifying style class for banner alignment in header section of page layout
10.44 How to Change Editor settings for Dashboard mode and Notifications
This is accessible through the EditSelf link which appears on the main Admin page when logged in and
Section 5.6 Edit Editors has a paragraph covering this. Whenever a change is made it may be necessary to logout and back in again
for the change to take effect.
10.45 How to Upload Embedded Video Cover Image
Oscailt uses embedded video cover images to enable it to quickly display the image rather than link the the site with the video and wait for the page to
draw from there. It also helps stop the video hosting site tracking users. As of Nov 2020 there is no API available from BitChute or
Brighteon to retrieve the cover images. Therefore you have to generate them yourself and name them according to the naming convention described
in Section 4.2.4 Embedded Video Cover Images and then upload load it through the administration
Upload Sites Files (section 5.1.1 ) which is accessible from the site layout admin page as a link.
10.46 How to Setup A Panel of Embedded Videos as Inset On Front Page
In this example the objective is to setup a slide panel of three separate embedded videos and to display them at the top of the front page above any of the
main content of the page. To do this follow these steps:
- Create three separate CodeBox objects and use the custom buttons to insert the JavaScript and HTML for the given Video type.
- To setup the JavaScript, look for the text VIDEO_ID and replace it with the actual video Id of the embedded video and amend the HTML used to display it.
- Create an Inset objects and include the three codeboxes and tick Enable Panel option.
- Create or Edit Page object to be used in the front page. Add the Insert Box just created to the page. Tick the
Make First Insets Top option.
Once the page object is saved and the cache file generated it should then work.
The Inset box or object has additional options to "auto" collapse the front page. This means only a down-arrow will display but once
clicked on, it will via JavaScript automatically display the Inset box. The collapse mode can be configured at different percentages so that it might only
be collapsed 50% of the time. This is useful in case you have important stories and for example important videos to show because it means half of the site
visitors are seen one or the other set more prominently. More details can be found at: Section 6.6.1 Inset Box Layout Element
10.47 How to Configure Jabber for Publish Notifications
Jabber is separate freeware software that can be downloaded and installed onto your server and used to send instant messages to a configured user. Oscailt 3.8
added features to allow it to integrate with it and send out messages via Jabber whenever a story or comment is published. The site owner / editor(s) can avail
of this feature by simply setting it up and configuring it.
The Oscailt Install Guide Sec 3.2.5 contains some information on how to do this. The installation
of Jabber itself is not covered here and is documented by many websites on the Internet. The Oscailt integration part is mostly controlled via the settings
in the file: config/systemconfig.php. You can then use the Jabber Page accessible from the administration page
Users logged In and Msgs to test the configuration and send out test messages to verify it all works.
Once Jabber is setup you can install client software like the yaxim XMPP/Jabber App to receive Jabber messages.
10.48 How to Export or Import an Oscailt Site or Objects
To import or export an Oscailt installation or any sub-section composing of the objects used in the layout or of the sites list of languages, topics, types
regions, tags, roles, editors and so forth you can make se of the Oscailt import and export features available through the main admin page. For further
details see Sec 5.19 and Sec 5.20.
11. Use of Cascading Style Sheets (CSS) in Oscailt
11.1 Overview
Oscailt has been using HTML style sheets since version 2.x and their usage has increased even further since that time.
For those unfamiliar with these, it is worth looking over the Cascading Style Sheets specifications.
Style sheets can be used to control text sizes, fonts, colors, background colors, margins, borders text alignment, layout and many other aspects of a webpage.
The use of style sheets allow great flexibility in the look and feel to the site but since there are now so many classes present,
these really need to be documented and their usage in the Oscailt code should be made consistent to ensure that when colours and fonts are changed
(such as through the new Section: 5.4.1-Generate New Style Sheets feature as part of the Edit Style Sheets admin page), the results are predictable. If any new style classes are added then this Style Sheet Generator module code should be updated so that it produces the new classes.
Oscailt can be configured to have different 'sites' defined and to assign different sets of style sheets to them but in practice
there is normally just one site defined and the style sheet files can be found in the directory
html/attachments/sites/default/ where the following three files can be edited
through the Administration interface via the 'Edit Default Style Sheets' screen described in
Section: 5.4 - Edit Style Sheets
- html/attachments/sites/default/common.css -general tags, admin screen classes, article, feature, story, comment, event, newswire, gallery and object layout classes.
- html/attachments/sites/default/style.css -contains classes for the headers and menus
- html/attachments/sites/default/contentstyle.css -some of the feature related classes
11.2 Determining Style Class Mappings
As each page is generated Oscailt generates HTML comments which indicate the name and ids of objects used and this can be used to help
relate which modules use particular CSS classes. The broad mappings are given in the list below.
- General tags for: BODY, IMG, BLOCKQUOTE, A Href, H1, H2, H3, H4, H5, TEXTAREA, INPUT
- Admin Object Layout Screens: These are mostly of the form: object-xxxxx
- General Admin Screens: These are mostly of the form: admin-xxxxx
- Admin Statistics Screens: These are mostly of the form: stats-xxxxx
- Story related classes. These are mostly of the form: storysummary-xxxxx and story-xxxx
- Feature related classes. These are mostly of the form: feature-xxxxx
- Article related classes. These are mostly of the form: article-xxxxx
- Comment related classes. These are mostly of the form: comments-xxxxx, comment-xxxxx and addcomments-xxxxx
- Latest Comments page. These are of the form: latestcomments-xxxxx
- Event Calendar page. These are of the form: eventcalendar-xxxxx
- Navigation menus and options related classes: These are mostly of the form: sitenavigation-xxxxx
- Publish page related classes: These are mostly of the form: publish-xxxxx
- Newswire page related classes: These are mostly of the form: newswire-xxxxx
In this case xxxxx will have values like the following but do check the actual css files as there are many other ones specific
to particular objects like publish, features, articles, comments and so on.
- title, subtitle, detail, details, relatedlink, footer
11.3 Setting Style Class Names for Oscailt Objects
It is possible to override many of the default style class names that Oscailt will generate for objects (like newswires, menus, listings
and other modules) which Oscailt uses to define and build up pages. Within each module/object layout page in the Edit screens there is
a tabbed link to an 'Advanced' option as shown in Figure 11.1. Click on that and the display will be expanded to
include a form field where the name of a style class can be specified. You will then need to ensure that style class is present in one of
the .css files referred to in section 11.1 above
Depending on the module/object, the style class names used by and or derived from the object name will be:
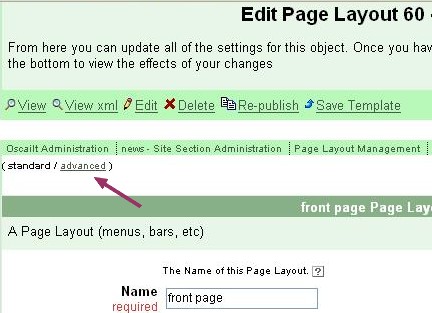
Fig 11.1: 'Advanced' option for customising the use
of style classes in object layout
- Newswire / Publish / Article Module
- site-navigation
- sitenavigation
- navigation-element
- navigationselected
- user-message
- display-footer
- save-prefs
- usernotice
- editornotice
- publish-header
- translateconfirm
- editorconfirm
- notifybox
- translatebox
- editor-option
- editor-attachment-option
- multioptions
- read-more
- category-text
- video_embed_box
- storysummary, storysummary-alternative and storysummary-promote and where these are xxxxx below:
- xxxxx-title
- xxxxx-subtitle
- xxxxx-readmore
- xxxxx-content
- xxxxx-readmore
- xxxxx-relatedlink
- xxxxx-hidden
- xxxxx-pending
- xxxxx-footer
- xxxxx-details
- xxxxx-detail
- xxxxx-context
- xxxxx-date
- xxxxxdate
- xxxxxauthor
- xxxxxorganisation
- xxxxxcomments
- Vertical Menu / Horizontal Menu
- indypagebody
- indyleftcolumn
- indyrightcolumn
- main-menu
- sub-menu
- indyheader
- indyfooter
- header-right
- header-left
- indyfooter
11.4 Page Layout Styles
The Page object which is used for defining the overall structure of page by defining header, right and left columns and footer
allows a style class to be specified for different parts and they are for:
- Page Style -e.g. indypage
- Header Style
- Left Style - e.g. indyleftcolum
- MainPage Style - e.g. indypagebody
- Right Style
- Footer Style
You can easily check all the style classes used in all the defined Page objects of the site, by selecting the View Objects Usage admin page
and filtering on Page objects.
11.5 Setting Style Class Names for Admin Pages
The Oscailt administration screens tend to use their own set of style classes and the main ones are listed below although these do not
cover the object layout screens.
- admin for HTML tags P, TABLE, TD, TH
- admin-highlight, admin-fade for HTML tags TD, TH
- stats, stats-vis, stats-hide for HTML tags TR, TD, TH
- stats-links for HTML tags TH
- admin-context for HTML tags A
- context for HTML tags LI
- editor-options for HTML tags A
- object-summary for HTML tags TABLE, TR, TH, TD
- object-listing for HTML tags TABLE, TR, TH, TD
- sitebuilder-header, sitebuilder-contents for HTML tags DIV, H1
- sitebuilder-intro for HTML tags P
12. Performance Considerations and Tuning
12.1 Overview
This section covers some tips related to increasing performance of your site and mainly relates to configuring your Apache server assuming
you have some control over this. Performance covers a broad area but there are two key things that matter most and they are:
- How long it takes to download or access a page on your site and whether it is perceived to be slow or not.
- The load on your server measured by the number of bytes downloaded and how busy your database server is.
There are a number of factors which influence these things and not all of them will be under your control. These are things like the size of your page in bytes and the number of images and the size of them. Your page may also reference CSS style sheets, javascript files and images which can increase
the time it takes to download also.
Another aspect to consider is whether a given page is likely to be frequently accessed or not. For example the front page and some of the newswires are likely to be accessed quite alot and possibly some of your RSS feeds. You can check this by looking through the Apache access logs.
It should be noted that search engine bots like the Googlebot and Bingbot may make up to 30% or more of your traffic. You don't necessarily want to
block these otherwise you won't be indexed, but you can control which pages they search or don't search by creating a robots.txt file and
tailoring it accordingly. There is plenty of documentation elsewhere on the Internet describing the contents of robots.txt files.
The way performance is improved is by taking advantage of caching that the browser will automatically do. Since almost every page will load CSS files and various banner images and icons from the site, then these can be setup to be cached through the Apache configuration. The other side of that is to minimize the size of these files and there are some popular techniques for reducing image sizes. Nevertheless it may not be always possible to make significant reductions in these file sizes.
The second way to increase performance is to try cache database requests so as to cut down the load on the database. Running out of database connections is a common problem too. An attempt can be made to cache the webpages themselves as this will give even better gains.
This is discussed further in section 12.3 below.
12.2 Apache Configuration
In the Apache webserver configuration it is possible to specify a refresh time for certain file types. The actual syntax depends on the Apache
version and you should reference the Apache documentation (at www.Apache.org. If this is not specified it
may result in these files being re-requested every time a page is requsted and since some banner images might be common to most pages on the site, then it is not
hard to see how this could add to the webserver load. A typical configuration would be to specifiy 2 or 3 days and the entry should look like this.
<Directory "/path/to/your/site/on/your/server/">

    ExpiresActive On
    ExpiresByType image/gif "access plus 2 days"
    ExpiresByType image/jpg "access plus 2 days"
    ExpiresByType image/png "access plus 2 days"
    ExpiresByType text/css "access plus 2 days"
    AllowOverride None

</Directory>
The Apache configuration file where this change is added is normally called httpd.conf.
Note that increasing the value beyond 2 days may not bring much additional benefit and it should be weighted against the possibility that
now and again you may want to update the css files and in some cases this would mean some users may not see the updates for up to 2 days when their
browser eventually hits the timeout period.
12.3 Oscailt Configuration
The Oscailt codebase implements a number of caches with the database cache probably the most important. Without, it is likely a typical installation
would not have enough database connections to handle the load and in release 3.1 the cache was further refined to help successfully alleviate this
problem. In later versions (3.4 onwards) a very basic HTML cache was added and while this applies to only a handful of pages such as the front page,
it noticeably increases the response time, when it is active. There is also a RSS cache covering imported RSS and Atom feeds.
The problem with caches is that they can be broken by various kinds of updates to the system, so will automatically get flushed and rebuilt
relatively often. By default, the HTML cache is switched off. It can be enabled by through the section 5.2 Edit Configuration screen.
12.4 Measurements of Performance
There are a large number of parameters that could be measured both internal and external to Oscailt. The general idea is to get an insight into what is causing the biggest delay and then to try and determine what can be done to reduce it.
There are three main areas to examine:
- Measure time to download a page. This may or may not include all the images contained within it. You could just use a free tool like wget or curl although these would measure the download latency of just the basic page without necessarily downloading the additional files and
images contained within it. There might be a plugin for Firefox to do these timings.
- Compile a list of mostly frequently accessed pages by analyzing the Apache logs and depending on the results focusing on most accessed pages.
- Examine MySQL statistics if available to see how busy database is. Alternatively with access to the Linux/Unix server, look at CPU and memory usage
In Oscailt v3.5 the admin stats page display some basic MySQL statistics. The most important ones are for the number of connections, read ratio which
should be around 0.01% and write ratio which should be close to 100%.
- If you have login access to the server, then you might want to run the Unix top command to see how busy the CPU is. There are other
commands available for looking at memory usage and disk usage.
- If you have access to the Apache logs then you can do simple analysis to see what pages are loaded the most and then focus on those. You may want to
install the Webalizer package which will do this for you.
13. Appendix A
13.1 Oscailt Support
For issues related to Oscailt, you can raise bugs and feature requests through SourceForge at the Oscailt project page at
www.sourceforge.net/oscailt/
Unfortunately the former Oscailt list oscailt at lists.indymedia.org is no longer operating.
For details on what versions of Oscailt support PHP and MySQL see the table in Section 3.1 of the
Oscailt 4.0 Features document.
13.2 License
Oscailt is free software. You can redistribute it and/or modify it under the terms of the GNU General Public License as published by
the Free Software Foundation. See the GNU General Public License for more details.
13.3 Install Issues
13.3.1 Install Instructions
A limited set of install instructions can be found in the README.txt file that is provided with the install tarball file
while more recently an Install Guide has been written which is more comprehensive.
Upgrade instructions are available for each release since version 3.1 and they cover the upgrade steps from one release
to the next. They can be found in the relative directories:
upgrades/upgrade-3-0x/ and upgrades/upgrade-4-0x/
13.3.2 Database Character Set
The MySql database character set must be set to Latin1. It should NOT be set to UTF-8 although it may work if only English is used. Oscailt
does not support the UTF-8 character set and instead uses ISO-8859-1 character set which should allow most European languages to be used. Some
hosting sites may set the character set to UTF-8 automatically and this should be checked before an install and changed if possible.
Since UTF-8 is a multi-byte character system there would be problems converting to and from ISO-8859-1 to UTF-8 as data is written and read
from the database and in the case of some characters in ISO-8859-1 which in HTML need to be represented as HTML entities, one would quickly
run into problems. The solution would be to wrap each database query with functions to do the character set conversion for every field in every
query. This would be a lot of work and probably slow down the response and performance too.
13.3.3 Back-slash Issues
A problem that continually causes problem with new users of Oscailt is that they have the problem where any
special characters are preceded by a slash ('\') which generates more in turn. The solution is the PHP
'magic quotes' setting which apparently can be controlled from .htaccess apache file.
mode is on. Changes to the use of magic quotes in PHP occurred from PHP 5.3.3 onwards so it is advisible to see the
PHP documentation on this for more details.
13.3.4 Install on Sites Using myPhpAdmin
On some sites where the user interface myPhpAdmin is installed, you may not be able to get the initial install.php to
display. This could be due to the way it affects the Apache access file .htaccess
If that is the case, adding these two lines to the top of the .htaccess may solve the problem.
	<?
        # Changes for sites with myPhpAdmin
        AllowOverride ALL
        php_value session.save_handler "files"
	?>
Some hosting sites will provide myPhpAdmin as the mechanism for you to manage your files on the server instead of giving your terminal
login access.
13.3.5 Switching on Shared Memory
To use the Shared Memory features, it needs to be configured but it can only be configured if the shmop extension
is installed and PHP has been compiled with the Semaphore functions. Oscailt checks for this by testing to see if the sem_get function
is loaded. Only if both shmop and sem_get are loaded will Oscailt give the option to use shared memory.
The Shared Memory feature allows lots of statistics to be gathered that cannot normally be including things like the most popular page, and the number
of hits for the different types of pages. When Shared Memory is enabled, new options are available in the Oscailt administration statistics page.
13.4 Security Issues
13.4.1 General
Security is really important and is something that you need to think about continuously. This is a vast area but there are a lot
of basics that one should be aware of and apply to your installation of Oscailt or indeed any software on any server.
- File permissions
- Server access
- Server ports
File Permissions: The file permissions is particularly important because you want to make sure that they are not writeable
by outside persons or scripts.
There are a multitude of hacking methods for trying to inject scripts or load files directory through the webserver onto your server
and from there executing them so that they open up access to the attacker. It is essential that anyone installing Oscailt (or any other
software) read up on file permissions. You need to set all the php and inc files so that they are only readable by the unix-account
that owns them and the web-server. Normally the webserver executes under its own user-id which might be either 'apache' or 'httpd'. In
rare cases it is run under 'root' but it shouldn't be. The files should only be writeable by the owning account. Same for all the directories.
The cache/ and attachment/ directories needs to be writeable by the Apache web-server.
Server Access: Depending on whether you are responsible for setting up the machine, you should only create Linux user accounts
for those people who require it. It is essential that strong passwords are used. If you have full control of the machine
and setup, then you should use a service like iptables to continually check for login attempts and for automatic banning
of IPs from servers where many failed login attempts have occured.
Server Ports: This really depends on who is setting up the web-server. If you have rented it and have been given no
control over the server setup, then it is the responsibilty of those providing the server. If you have full access to the machine and
only your server is using it, then you should use a "minimal" Linux install and only open the minimum of ports. These would be port 22
for ssh access, port 80 and 443 for the web-server and possibly other ports depending on whether you are running mail servers
and name-servers.
The .htaccess file is generally used for controlling access to scripts and directories and there is a default
provided but if possible it is far more preferable if file and directory access is controlled through the webserver (Apache) configuration
because it is easier to do and has less performance impact.
13.4.2 Setting Up HTTPS for Login
When you setup your webserver (using Apache webserver) you should enable it to work with https as well as http.
When browsing with https this means the data is encrypted as it leaves your PC/laptop/smart-device and only gets unencrypted
within the Apache webserver. Likewise for traffic going from the server to you, the same is true. This makes it far more difficult
for sites, servers or routers through which your traffic passes to be read. When you login your webserver should automatically
switch to using https so that nobody can read your login password while it is being transmitted during the login. This
redirect to https is handled by one of the lines in the .htaccess file but also requires corresponding configuration for ssl setup
of your site in the Apache configuration.
By default neither Apache or Oscailt is setup to use https. To setup https all the changes must be made with the Apache webserver
configuration. There are no changes to Oscailt.
To do this you need to configure your Apache webserver to operate in https mode. See the ssl.conf file and Apache documentation
for details. You will also need to setup SSL certificates whilst relatively easy, can be a problem if they are self-signed because most
browsers are setup to automatically accept certs (when presented by the webserver in https mode) from established corporate
and or quasi-government entities which of course can't be trusted anyhow.
You can use openssl for geneating the certificates. Just look it up on the Internet and it is free software.
For the Oscailt specific part to HTTPS setup, you will need to change your .htaccess to add these lines as the last lines in the file:
        RewriteCond  %{SERVER_PORT}  !^443$
        RewriteCond  %{REQUEST_URI}  ^((.*)admin.php)$
        RewriteRule ^(.*)$ https://www.<your-website-domain-name>/$1 [QSA]
The port 443 refers to the default port over which https communication occurs and basically these lines say if there is an incoming
request over port 443 and it is to the admin.php page then rewrite it as a https request.
Sometimes there will not be a .htaccess file but a similar one of filetype .cf and will likely be somewhere in the /etc/httpd/
directories.
13.4.2.1 LetsEncrupt Certificates
To use https, as mentioned above you must have a set of SSL certificates. The key problem here is that you probably don't want to use
ones obtained from any corporate or state entity and self signed ones will not be recognised by any browser by default. However there is
an alternative from an non-profit organisation called LetsEncrypt.org and you can download software from them and get them to
generate certificates and these will be recognised by most browsers. The only problem is that they expire after a few months and new
ones need to be generated again with LetsEncrypt. The shell script for it is called getssl and that and details on how to do
it can be found on their website.
13.5 Third Party Software
13.5.1 ffmpeg Video Tool
ffmpeg is a command line video tool which can be used to read video fil headers, resample the video, extract cover images and lots more.
Information can easily be found on the internet. You may be able to install it on the same server as your site running Oscailt in which case
you can update the configuration to integrate it and run it from Oscailt in the Image Manager page where it can used to read video header
and generate cover images.
13.5.2 Jabber
This is free software that implements a messaging protcol and is widely used. It can be installed on the server and integrated with Oscailt to send
notifications to the user. You can easily find client applications and Apps to receive the messages. Some more details can be found in
10.47 How to Configure Jabber for Publish Notifications
13.6 Other Issues
13.6.1 Receiving Email
There is lots of documentation on the Internet on how to install email on servers but for those who are at the very start there
are a few key steps which are:
- Install email server software -this is generally already in place
- Install email client to read emails -this is sometimes present too
- To receive email you must have a MX record setup for your DNS / hostname. It specifies a mail server responsible for accepting
email messages on behalf of a recipient's domain -i.e your server. The assumption is that you receive the email on the same server although
it doesn't have to be.
Back to Table of Contents
Last updated: Mar 2024